Monday, November 24

Joy to the world (Tutorial)

Hello friends!! Hope you all are having a great day! Few more days to Thanksgiving (here in the USA) and then Christmas!! I love Christmas very much.
Few days ago, I got my new Inspiration Christmas Magazine from Crafter's Companion and it's full of great ideas, papers, and this fun goodies! I really love them, the snowman and puppy are so adorable! And they can be used for other projects too. Love the little puppy has a little heart (perfect for Valentines or if you are adopting a pet!!)

Ok, so let's get started !!
  • With the help of your eBrush, create a blue background. Here I used : BT1, BT2, BT4, after that I decided to add a little darker color TB4

  • After you piece is dry (yes, let it dry for few minutes), emboss your piece.
  • Hand cut a couple of white hills, adhere one direct to the embossed piece, then add the other one with foam adhesive.
  • Finally, add the snowman and dog. Add some silver confetti if you wish (as I did here).  Stamp the sentiment in Versamark ink and Silver embossing powder, add a piece of red cardstock and adhere it to card.
  • The embossed panel measured 3.75" x 5". Adhere it to a Kraft card base. 


Hope you like it!
Have a fantastic day!

Friday, November 21

You are special.

Hello friends! Happy Friday. Today, I have a couple of cards for you using brand new stamps, just released few days ago by Latina Crafter.

For this card I used the new stamp Nena con Banner (Banner Girl) and the sketch from Viva La Verve Week 2.
This card is a 5" square card. The patterned paper is so pretty and part of the September Kit. The Cherish doily is from Top Dog Dies. The cute image was colored with Spectrum Noir Markers, the flower was made with these dies, added a big twine bow and pearls and the card was done :)


The sentiment says: You are special

===============================================

For this card I went super CAS, I used the new stamp set Disfruta (Enjoy) and the sketch from Retro Sketches. 
I used the little flower and repeat stamping it in different colors (All Memento Ink), then I stamp the sentiment in St. Valentine Archival Ink. Finally, I added White Opal Liquid Pearls.


The sentiment says: Enjoy this moment

Submitting these projects also to:
Hope you like it!
Have a great day!

Wednesday, November 19

Hello!!

Hello friends! Hope your Wednesday is a good one, full with craftiness and fun. Today, I have an easy and clean card for you using new dies from Top Dog Dies!!

Here are the details:

  • Make a card base from White cardstock. A2 size.
  • Cut a panel from white cardstock, 3.75" x 5". Ink all edges with Tumbled Glass Distress Ink.
  • Stamp doilies on a piece of White cardstock in Versamark ink and apply white embossing powder. 
  • Then take your stamped piece and using the dotted tag from Top Dog Die Gift Tag Set, die-cut the piece.
  • Take the Top Dog Dies Hello Die Set and die-cut half of it from the stamped piece. Adhere tag piece to card panel.
  • Die-cut a Hello word from Shimmering Red Cardstock and add it to the negative space of the tag. 
  • Using a scrap from the embossing piece, trim a thin piece and adhere it to the right side. Tie on twine and add rhinestones and pearls.
  • Add panel to card base with dimensionals.


Submitting this project to:


Hope you like it!
Have a great day!

Tuesday, November 18

God bless America!

Hello friends! Happy Tuesday, I wanted to share this card long time ago, then it got into draft and to the next page and I am glad I found it and it is here for you!

This card is super easy and love the mixed media look of it. I used the new Dreaweaver Embossing Pastes, available now at Crafter's Companion and also the new Sheena Douglas' stencils.

Here are the details:


Hard to see on the pictures, but the image really shimmers, it is beautiful!!


Submitting this project to:


Hope you like it.
Have a fantastic day!

Sunday, November 16

Craft room transformation

Hello friends! How are you today? I don't usually post on Sundays, but today I am making an exception. Last few weeks has been very stressful, a lot of things going on here, family members in Peru got really sick, 2 of them got in serious condition, Tuesday night I couldn't sleep and first thing I did before starting my day was to check on Facebook and found out my cousin passed away, I was so sad, then while talking to my sister about few things and how my dad was doing (since he didn't sleep much staying at the hospital until 5:30 am), she got a phone call letting the family know my aunt passed away too. My heart sank at that very moment. I just wanted to travel and be there with my family. Hard to deal with grieving sometimes, but I am doing better.

November 3rd was my birthday, my husband birthday present was a white counter  for my craft room so I could have a bigger desk. I packed everything and move boxes to my daughter's play room. I thought it would be done in no time, but it took a lot longer than I expected.

So today, I have an evolution of my craft room! I would say I have downsized a lot, I have tons of thing to sell and giveaway.

Craft room 2010-12

Craft room 2012-14: I bought an old computer desk at a yard sale for $8.00! I painted it white and used it until 2 weeks ago! Nothing fancy, but it worked out pretty well for me.


This is how my craft room area looks like now:

 Well, this old desk could hold the universe, LOL. You can not imagine how many boxes of stuff I got from this desk!!

Check out the new desk!!


I love my new desk!! More counter space and believe it or not, I clean up after a project is finished.

Sharing this with my crafty friends at the Moxie Fab Blog! And yes, my craft desk is clean, yay!

Ok, before I leave, why not be forever friends?! Yes! I love this very simple card I made with Latina Crafter products. I die-cut the "amigas die" 4 times and glue them together and stamped the sentiment "para siempre" in Black Archival ink. The leaves and dots are from a promotion set. Love the color combo, I think less is more sometimes.


Well, this post is a little bit long, hope you didn't mind.
Have a great day!
Many blessings!

Friday, November 14

Sweet 'n Sassy November Release!

Hello friends! It's time for another fun Sweet 'n Sassy Stamps Release! This month we have a variety of stamps and dies plus the bundles from the Sweet Club will be available for you too!

Let me show you the projects I have for you today.

Birthday Word Die and Companion Words Set. I combined these 2 to create a couple of birthday card, two very different styles.


Happy Birthday: I posted this on the SNSS blog yesterday. This card was super easy to make, with a little bit of mixed media touch. The sentiment was stamped in Black Archival ink, I die-cut the Birthday word in watercolor paper and colored with Distress Inks, then added Crystal Lacquer and sprinkled clear glitter. Super easy and fun!!

Birthday Wishes: This is a very feminine card with a little bit shabby chic touch. For this card I used leftover shabby chic papers I got long time ago, added lace, ribbon, flowers and twine. The papers were zig-zag stitched. I used Grunge Borders set in Versamark ink and then added white embossing powder and heat set. I kept the Birthday word die just plain white to create a contrast. The sentiment was stamped in Brown Archival ink.

Baked for you Set: This is one of the sets that was part of the Sweet Club, I used the super cute sentiment to create this super fun card!!


For the stove I used a polaroid die and used it upside  down, it was created with a couple of pieces chipboard and orange cardstock, hard to see, but I added a piece of film. For the image, I stamped the bunin Memento Tuxedo Blakc and colored it with Spectrum Nor markers. Then, I used a fine black marker and drew the baking sheet and oven rack. After that, I added sequins on the center of the image and added the stove door. Sentiment was stamped in St. Valentine Archival ink. Finally , added ribbon and heart pearls to the stove.

Scripture and Sentiment Companion & Bare Tree Die: I combined these 2 new products to create a monochromatic card, I wanted to keep it simple and elegant. Hope you like it.


I die-cut the bare trees in white cardstock (x2) and 1 in White Metallic Sheet, I also die-cut 1 small tree from this set. The sentiment  was stamped in Brown Archival ink, I created a little hill, added the sentiment on a rectangle piece, then glue the trees, added glitter and silver glass. Finally, I added the rectangle panel with dimensionals to a white card base.

One random commenter from one of the DT blogs will be selected to win a $10 Gift Code to be used at the Sweet 'n Sassy Stamps Store.  You have until Thursday, November 20th at midnight EST to leave your comments.  The winner will be posted on the Sweet 'n Sassy Stamps Blog on Friday, November 21st!
One more thing before we let you go...
We can't forget our fun Release Day Challenge!
"Create a Wintery Birthday Card"   

Just a few guidelines to remember as you play:
          
  • You don't have to use a Sweet 'n Sassy Stamps image to enter (although we sure love when you do!)
  • Please create a NEW card (no back linking)
  • We ask that you enter your card in no more than 3 challenges
  • You'll have until Thursday, November 20th at midnight EST to enter
  • We'll draw 1 winner from this week's challenge to receive a $10 credit to the Sweet 'n Sassy Stamps Store!  
  • If there are 25 participants, (not including the DT), we'll draw 2 winners!
  • Please use code SNSNOV2014RC when uploading to Splitcoaststampers or other galleries 
To enter simply share a link to your creation below!
Thanks for joining us today!  Be sure to join us again on Friday, November 21st to see if you've won!
Hope you like my projects.
Have a fantastic day and enjoy the hop!

=====

Wednesday, November 12

Give thanks


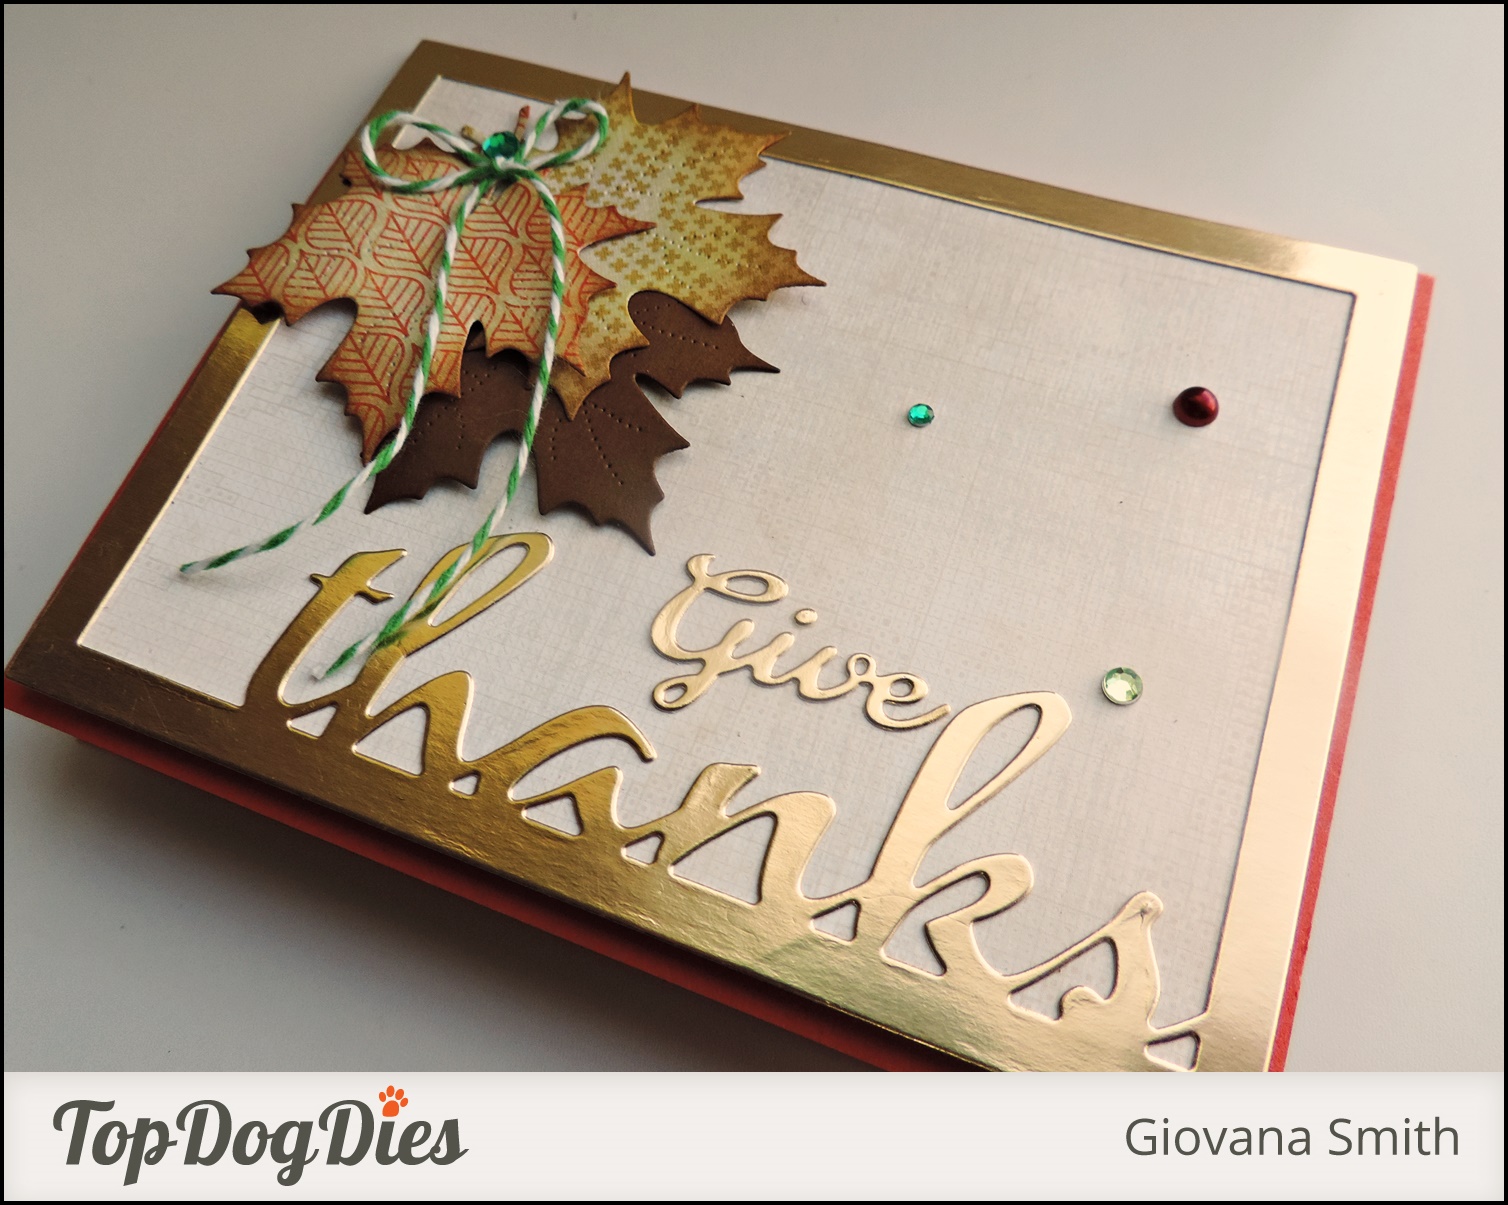
Hello friends! Today, I am bringing you a super easy "Give Thanks" card. Perfect to mass produce and send to your family and friends, only few steps and ready to mail.

Here are the steps:

  • Die-cut a frame using the new Top Dog Dies Thanks A2 Mat Die in Gold Cardstock, this cardstock is super shimmery, it looks like gold metal. Cut a mat to adhere behind the mat. Here, I used a piece of patterned paper.

  • Die-cut leaves from Patterned Paper using Top Dog Dies Fall Foliage Die Set, ink all edges with Vintage Photo Distress Ink. I also die-cut leaves from light brown cardstock to all to my card.

  • Add leaves to mat frame, green and red rhinestones and pearl. Finally add a twine bow to the leaves. I die-cut the Give from Top Dog Dies Give Thanks Die set in the same gold cardstock.


Submitting this project to:


Hope you like it!!
Have a great day!

Monday, November 10

Let your light shine this Christmas

Hello friends! Happy Monday to you all. Today, I have a Christmas card for you using just a small sentiment stamp, I think, after so many years I finally figured it out, LOL.
For my background I used one of my latest toys tools, the eBrush!! I got it few weeks ago, but until yesterday I had the chance to use it, my daughter was so excited, she couldn't stop using it.

Anyway, I used 2 of the markers that come with the tool to create my cool background and the Dots Stencil.


Here are the details of my project:

  • Make a cad base from White cardstock.
  • Mat background piece with a slightly larger piece of red cardstock. Adhere it to card base.
  • Cut a piece of gold paper. Adhere it to card base.
  • Die-cut a tag in white and red, cut a center piece from red tag and adhere it to white tag, add a strip of gold paper.
  • Die-cut a scallop piece from Green cardstock and adhere it to tag. Add twine and add tag to card.
  • Stamp sentiment from Frases Mini para Navidad set in StazOn St.Valentine Archival ink, add a fine strip of patterned paper and cut left side.
  • Adhere banner to card with foam tape. 
  • Cover a little wood veneer star from October's Kit in Gold Delicata ink. Then Add it to card.

The sentiment says: Let your light shine this Christmas.


For my project I used the Deconstructed Sketch #176


Submitting this project also to:
Hope you like it!!
Have a fantastic day!

Thursday, November 6

Crafter's Companion November Challenge: Christmas/Winter

Hello friends! Hope you all are having a great day, I am so close to finish reorganizing my craft room, feeling excited already. I can't wait to start crafting again!


So today I have a super cute Christmas card for you!! I made this card for the November Crafter's Companion Challenge, you can find all the details HERE (just in case, yo don't need to use Crafter's Companion products) For this card I used "Christmas Kisses" set one of the new Moonbeam Meadow Christmas Collection sets from Crafter's Companion.

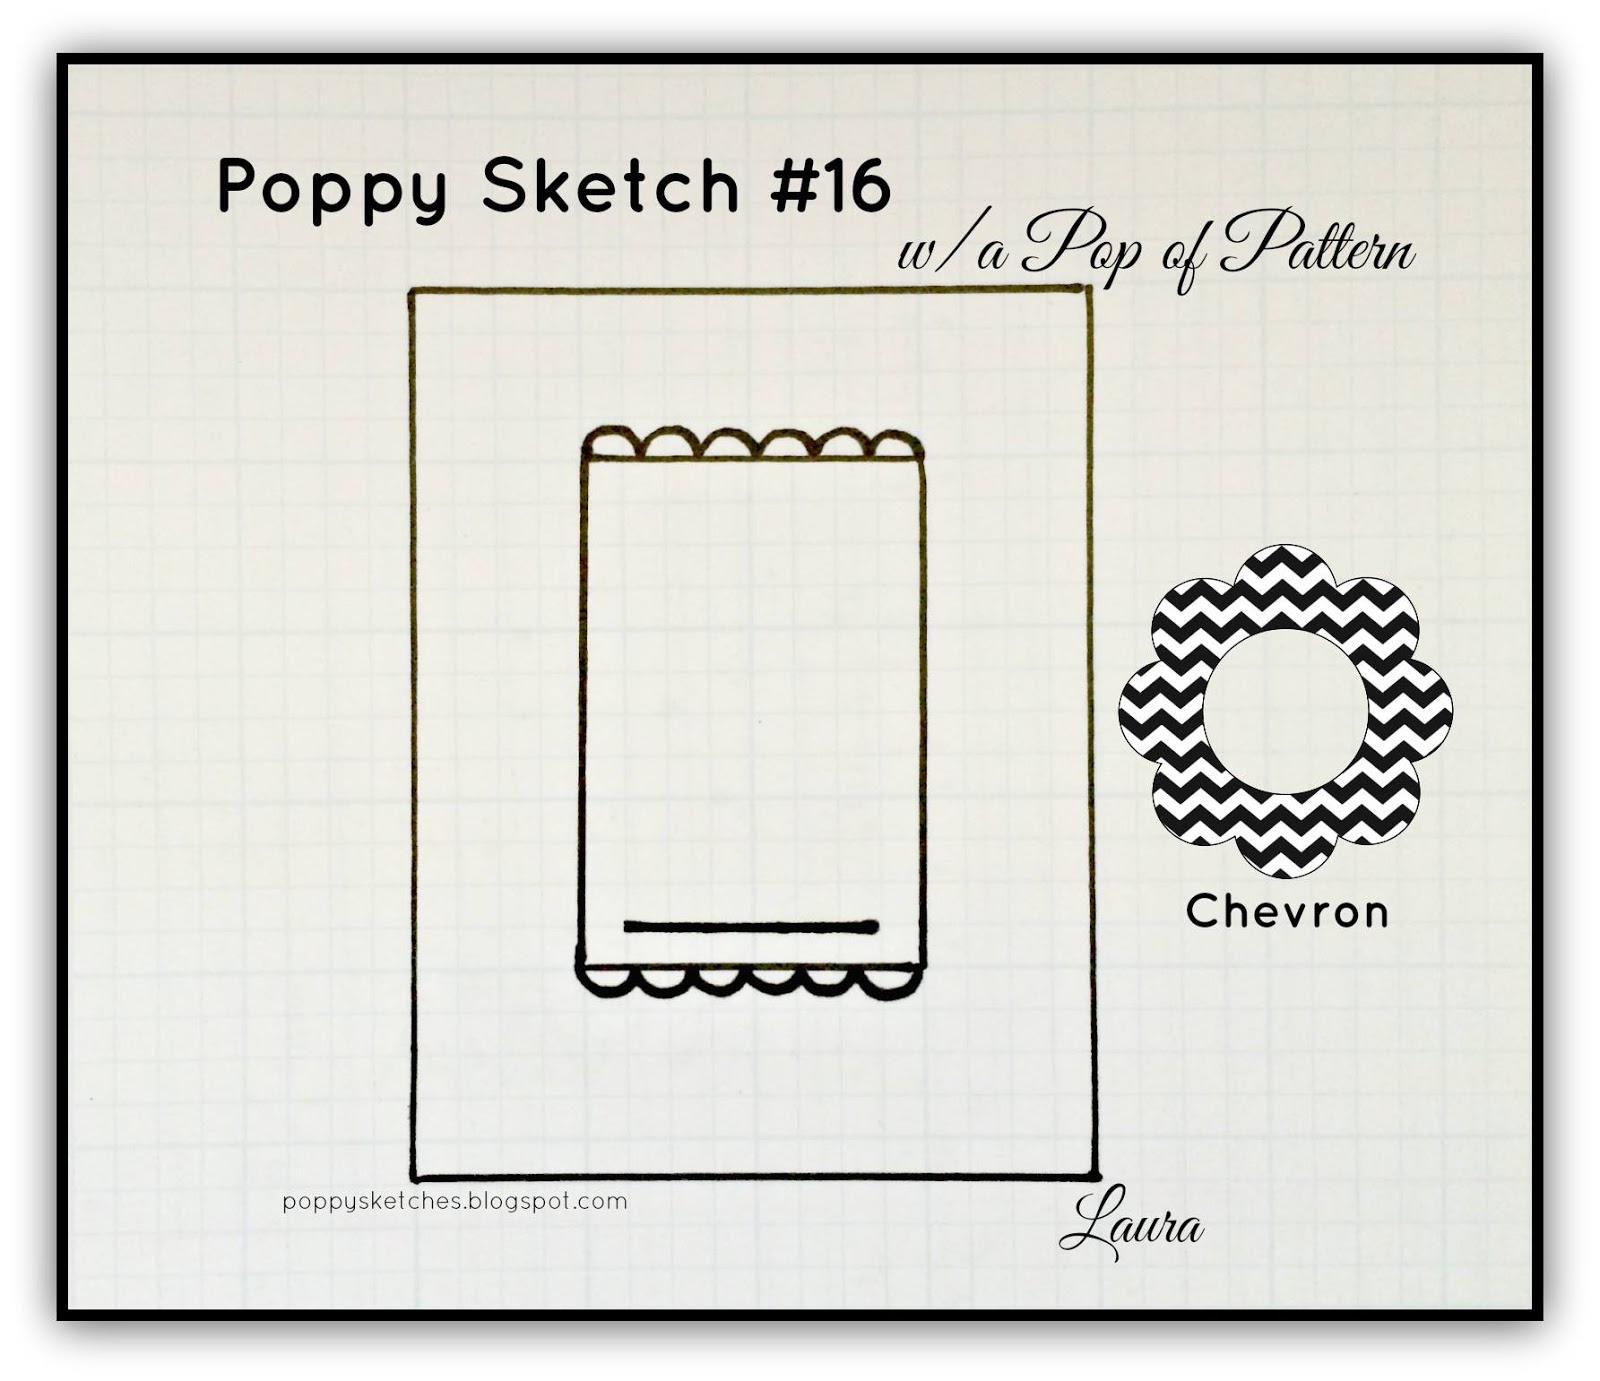
I got inspired by the sketch#16 from Poppy Sketches
Here are the details:


Submitting this project also to:
Hope you like it!
Have a fantastic day!

Wednesday, November 5

Give Thanks

Hello friends! Happy Wednesday, midweek is here and I am officially 42! LOL. Yesterday I had the post birthday effects, I had a great dinner at Red Robin with my husband and daughter, it was so much fun! But I ate all the food that I have not had in long time and my stomach was not too happy. So, I am back into my healthy eating again, also my husband bought few things to remodel my craft room, oh my, that's a lot of work!! I worked on that almost all day yesterday, I am super tired but excited to finishing all the organizing. I have a lot of things to sell and giveaway, so be alert ;)

Ok, back to my project, super cute Pumpkin Thanks card, made with Top Dog Dies.


Here are the details:


Submitting this project to:
Hope you like it!
Have a fantastic day!

Monday, November 3

Happy Birthday!!

Hello friends! Happy Monday and Happy birthday to me!! After 40 you get excited to celebrate another year, LOL. I am turning 42 today and the first thing I have to do this morning is to have a blood test taken, did I mention I needed to fast? Oh yeah, the fun things you need to do especially on your birthday.

Anyway, today I want to share a birthday card, no, I didn't make a card for me, I made it for the little one I babysat until September, I babysat him for about 8 months and his big sister for almost 5 years! He turned BIG 1 yesterday and my family and I got invited to his birthday party last Saturday. I was so happy to see all of them.

My big idea inspiration for his birthday card came from an UNO card, and here it is!


I love how they turned out "the bag and the card". This card was super simple to make, I just followed the colors from an UNO card, I used the Top Dog Dies Vintage Alphabet Set, die cut the letters in white cardstock and colored the letters with Spectrum Noir Markers. The dots were stamped in Versamark Ink, then added gold embossing powder and heat set. The Celebrate" was stamped in  piece of vellum in Versamark ink as well and added White embossing powder and heat set, used my scissor to create the banner and added it to card. Both sentiments are from Birthday Bash set.

Inside, I stamped the Happy birthday sentiment in Jet Black Archival ink and added the baby's name.

For the bag I used the Decorative Hanger Die from Soapbox Creations. First time using it, I am bad, I bought this die long time ago and I will be using it more often from now on.

Submitting this project to:
Hope you like it!
Have a fantastic day!!