Showing posts with label My Sweet Petunia. Show all posts

Friday, August 16

My Sweet Petunia and Sweet 'n Sassy Stamps Collaboration Blog Hop!!


Hello friends!! 
Time for another collaboration blog hop between My Sweet Petunia and Sweet 'n Sassy Stamp!!

Thanks
A very CAS and elegant card, perfect for Fall.

Position all the leaves from Give Thanks Set on your Original Misti, stamp them in Tea Ink, color them with markers, then fussy cut them and ink all edges with Tea Ink.
Die-cut a rectangle from watercolor paper, mist piece with Dazzle and Gold Shimmering Bliss. Set aside to dry, then stamp Thanks in Chocolate Ink.
Adhere watercolor panel to a white card base.
Arrange leaves around
Embellish card with white and gold Nuvo drops.


Not the presents, but His presence.
Create a blue background on watercolor paper, blending blue inks.
Position background piece on your Misti, stamp saying from Christmas Word Art in Navy Ink.
Die-cut piece and set aside.
Create a background piece using the tiny snowflakes.
Adhere panels to a light blue card base.
Add little dots of White Nuvo Drops.

http://shrsl.com/1mqmfhttp://shrsl.com/1r2adhttp://shrsl.com/1r28y
Checkered FramesChocolateNavy


We are giving away $50 Gift Certificate to each store!!
Don't forget to leave a comment on all the participant blogs, more comments, more chances to win!

Blog Hop List

Hope you like my projects!!
Have a wonderful day!

Monday, August 5

Trifecta Blog Hop : my Sweet Petunia, Picket Fence Studios and Thermoweb


It's a Trifecta FUN day!!
Yes, Thermoweb, Picket Fence Studios and My Sweet Petunia Teams are teaming up together, bringing you lots of inspiration, fun and prizes.

I have a couple of projects for you

Little retail therapy
Position your girl on your MISTI  from Dear Best Friend Stamp Set in Cherry Ink and die-cut image using  Dear Best Friend Coordinated Dies.
Die-cut a circle piece from White Cardstock, stamp sentiment in Chocolate ink. 
Apply Rainbow Deco Foil Transfer Sheet to a Double Dots Toner Sheet, use a laminator and heat press.
Trim piece and adhere it to a white card base.
Adhere circle piece and add girl with foam adhesive.
Finally, add Nuvo drops.

Close-up of the beautiful foiling.


Donut you love me?
Position your  fun coffee cup and donut on your MISTI  from You Make Me Glazy Stamp Set in Chocolate Ink, color image with markers, then die-cut it with You Make Me Glazy Coordinated Die Set.
Add glitter to donut and set aside.
Die-cut a circle from gold vellum and add image with foam tape.
Stamp sentiment in Chocolate ink and die-cut using a banner die.
Stencil front card base using Pure Gold Metallix Gel.
After stencil piece is dry, add gold thread behind the sentiment, add dew drops.
Adhere Circle and die-cut piece.


Now, don't forge to visit the My Sweet Petunia, Picket Fence Studios and Thermoweb Blogs, among all the comments 3 winners will be picked to win a $25 Gift Certificates.


Thursday, May 30

Three Way Swap with Gina K, Picket Fence Studios and My Sweet Petunia!

Hello friends!
Welcome to a fun trifecta blog hop!!
Yes, the Design Teams from My Sweet Petunia, Picket Fence Studios and Gina K. Designs are teaming up to show you a variety of fun projects!!

Let me show you the projects I have for you.

You are such a Gift to me
For this project I did a lot of masking!!
I started positioning the big Aster flower from Elegant Asters Stamp Set on my MISTI, then masking  them and keep stamping.
After that, I colored them with Spectrum Noir markers and add a bit of pencil.
Stamp the sentiment in Black Ink, die-cut the panel and added a bit of pink shimmer marker to the flowers.
Die-cut the panel. added it to a white card base. 
Finally, embellish it adding few white Nuvo drops.


Hello
This card was very easy and fast to make.
Stamp flower and leaves from Elegant Asters Stamp Set on a piece of Sea Glass cardstock in Versamark Watermark Ink, add white embossing powder and heat set.
Blend Peacock Distress Ink on stamped area.
Stamp butterfly on Wild Dandelion Cardstock in Versamark Watermark Ink, add Gold Embossing powder and heat set, die-cut image with coordinated die, add butterfly to card.
Die-cut Hello in Gold cardstock, apply glue and adhere it to card.
Finally embellish with white and yellow nuvo drops. 

Don't forget to leave a comment for your chance to win a $50 Gift Card to their stores!!
Three winners were selected randomly and announce on the companies blogs no later than June 7th!

Blog Hop List 

Have fun hopping!
Have a wonderful day!

Thursday, February 28

Ink Blot Shop and My Sweet Petunia Collaboration


Hello friends!
Welcome to a fun collation hop between Ink Blot Shop and My Sweet Petunia!

Be sure to check out all the blogs listed below for your chance to win amazing prizes!!
You don't want to miss it.

Let me show you the projects I have for you today.

Sending Lots of Love
For this card I used Marvelous Mask Heart stencil and the adorable hearts from Heart Dot Star Background.
Position watercolor paper, stencil then the stamp and ink it up in Versamark Watermark, then add Gold Embossing powder and heat set.
Blend the heart part with Victorian Velvet Distress Ink.


Then, cover the heart with the negative part and stamp the background with the circle stamp ink Mist Ink, then mist the background with Imperial Yellow Shimmering Bliss.


Die-cut the panel, stamp the sentiment on red cardstock in Versamark Watermark Ink and gold embossing powder, then heat set. Die-cut piece and add it to the center of the embossed heart.
Embellish with Nuvo drops.


You are so loved
I had a lot of fun creating this card, so sweet and the cute couple are just adorable!
Stamp the cute couple from Little Something Set on white cardstock in Black Ink. Color images with markers, here I used Spectrum Noir Illustrator, add a little extra to the dress and hair with Chameleon Pencils.
Cover the glasses and the bow with Crystal Lacquer, set aside to dry.
Create a background with the stars from Heart Dot Star Backgrounds set, stamp the sentiment on top right in Black ink.
Card size is 5.25" x 5.25"


Blog Hop List


Be sure to visit all the blogs for your chance to win amazing prizes!
You have until Sunday, March 3rd to leave a comment, winner will be announced on March 5th over at the My Sweet Petunia Blog.

Let me show you the prizes:

Ink Blot Shop Prize
Four amazing Stamp Sets!!


My Sweet Petunia Prize
* A Misti 
* A Cut-Align
Thanks so much for stopping by!!
Have fun hopping.


Friday, January 18

My Favorite Things and My Sweet Petunia Product Swap


Hello friends!
The My Favorite Things and My Sweet Petunia teams are collaborating together!
We are using our favorite MISTI and adorable MFT stamps, dies and stencils!
I have so much creating these cards.
Valentine is just around the corner and I love the products I got and honestly love the cards I created too, lol.

Ok, let's talk about these cards, shall we?

Special Delivery of Love
For this card I used the Lots of Hearts Stencil on white cardstock and Distress Oxide. die-cut the panel. Die-cut the Hearts Entwined in Metallic Red Cardstock (I did it twice and glued them together).
Stamp the sentiment from So Much Love Set in Chocolate Ink.
Glue the Hearts Entwined to panel, then add panel to a pink card base with foam tape.
Add red rhinestones to embellish.


So Much Love for You
Create a panel using the Lots of Hearts Stencil in Red Distress Ink, die-cut piece, die-cut panel using the Stitched Heart Peek-a-boo window.
Stamp and color the sweet girl from So Much Love Set, then die-cut it with coordinated die.
Adhere girl behind heart panel.
Stamp sentiment on black cardstock in Versamark Watermark and white embossing powder.
Add sentiment to card.
Add panel to white card base with foam adhesive.


Our Chemistry is explosive

Isn't this card adorable! hehehe. I had to confess I had a different idea for this card, but after that sentiment I decided to use the Lots of Hearts Stencil again, perfect for an explosion of love [wink, wink}
Stamp and color images from Cute Chemist Set, then die-cut them with coordinated dies
Cut a card base 5" square, stamp sentiment in Red ink.
Add a stripe of white cardstock to the stenciled panel and adhere it to card base.
Add die-cut pieces with foam tape.
Finally embellish it with pearls and Stickles .


Don't forget to leave a comment for your chance to win one of three $50 Shopping Spree to My Sweet Petunia and one of three $50 shopping spree to My Favorite Things!!
Just leave a comment, tell me if you celebrate Valentine's Day or not  ;)
Easy peasy!!

Now, don't forget to visit the rest of the My Sweet Petunia and My Favorite Things 
Design Team Blog!!

My Favorite Things Team

My Sweet Petunia Team

Have fun hopping!!
Hope you like my projects!


Thursday, January 17

Yours is my favorite!

Hello friends! 

Sharing today a super easy, Clean and Simple style!

Now, let me tell you about my project.
Valentines is just around the corner and I have the perfect card for you!

This card uses stamps from Valentine Release by Impression Obsession.

Details:

Position your stamp on your Original Misti, then stamp the Baby's Breath Large on the front of a white card base in Bubblegum Ink.
Color little flowers with a pink marker.
Mist a watercolor panel ,then stamp Seven Million Smiles in Chocolate Ink
Die-cut stamped panel and add it on top of a pink panel, then add it to card base with foam tape.
Finally, add little drops of Rhurbarb Crumble Nuvo drops.


I hope you like it.
Have a wonderful day!


Thursday, November 8

Unity Stamps and My Sweet Petunia Collaboration Hop!


Hello friends!! Hope you all are having an amazing day!
Today is a very special day, the My Sweet Petunia and Unity Stamp Company are joining forces to bring you a LOT of inspiration, ideas and prizes!

First let me show the projects I created for you.
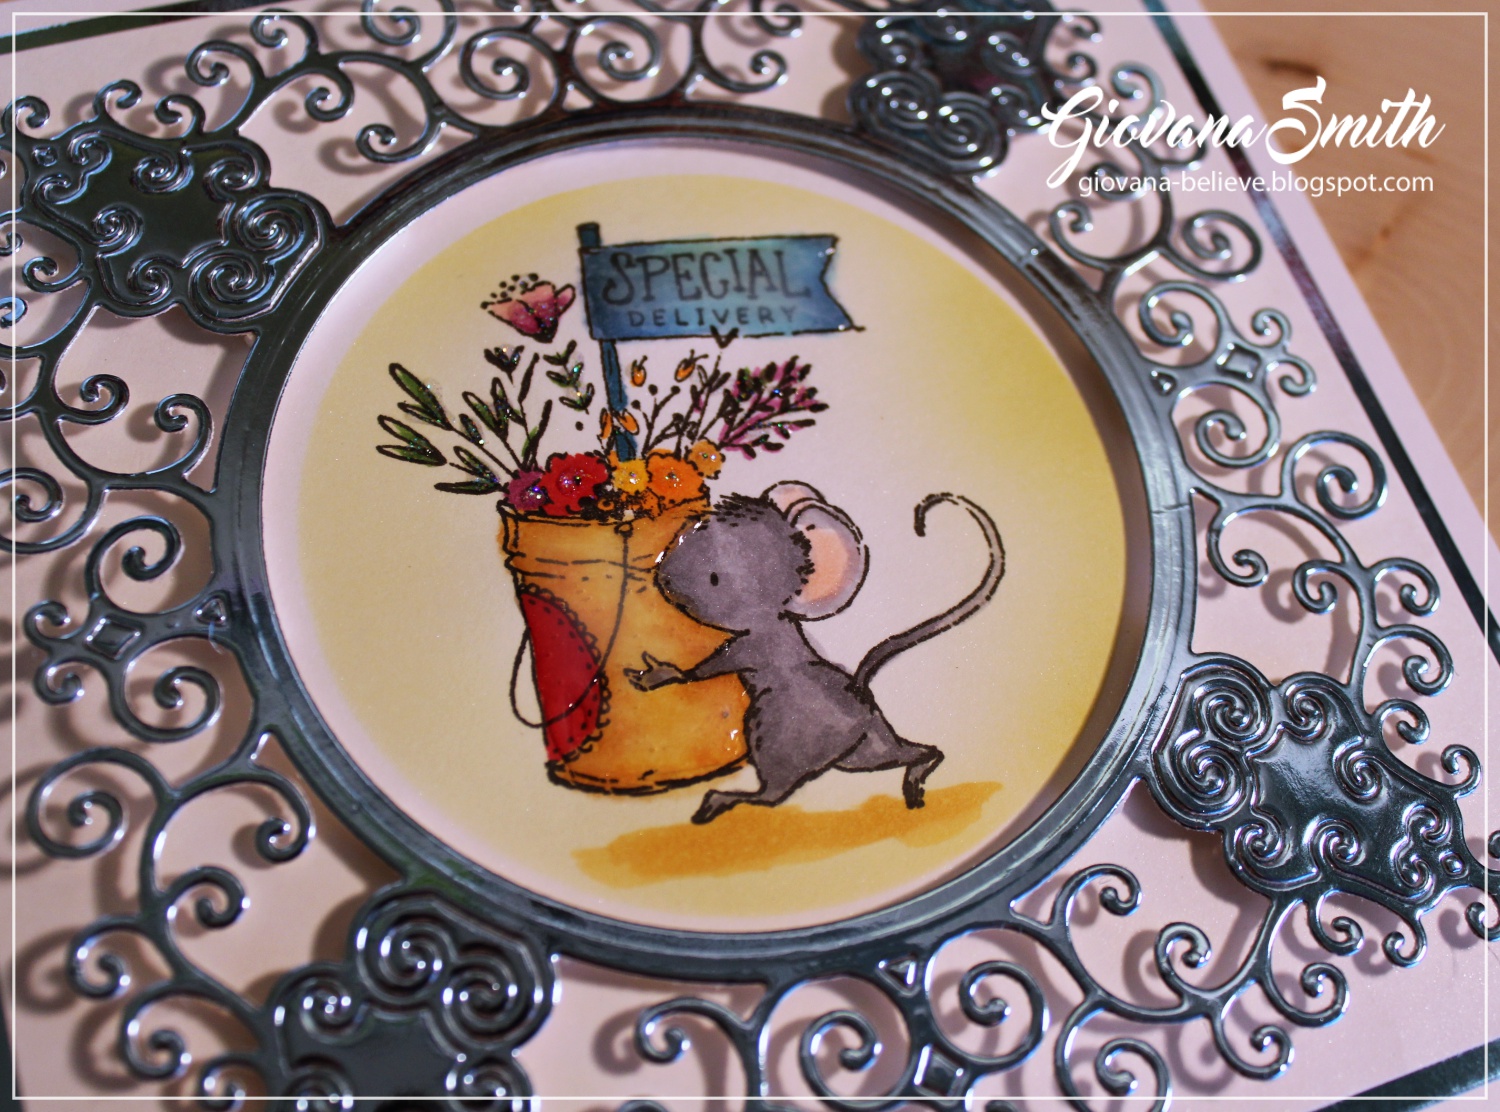
For this card I used Special Delivery Mouse and of course my Misti

I wanted to use this super cute frame so I placed it on top of my piece of white cardstock to know exactly where to stamp the image. I used Black Ink and colored the image with Copic Markers.


After the image was colored, I used a small soft brush and applied Fossilized Amber Distress Oxide using a 3" Marvelous Mask Circle Stencil, so much better than die-cutting your own little pieces {wink, wink} 


After that, just removed the stencil and reveal the perfect blended ink circle.


Using a marker create a little shade under the mouse.
I added Crystal Lacquer on the Special Delivery sign and bucket, also added Clear Stickles to the flowers and little leaves.
Adhered the die-cut frame with foam adhesive and added the panel to a 6" x 6" White card base.


Clos-up of the image.


I decided to created an extra project, here I used "A Time of Peace"
I stamped the image on a piece of white cardstock in Black Ink, colored with Copic Markers and Chameleon Color Tone Pencils
After that I used Falling Stars Stencil and Fossilized Amber Distress Oxide ink. I added a little extra pressure to get the stars really popped!
Stamped the sentiment on a piece of white cardstock in Sienna Ink.
Tied gold thread on strip and added the sentiment to panel with foam adhesive.


You can find the whole list of participants clicking the Unity Stamps and My Sweet Petunia lists.

And a hop is not a hop without prizes, right?
Unity will be giving away 2 Unity filled prize packs
 My Sweet Petunia is giving away a $60 gift certificate.

Thanks so much for stopping by!