Showing posts with label Reverse Confetti. Show all posts

Tuesday, March 20

My Sweet Petunia and Reverse Confetti Collaboration Hop!!


Hello everyone!! Welcome to a fabulous collaboration hop between My Sweet Petunia and Reverse Confetti. Both Design Teams have prepared amazing projects for you, plus what is a hop without prices! YAY!! 
Yes, we have 2 amazing prices:
$60 shopping spree at My Sweet Petunia and
$60 shopping spree at Reverse Confetti.

The only thing you have to do is enjoy the hop and leave your comments on the participating blog (we all love them). 
Leave your comment no later than March 25th at 11:59 pm (Central Time) and winners will be announced on Tuesday March 27th, on the Reverse Confetti and My Sweet Petunia blogs.

Now, let me show you the projects I have for you today! Of course for all my projects I used Reverse Confetti and my MISTI, so let's get started.

Wishing you Well
I started stamping a background using Cubes Color Combo #4 Inks and one of the stamps from So Stripey set. Then I added a frame created with dies and vellum paper. After that I stamped the sentiment on the vellum piece in Jet Black Stazon Ink, sentiment from Petals' n Posies.
For the top image, I stamped the big floral image from Something Wonderful set on a piece of white cardstock in Salsa Ink, then cut it out. Added leaves from Petals 'n Posies set, stamped in Pistachio ink. Added them to card front with foam adhesive. Embellished with silver thread and pearls.

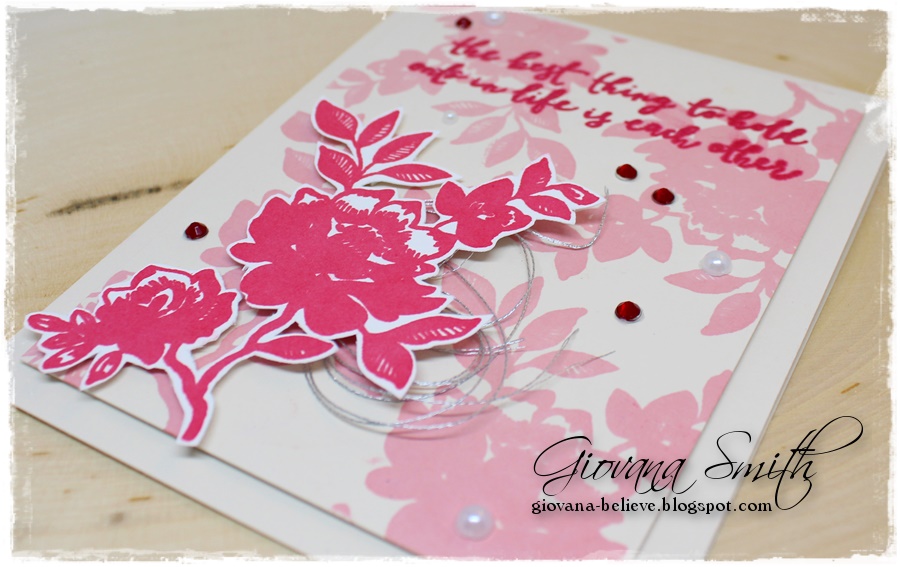
 The best thing...
This card was super easy and fast to make.
Started with a piece of light pink cardstock and stamped  the floral image from Something Wonderful in Piggy Bank Ink, then stamped the sentiment in Salsa Ink. The top floral was stamped in Salsa ink as well, cut out and added to front panel with foam adhesive. Embellished the card with silver thread, pearls and red rhinestones.

 Thanks so very much
This was the first card I made and love it very much!! 
Started with the background, used a stencil and white embossing paste, then set it aside to dry. 
Stamped the floral images from Garden Bunch Set in Rose, Wisteria and Black. Then die-cut the flowers using coordinated dies
Added flowers and leaves from Petals' n Posies using foam adhesive.
Stamped the sentiment from Lots' to Say on a piece of vellum in St. Valentine Stazon Ink.
Embellished the card with pearls.

Blog hop list!
Get ready to get inspired!

Giovana Smith ---> Me
 Lydia Fiedler


Hope you enjoy this hop! 
Don't forget to leave a comment for your chance to win!
Have fun!


Saturday, February 28

Just wanted to "espresso' my thanks

Hello friends!! Hope you all are having a nice and relax Saturday! I love coffee so I decided to play again and make another coffee card for the "Spring Coffee Lovers Blog Hop", this time I used a set from Reverse Confetti.
My idea was to create an OLC, but I just couldn't, LOL. I added few embellishments and the card was perfect, here are the details:
  • Make card base from White Cardstock. A2 size.
  • Place the image and stamp on your MISTI, then stamp image and sentiment with Ganache and Emerald City StazOn inks.
  • Color image with Spectrum Noir Blendable Pencils.
  • Die-cut a banner, fold it and create an uneven end, add paper flower, bow and twine.
  • Finish your card with a couple of gold enamel dots.


Submitting this card to:
Hope you like them.
Have a fantastic day!


Wednesday, August 27

Glittery Ombre Tutorial

Hello friends! Today, I am sharing a super easy tutorial!! You have probably seen something similar, but this time you are not going to waste a bit of your products! Promise {wink, wink}

For this project I created an ombre background using Embossing Paste and Glitter! Super easy and you can make this in any color you like/want.

Let get started!

  • Secure your mat to a piece of cardstock (here I used white) with removable tape or washi tape.

  •  Combine White Embossing Paste and 2 drops of Faded Jeans Distress Ink, mix well.


  • Apply it to left part of your piece, then add "more embossing paste" to soft the blue and apply to the middle part (I applied it diagonally) 


  •  Mix 1 more time the remaining past with more embossing paste to apply to your right bottom corner (your softest color)

  •  Add clear glitter to piece, use your heat gun to set it.


*Sentiment from Lots to Say (Reverse Confetti)
*Flowers from Painted Flower (Altenew)

Submitting this project to:


Hope you like it!
Have a great day!

Monday, May 26

Wishing you well

Hello friends! Hope you all are having a great day, I am here tired, my daughter is sick, hopefully she will feel better soon, school is almost over and she has a lot of activities planned before school is out.

Although I didn't make this card for her, I think this is what I wish for her. This card was made for a girl who had a horse accident, my friend asked me if I had or could make a card for her and of course I say yes .

Here are he details:

  • Make card base from White cardstock. A2 size.
  • Mat together a piece of pink cardstock and patterned paper (PTI), add straight stitches.
  • Die-cut a scallop border in green cardstock and add it to panel, add zig-zag stitches.
  • Die-cut a scallop circle in red and circle in white cardstock.
  • Stamp polka dot flowers in yellow and red ink. Die-cut images with coordinated dies.
  • Stamp leaves in green ink, die-cut image with coordinated die.
  • Stamp little dots on white circle piece in yellow and pink ink.
  • Add die-cut pieces to circle. Add pearl.
  • Stamp sentiment in black ink.
  • Add circle piece to card base with dimensionals.
  • Add little pearls to scallop piece.


Hope you like it!
Have a beautiful day!

Wednesday, December 11

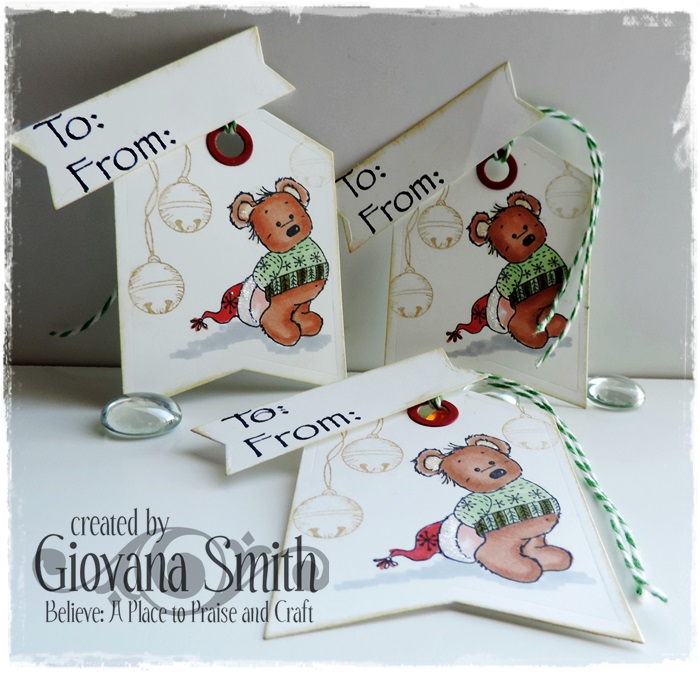
Winter Teddy Tags

Hello friends! Hope you all are having a fantastic Wednesday. Today, I want to share with you these cute Teddy Tags I created using Great Impressions Stamps.

Isn't this bear extremely cute? I think he really is!
For this project I started die-cutting the tags using Reverse Confetti Tag me Dies , then I stamped the bear in Memento Tuxedo Black and colored it with Spectrum Noir Markers. Then, I stamped the bells from Christmas Bell Swag image in Golden Glitz Ink. The To/From banner was stamped in Jet Black Archival. The final touches were adding Twine and stickles to the Santa's hat.


Great Impressions Stamps used:
Hope you like them!
Have a fantastic day!

Friday, November 8

Reverse Confetti Release Blog Hop!

Welcome to the REVERSE CONFETTI New Release Blog hop! Could it be November already? With this month’s new release from REVERSE CONFETTI, it’ll be a snap to get a jump start on those holiday cards and projects (yep, Christmas is just around the corner!). Lucky for you, it’s the 8th of the month, and we’ve got some inspiration to get you going with that very thing! Come and hop along with the Confetti Crew as we share some creative ideas using all the new products from REVERSE CONFETTI, including five new trendy stamp sets and introducing CONFETTI CUTS. That’s right, we now carry steel dies, and there are 2 sets to choose from this month. Along with the Confetti Crew and our new CHALLENGE Crew, we’ve also invited some extra friends to join in on the action! Let’s go!


The hop started over on the Reverse Confetti blog, and you should have made it here from Laurie’s blog. It would be worth your while to start at the beginning of the hop, so you don’t miss a thing. We have tons of inspiration for you to see using all the new Reverse Confetti stamp sets!

 This is the card I have for you today:

 
The sentiment is from "Lots to say" set, I used "So stripey" set to stamp the pink and yellow panels and for the baby onesie, then I added Star Dust stickles. The sketch is November's Sketch For You o Try.


 These are the sets I used:


I hope you’ve enjoyed hopping with us today. Be sure and hop with us on the 8th of EVERY MONTH for more REVERSE CONFETTI inspiration! Now it’s time to hop on over to Lisa’s blog. If you get lost along the way, you can find the hop order and list of all the participating designers over on the Reverse Confetti blog.

A few things before you hop along though, just to keep you “in the know”…
November’s SKETCH FOR YOU TO TRY is open for you to play along. Click HERE 


Hope you like it!
Have a fantastic day!

Thursday, November 7

Contdown to Confetti: Lots to say


Welcome back to day 3 of Countodown to Confetti. Today we are featuring "Lots to say" set.This set is FABulous! A lot of great sayings in one set, perfect!! I created 2 cards using this set.

Happy Birthday: Few stitches, a big rhinestone swirl, a bow and your card is done! Seriously, I made this card in no time, which doesn't happen very often.


For the happy couple: I love this card, yes sometimes I have some favorite ones. I used my favorite gold ink (Delicata Golden Glitz), gold cardstock and patterned paper, added vellum paper to mute the patterned paper colors. I have a lot of those gold rings from my wedding reception, LOL. I don't know why I keep stuff, but I am glad I did, those rings look cute on my card.


This is the set I used today :


Be sure to leave a comment here, as well as the other blogs, to be eligible to win a  $15 gift certificate to Reverse Confetti!   To visit the other designers participating, please visit: Reverse Confetti for a list and start hopping! Comments will close at noon CST on November 7th and the winner will be announced at 5pm on November 7th.

Want another chance to win? Head on over to RC's Facebook page and find the Comment to Win post and leave your comment for another chance to win.
 
All products available November 8th!
 
Hope you like my projects!
Have a fantastic day!

Wednesday, November 6

Countdown to Confetti Day 2: Be a Barista

 
Hello friends! Welcome to Countdown to Confetti Day 2! Today we are featuring a new set "Be a Barista" and a new illustrator, the very talented Angelica Suarez!!
If you love tea or coffee, this new set is for you! I made an espresso card for you.


Here are the details:
  • Make card base from Kraft Cardstock. A2 size.
  • Mat a piece of Pink CS and Patterned Paper (Trendsetter by Fancy Pants), add stitches.
  • Mat another smaller duo, add stitches, stamp sentiment in Coffee Archival Ink.
  • Stamp images on White Cardstock in Memento Tuxedo Black Ink. Color it with Markers (Copics). Die-cut piece and adhere it to another pink square piece.
  • Add pieces to card front.
  • Create a bow, add a button and twine.
  • Add Crystal Lacquer to coffee.
This is the set I used for my project:


Be sure to leave a comment here, as well as the other blogs, to be eligible to win a  $15 gift certificate to Reverse Confetti!   To visit the other designers participating, please visit: Reverse Confetti  for a list and start hopping! Comments will close at noon CST on November 7th and the winner will be announced at 5pm on November 7th.
 
Want another chance to win? Head on over to RC's Facebook page and find the Comment to Win post and leave your comment for another chance to win.
 
All products available November 8th!
 
 
Hope you like my project!
Have a fantastic day!

Tuesday, November 5

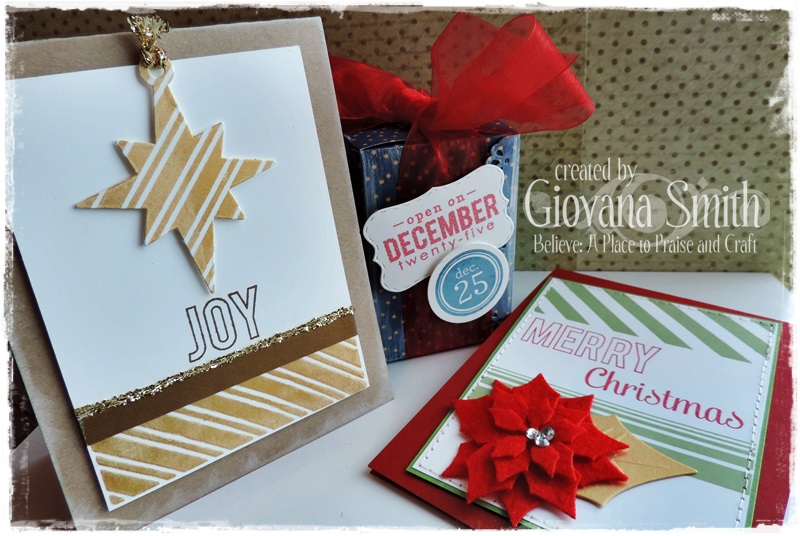
Reverse Confetti: Bring on the Merry & Tinsel 'n Trim


Welcome to the REVERSE CONFETTI Countdowns! I am super excited to be hopping with this super talented group of ladies, thanks Jen so much for the chance!!

Today we are featuring 2 great sets, Christmas is just around the corner and these sets are super cute and easy to work with, think cards, tags, boxes, you will love to use these sets :)
Come and hop along with the Confetti Crew as we share some creative ideas using all the new products from REVERSE CONFETTI, including five new trendy stamp sets and introducing CONFETTI CUTS. That’s right, we now carry steel dies, and there are 2 sets to choose from this month. Along with the Confetti Crew and our new CHALLENGE Crew, we’ve also invited some extra friends to join in on the action! Let’s go!


Bring on the Merry Set: This set has fantastic Christmas sayings for your  Christmas projects. I made this card in combination with "So Stripey" set.

Here are the details:
  • Make card base from Red Cardstock.
  • Cut a panel from White Cardstock, stamp stripes in Memento Bamboo Leaves and "Merry Christmas" saying in Memento Lady Bug ink. Mat this panel with a slightly bigger piece of green cardstock and add straight stitches.
  • Add panel to card base.
  • Create a poinsettia flower, add it to card. Add rhinestones to center of flower.


Tinsel 'n Trim Set: This set has a lot of possibilities! Perfect for cards, tags, boxes :)
My first project is a super CAS card.

Here are the details:
  • Make card base from Kraft Cardstock, ink all edges with White pigment.
  • Cut a panel from White Cardstock (3.75" x 5"), stamp stripe border in Golden Glitz Ink. Stamp JOY in Coffee Archival Ink.
  • Add a piece of Gold Cardstock and tinsel.
  • Die-cut a star from white cardstock and stamp the stripe in Golden Glitz delicate.
  • Add to panel with dimensionals.
  • Add panel to card base.

Gift Box: I created this cute box and already included a little present for one of my nieces :) I love this paper (old Graphic 45).

Here are the details:
  • Create or decorate box. Here, after creating my box, I added bits of White paint, just to make it more wintery like :)
  • Die-cut a label and stamp the saying in Memento Lady Bug ink. Die-cut or punch a circle and stamp the date in Memento Luxe Teal Zeal.
  • Tie on ribbon (recycled) and make a bow. Add label and circle.

These are the stamps I used today:


How would you like to win some Reverse Confetti goodies of your very own? Leave a comment on each stop along the way for a chance to win a $15 gift certificate to Reverse Confetti.  Comments will close at noon CST on November 7th and the winner will be announced at 5pm on November 7th.


A couple things before you hop along though, just to keep you “in the know”…
  • November’s SKETCH FOR YOU TO TRY is open for you to play along. Click HERE for a chance to win. 
  • Be on the lookout for a NEW COLOR challenge we will be introducing on November 16th and another way to win!

Hope you like my projects!
Have a great day!