Tuesday, September 29

Thank You


Hello friends!! How are you doing today/tonight? Hopefully you are having/had a fabulous day. I started this post earlier today (around noon), but couldn't finish it because the little ones woke up at the same time and my busy schedule started again.

Anyway, I want to share with you about a new stamp company, it is called Concord & 9th and it has super cute stamps!! I recently purchased 3 sets and today had the chance to play with one of them while the little ones were napping, this one is called Painted Thank You and it is super cute and fun stamp.

I used the embossing resist technique for this card, the colorful background was created with my Color Burst Powders, that is something you need to get for sure, they are so much to play with ;)

Here are the details:
  • Make a card base from white cardstock. A2 size.
  • Cut a piece of watercolor paper, size 4.75" x 3.5". 
  • Stamp image in Versamark Watermark ink, add white embossing powder and heat set! Then, mist your watercolor paper with water and sprinkle your Color Burst Powder, here I used Alizarin Crimson, Lemon Yellow and Ultramarine Blue. (I got mine on Blitsy)
  • Stamp the little flower in a circle tag, add lace tape and silver thread.
  • Adhere panel to card base.


Hope you like it!!
Have a fantastic day/night!

Friday, September 25

Fall Coffee Lovers Blog Hop take 2


Hello friends, it's me again. This time I have a card using Latina Crafter stamps! This card is super cute, very Autumn-y look ;) Here I used "Coffee and Pretty things"

Here are the details:
  • Make card base from Ivory cardstock. A2 size.
  • Cut a panel from Gold Cardstock 3.5" x 4.75".
  • Create a watercolor background using Color Burst, then die-cut a circle and leaves. Adhere them to gold panel. Add lace.
  • Stamp sentiment on a piece of Ivory cardstock. Add it to gold panel with foam adhesive.
  • Add twine to leaves.
  • Add gold panel to card base with foam adhesive.


Now, to celebrate coffee, I am giving away 2 little prizes, a Coffee set + Coffee Wood veneers.
You just leave a comment and your name will be included. You have until October 2nd at midnight (Pacific Time) to leave a comment. I will post the winners Saturday, October 3rd.


Hope you like my card!
Have a fantastic day!

PS: Check out my other card HERE

Fall Coffee Lovers Blog Hop!


Hello friends! It's the most wonderful time of the season! Coffee Lovers Blog Hop!! I am so proud to say I have participated in all of them {wink, wink} Coffee Lovers United, hehehe.
Let me share the card I made for this special hop! I used this super fun set from Skipping Stones Designs "Funny Coffee Vol #1".

Here are the details:
  • Make a card base from Ivory Cardstock. A2 size.
  • Cut a panel from Ivory cardstock 3.75"x 5". Stamp coffee stains in Tea Dye and Vintage Photo Distress Inks, ink all edges and add a thin gold stripe to the right side.
  • Stamp coffee cup on a piece of watercolor paper, color it with markers (Spectrum Aqua), die-cut and emboss piece with circle dies.
  • Add piece to card panel.
  • Leaves: A couple of weeks ago I played with my new Ken Oliver Color Burst Powders! I had so much fun and the colors really screamed Fall! I used it to die-cut the leaves.


Now, I invite to visit the Skipping Stones Blog, the DT is sharing more projects plus you can have the chance to win  this fabulous set + $15 store credit!!

Hope you like it!
Have a great day!!

PS: Check out my other card HERE + a giveaway!!

Skipping Stones Challenge : Happy Belated Birthday

Hello friends!! It's time for another Skipping Stones Designs Challenge! This time it is an inspiration! I think this picture has a lot of possibilities, think about colors, elements, textures.


For my project I got inspired by the door colors, this is a very easy and simple card, I wanted to showcase the beautiful damask design.

Here are the details:
  • Make a card base from White cardstock. A2 size.
  • Cut a panel from patterned paper and kraft cardstock, both 4.75" x 3.5" size.
  • Stamp damask from Damask Darling set  in Versamark watermark ink, then add Light blue embossing powder and heat set.
  • Stamp sentiment from same set in Jet Black ink on a piece of white cardstock, cut the piece and create a banner, add silver thread to kraft panel, then add sentiment.
  • Add patterned paper and kraft panel to card base.
  • Add sequins and rhinestones.

You can enter your creations HERE, one winner will get a set of her choice!!

Hope you like my card.
Have a fantastic day!!

Wednesday, September 23

Three cards, one die.

Hello friends! Happy Wednesday to you all.Today I have 3 cards for you using 1 die! I made these cards some time ago but haven't had time to show them to you, what's wrong with me? {wink, wink}

Anyway, for this project I used a Create a Card Die, this one is called "Daisy Dreams", for this project I die-cut the Daisy Dreams die in Pink Pearl Shimmering Cardstock, then cut the lager piece in 2.


Here is a view of the cards made with just 1 die!! You can do so much with them!


Card #1: For this card I used the upper part of the die. Created a window with rectangle dies and added white and  pink pearl panels behind. Stamped the sentiment from Sentimentals Friends and Family set in St. Valentine StazOn ink, the little flowers are from Four Seasons Die set. Added pearls.

Card #2:For this card I used the bottom part of the die, just added a Rose Pearl piece behind the die part, scored the lines around the window piece and mounted it to a white card base. Stamped the sentiment from Sentimentals Friends and Family Set. Added pearls.

Card #3: This last uses the circle die-cut part. I die-cut a window using circle and scallop circles in Rose Pearl Shimmering cardstock to create a shaker part. Inside I added sequins and rhinestones, added little flowers and leaves from Four Seasons Die set and stamped the sentiment also from Sentimentals Family and Friends Set.

Submitting these cards to:

Hope you like it.
I will appreciate your comments.
Have a fantastic day!!


Monday, September 21

Happy Birthday "Minion" style.

Hello friends! Happy Monday to you! Today, I want to share a Minion card I made last weekend for one the little ones I babysit, she just turned 2 and loves the Minions! So, I put my dies and to great use and create this super fun card!! I think it looks better in person, but it was super easy!!

To create the minion:

  • For the body I used the longest, kinda rectangular bubble speech from Latina Crafter.
  • For the glasses, the black part was created with Circle dies (negative from the window part)
  • For the eye, lense I used the circle detail used for tags, the circle was die-cut in gray and white and little black part was die-cut from the little circle detail.
  • With a fine black marker draw a smile and few hair.
Card details:
  • Create a card base with white cardstock. A2 size.
  • Create a window from Black Shimmering cardstock and Patterned Paper (SU) 
  • Add minion behind black circle.
  • Die-cut balloons in purple and pink, add twine behind and add them to panel.
  • Stamp Happy and die-cut Birthday in purple.
  • Add panel to card base with foam adhesive.


Submitting this card to:

Hope you like it!
Have a fantastic day!!

Saturday, September 19

Let it Snow

Hello friends!! I can't believe I haven't blogged since Tuesday, life is busy, BUT I am working in lots of projects behind the scenes, I think I will start sharing soon.

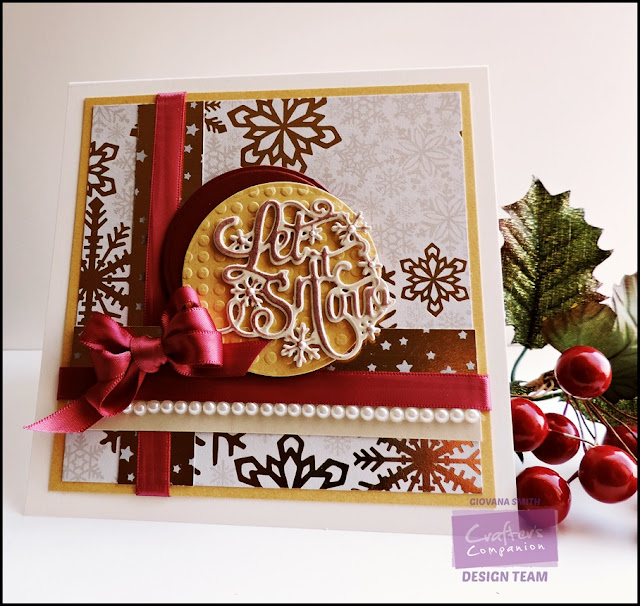
Today, I want to share a super cute and Christmas card I created with Crafter's Companion products, no stamps needed for this card, only a couple of dies and patterned paper!

Here are the steps:

  • Make a card base from White cardstock. 5.5" square card.
  • Cut a panel from Yellow Pearl Shimmering Cardstock, 5" square, add patterned paper to panels and 2 stripes (gold with stars paper)
  • Tie on ribbon.
  • Die-cut a couple of circles in Yellow Pearl and Candy Red Shimmering Cardstock, emboss the yellow Pearl piece with Petite Dots embossing folder, add circles to card base.
  • Die-cut, emboss and stencil "Let it Snow" in Gold Dust Shimmering Cardstock. Adhere it to yellow circle.
  • Create a triple bow with your Ultimate Bow maker.
  • Add a row of pearls.


And great news! Crafter's Companion is having a great SALE!! 50% off in all EZ mount stamps, ALL of THEM!! Get your favorites before they are gone! I ordered a long list yesterday, like these ones: Beautiful background stamp, Great for mass producing Christmas cards, love this one very much, several from here and more!!

Entering this card to:


Hope you like it.
Have a great day!!

PS: I am so excited to go to a birthday party and eat cake (Haven't had sweets in weeks, LOL)

Tuesday, September 15

You mean the world to me

Hello friends!! I am blogging over at the Skipping Stones Designs Blog, here is a sneak peek of the project I have there, hope you can stop by .


Have a great day!!
~G~

Monday, September 14

Hola!

Hello friends! Happy Monday to you all! Hope your week is starting great, I am dealing with some health issues,  am starting week 4 and I think it is time to go to the doctor.

Anyway, today I want to share a super simple card I made using Latina Crafter products. Super simple with a great look result.

Here are the steps:
  • Make a card base from Orange Cardstock. A2 size.
  • Cut a piece of White cardstock. 3.75" x 5"
  • Cut a piece of watercolor paper, same size as white piece. Create a watercolor background, here I used Spectrum Aqua markers.
  • Stamp butterflies, here I used butterflies from 2 different sets  "Sellos Postales""Llenas mi vida de...", use different colors or make a match with the colors from the background.
  • Die-cut "hola" from the watercolor piece, reserve the little pieces, then die-cut 3 more pieces from white cardstock, glue them together. Add the white die-cut piece in the watercolor paper, then add the little watercolor pieces to fill the word.
  • Add white and watercolor panels to card base.
  • Add sequins and rhinestones. 

Submitting this project to:
Hope you like it.
Have a fantastic day!!

Saturday, September 12

Skipping Stones Design Tip/Technique Blog Hop

Hello friends! Welcome to the Skipping Stones Tip/Technique Blog Hop!! I have a tip for you today! A super cool and easy one "Repeat stamping" This card is the result of repeat stamping, you just need a wipe and ink in different colors. I used a whole bunch of Memento Dew Drops I have in a little box that doesn't get too much love, I thought why not use this super cute dandelion image in different colors, at first I wasn't too sure, but at the end I loved the result!!

For my project I used Dandelion Dreams
Here is a close up of the image , doesn't look lovely? 
I used Memento Angel Pink, Tangelo, Bamboo Leaves, Sweet Plum, Lady Bug, Love Letter, Dessert Sand, Dandelion, Cabana (SU)


I stamped the saying on a same cardstock color as my card base.


And this is how it looks like!! 


Are you ready to hop along? The Design team has tips/techniques for you! Don't forget to leave a comment as you hop along, one lucky commenter will win a stamp set!! You have until Wednesday September 16 at 5:00PM EST


+++++++++++++++++++++++++

PMS SALE
Purchase More Stamps

Finally it pays to PMS!!!
Buy 1 save 5% enter pms1 at checkout
Buy 2 save 10% enter pms2 at checkout
Buy 3 save 15% enter pms3 at checkout
Buy 4 save 20% enter pms4 at checkout
Buy 5 or more save 25% enter pms5 at checkout
If you have any problems using these codes email me your order
at madebyme33@hotmail.com and I will send you an invoice.

Hope you like my project!
Have fun hopping.

Monday, September 7

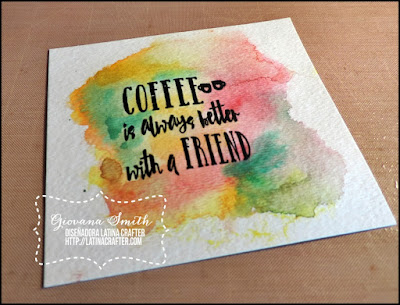
Coffee is always better with a friend

Hi friends! Sorry I've been MIA, I am super busy working on samples for an upcoming event, plus family and work I have enough time to sleep, LOL.

Today, I want to share with you a super easy and fun project. It can be a super cute present, just add a cup of coffee and voila!

For this project I used the frame from March kit and the stamp Coffee is better with a friend.


Few days ago I got this new to me Gansai Tambi watercolors! I am learning how to use them, but I love how vibrant they are!
So I wanted to use them plus a piece of watercolor paper.

Then, I stamped the sentiment in Stazon Jet Black ink and my MISTI for perfect coverage. 

Here is the piece already with the watercolors, I used yellows and reds. 

As a final touch, I added Memento Luxe Wedding Dress to the frame, just bits here and there.

And this is the result!! It took me only 10 minutes to create this.  

Submitting this project to:


Hope you like it!
Have a fantastic day!!


Wednesday, September 2

Gift Card Holder

Hello friends! Happy Wednesday to you all! It's midweek, almost Friday {wink, wink}, well today I don't have a card, I made a super simple gift card holder. I used a just released Prestige Christmas Only Words Dies, here I used O Holy Night.

This gift card holder is super simple, here are the details:


Hope you like it!
Have a fantastic day!

Tuesday, September 1

Joy


Hello friends! Today I have a Christmas card using Skipping Stones Design Stamps, did you know SSD has a challenge going on? yes! and the theme is Christmas!! For my card I used the "Joy" set and got inspired by the sketch from Retro Sketches.


Here are the directions:
  • Create a card base from Gold Cardstock. 5" square.
  • Cut a panel from White Cardstock 4.25" square. Stamp the tree, saying and top swirl in Versamark Watermark ink, add gold embossing powder and heat set.
  • Add thin stripes of red cardstock to the sides.
  • Mist the panel with gold spray.
  • Add red rhinestones.


Submitting this project also to:
Hope you like it!
Have a fantastic day!