Friday, August 31

Wishing you

Hello!! Hope you all are having a fantastic day! August is coming to an end and with it, the season changes, which I really love! Fall is my favorite season, so I decided to create a Fall card using "Leaf Silhouettes" set.
This card is super easy!! I stamped 3 of the leaves on White cardstock in Wild Honey Distress Ink, cut them out and then ink all edges with Spiced Marmalade and Vintage Photo Distress Ink, love the result!
I added stitches all around the card, die-cut 3 scallop edges borders from Patterned paper. Added them to card front, as well as small gold nail heads and a bow with a big gold pearl brad.
I stamped the sentiment on Ivory Cardstock, die-cut it using one of the Decorative Plaque dies. Added to card with foam tape, added the leaves and you are done :)


Products Used on this Project:
I am submitting this card to:

Hope you like it!!
Have a great day!

Thursday, August 30

Holiday Duo Blog Hop

Hello My friends. Today, we have prepared a really nice Blog Hop using new " Holiday Duo Stamps", they are adorable! In addition of that you don't want to miss the great SALE!! that Gina is offering, check out the flyer!!

SaleFlyerlaborday


Here is my card using one of the new Stamp Duos, the snowman is so cute I couldn't resist.

Directions:
  • Make card base from White cardstock.
  • Mat Kraft Cardstock and Patterned Paper "Wishing You Joy", add straight and zig-zag stitches. Add ribbon. Adhere panel to card front.
  • Stamp image on White Cardstock, color it with Copic Markers. Die-cut, emboss and stencil image with Rectangle Nestabilities. Mat piece with Ocean Mist and Kraft Cardstock, add stitches. Add sentiment to right side.
  • Adhere image to card with Large Pop dots.
  • Die-cut and emboss a Poinsettia. Adhere it to card.
gkdtgio350
gkdtgio351


Card recipe:
  • Cardstock: White, Ocean Mist, Kraft, Red Hot (Gina K. Designs)
  • Patterned Paper: Wishing You Joy (Gina K. Designs)
  • Embellishments: Ribbon Rocket Red Stitched, Pearl, Mini Goldhead Nails (Gina K. Designs)
  • Accessories: Rectangle Nestabilities, Layered Poinsettis Shapeabilities (Spellbinders), Pop Dots, Sewing machine.
All the items in bold can be found at Gina K. Designs Store

Important information about this sale:
  • All stamp set duos are 50% off including the four brand new duos, so you can get a jump start on your holiday stamping projects. These duos are available in deeply etched pre-cut rubber only.
  • All Gina K. Designs patterned paper packs are now 25% off including the brand new Winter Wonderland! Stock up now and save!
  • Sale good from Thursday, 8/30/12 through Monday, 9/3/12.

Now, time to hop to:

Hope you like my card!!
Have a great day!

Wednesday, August 29

Doves and Poinsettia

Hello my friends!! I have another Christams card for you, this time with lots of white spaces.

Doves and Poinsettia Card:

Directions:
  • Make card base from White Cardstock (5" square)
  • Cut a panel from White Cardstock (4.5" square), emboss bottom part, add Patterdned paper and add stitches.Tie on gold tinsel, make a bow and adhere panel to card front with Double dots.
  • Stamp image on Watercolor Paper in Archival Black Ink. Color image with Inktense watercolor pencils.
  • Die-cut, emboss and stencil image with Labels 3 Nestabilities.
  • Stamp Poinsettias on White Cardstock, color them with Red Copics. Die-cut, layer images to create a flower. Add a gold brad. Adhere it to card.
  • Add glitter to image and Liquid pearls.


Products used on this project

  • HCPC 3491 Holiday Haven PreCut Set
  • HCPC 3415 Petite Poinsettia PreCut Set
  • HCDP1 225  Frosty Blanket Paper Collection
  • Layered Poinsettia Shapeabilities
  • Labels 3 Nestabilities
  • Gold Brad
  • Antique Rose Pee Wee Glitter Kit
  • Crystal Lacquer
  • Double Dots

Other Products:
  • Cardstock: White (Gina K. Designs), Watercolor Paper (LSS)
  • Ink: Archival Black (Ranger), Inktense Watercolor Pencils.
  • Accessories: Flourish Embossing folder (Provo craft), Gold tinsel (etsy), Red Ruby Liquid Pearl (Ranger)

All the products in blue can be found at the Heartfelt Creations Store

Hope you like it!!
Have a fantastic day!

Monday, August 27

Dear friend

Hello!! Hope you all are having a great Monday! I have been quiet all weekend, well I decided to enjoy it with my family, went to the movies, out for lucnh, ice cream, TV time and relax!! I don't do that very often, but it was great!

Now, onto my project. I made this card using "Latina Crafter" Stamps, this set is called "Mi Flor Favorita" (My favorite flower). The images are really pretty (one of my favorite sets) and if you need a sentiment in Spanish, well Latina Crafter has the perfect ones for you :)

Directions:
  • Make card base from Ivory Cardstock.
  • Mat Pink CS and Patterned paper, add stitches.
  • Add a panel from Ivory Cardstock and a scallop border. Add stitches.
  • Stamp sentiment in Vintage Photo Distress Ink.
  • Tie on ribbon, create a bow with bow-easy and adhere it to card.
  • Stamp flowers on White cardstock in Spun Sugar Distress Ink. Cut them out.
  • Die-cut leaves.
  • Add leaves and flowers to card panel. Add pearls to flowers.
lcgio25
lcgio26


Card Recipe:
Submitting this card:
Also, my daughter started school today, 3rd grade. She was super excited to go to school and take the bus, see her friends and have lunch there, LOL.


Have a great day!

Thursday, August 23

Dulce Vida (Sweet Life)

Hello my friends! Hope you are having a great day! Today I have a card using one of the new sets from Latina Crafter "Dulce Vida", the saying in English says "Sweet Life" and the sketch is from yesterday's Sketch Challenge over at Splitcoaststampers.

Directions:
  • Make card base from White cardstock.
  • Stamp image on White Cardstock in Memento Tuxedo Black, color it with Copic Markers.
  • Create grass with torn paper and sponge it around with Green Ink.
  • Die-cut grass, fence and clouds. Dry-emboss clouds. Adhere grass and fence to card.
  • Mat image panel with Yellow Cardstock. Add stitches.
  • Add clouds to panel.
  • Stamp image on Yellow Cardstock in Brown Ink. Die-cut and emboss piece using Wonky rectangle Dies.
  • Adhere it to card panel. Tie on Twine and make a bow.
  • Add panel to card base.
Dulce Vida
Dulce Vida (close-up)

Hope you like it!
Have a great day!

Wednesday, August 22

Yuletide Doorway

Hello my friends! I have a Christmas card for you today using stamps from the new release by Heartfelt Creations!

Yuletide Doorway Card:

Directions:
  • Make card base from White Cardstock (5.5" square)
  • Cut a panel from Frosty Blanket Paper Collection (5.25' square), ink all edges with Vintage Photo Distress Ink.
  • Adhere Beige Lace tape (bottom) and Seam Binding Ribbon (Top), add piece to card front.
  • Stamp Image on White Cardstock in Memento Tuxedo Black, color image with Copic Markers. Die-cut image with Labels 8 Nestabilities Dies. Using the same die, trace it onto Cranberry cardstock and cut it out. Use this piece to mat it with image panel. Adhere it to card base.
  • Create a mini bow with bow easy, adhere it to image.
  • Add Liquid pearls to wreath and Star Dust Stickles to snow parts.
  • Stamp Lamp Post and lamp on Ivory Cardstock in Vintage Photo Distress Ink. Die-cut images with coordinated dies.
  • Add lamp post and lamp to card.

Products used on this project: 
  • HCPC 3489 Festive Yuletide Doorway PreCut Set
  • HCPC 3488 Decorative Metal Fixtures PreCut Set
  • HCD 725 Decorative Metal Fixtures Die
  • HCDP1 225 Frosty Blanket Paper Collection
  • Holiday Tag Shapeabilities
  • Grand Calibur
  • Labels 8 Nestabilities.
  • Double Dots

Other products:
  • Cardstock: White, Ivory, Cranberry (Gina K. Designs)
  • Ink: Memento Tuxedo Black (Tsukineko), Vintage Photo Distress (Ranger), Markers: "Copics" R29, R46, E35, E37, Y17, YG63, YG95, "Stampin' Up" Creamy Caramel
  • Accessories:Beige Lace Tape (Love My Tapes), Seam Binding Ribbon, Star Dust Stickles, White Opal and Red Ruby Liquid Pearls (Ranger), Bow-easy.

All the products in blue can be found at the Heartfelt Creations Store

Hope you like it!!
Have a fantastic day!

Monday, August 20

Thank you


Hello my friends!! Happy Monday, hope you are starting a great week. Today I have an Autumn card! Honestly I can wait for Fall to be here. First, it's my favorite season and second, no more allergies for my little bundle of joy. she is having a horrible time dealing with her allergies, her eyes and nose are driving her crazy!! Poor thing, she gets sick as soon as we open the door. Boo!!

Anyway, let me show you the card I have for you today.

Directions:
  • Make card base from Ivory Cardstock.
  • Cut a panel from Ivory Cardstock (3.75" x 5"), ink all edges. Add a piece of Patterned paper a green scallop piece and add zig-zag stitches.
  • Score lines on top and bottom of card panel.
  • Die-cut a piece of Ivory Cardstock, stamp sentiment. Add piece to panel with Large Pop dots.
  • Stamp leaves (follow tutorial  HERE), cut them out and add them to panel.
  • Add panel to card base.
  • Create a bow from jute twine and adhere to leaves.
  • Add mini gold head nails.


Card Recipe:
  • Cardstock: Ivory, Green (Gina K. Designs)
  • Paper: Bo Bunny
  • Stamps: Leaf Silhouettes (Sweet 'n Sassy Stamps)
  • Ink: Vintage Photo, Crushed Olives, Dried Marigold (Ranger)
  • Embellishments: Mini gold nailhead, Jute twine, Microfine Transparent Glitter
  • Accessories: Decorative Plaque Dies, Small Scallop border Die (Sweet 'n Sassy Stamps), Sewing machine, Pop dots, Scor-buddy.
I created a tutorial on how to make this pretty glittery leaves, you can check it out HEREI am submitting this card to:

Hope you like it!
Have a great day!!

Friday, August 17

Back to School!

Hello! Today I have a cute "Back to School" card using "Back to School Rhubarb" set. Perfect card for the all the kids that are returning to school! My daughter has 1 more week of Summer Vacation and then school starts! She is super excited to meet her new teacher and new friends. I don't think I ever got this excited to go back to school, LOL.

Directions:
  • Make card base from White Cardstock. Sponge clouds.
  • Cut a piece of patterned paper with flowers and adhere it to card front.
  • Die-cut grass from Green Cardstock. Adhere them to card. Tie on Pink Twine.
  • Stamp Rhubarb on White Cardstock, color it with Copic Markers. Die-cut image with one of the Decorative Plaque Dies and adhere it to card.
  • Die-cut clouds, ink all edges, stamp sentiment and adhere them to card.

Sweet 'n Sassy Products used on this project:
Hope you like it.
Have a great day!!
Giovana

Thursday, August 16

In Sympathy

Hello my friends! Hope you are having a great day! Second post for today :) I have a sympathy card for you, very simple yet elegant.

Directions:
  • Die-cut a couple of pieces of Innocent Oink Cardstock using Floral Oval Nestabilities to form a card.
  • Die-cut a piece of Watercoloring Paper using Oval Nestabilities.
  • Stamp image and sentiment in Black Archival Ink.
  • Color image with Distress Re-inkers.
  • Adhere Oval piece to card with Pop dots.
  • Add  Rhinestones.

Products used on this project:
  • HCPC 3478 Twining Roses
  • HCPC3377 Sympathy Sentiments
  • Oval Nestabilities
  • Grand Calibur
  • Double Dots

Other Products:
  • Cardstock: Innocent Pink (Gina K. Designs), Watercolor paper (Strathmore)
  • Ink: Black Archival (Ranger), for coloring: Bundled Sage Distress, Spun Sugar Distress and Worn Lipstick Distress (Ranger)
  • Embellishments: Say with Rhinestones (Want2Scrap),  Star Dust Stickles (Ranger)
  • Accessories: Floral Oval Nestabilities,  Watercolor Brush (Pentel)
All the products in blue can be found at the Heartfelt Creations Store

Hope you like it!!
Have a fantastic day!

Wednesday, August 15

Gina K. Designs Inspirational Blog Hop Day 3: Sun Kissed Autumn STV Kit and Fall Foliage


The Design Team for Gina K. Designs welcomes you to another fabulous Inspiration Blog Hop!!! Gina and the Design Team will inspire you with many beautiful ideas! And as you hop through their blogs, make sure to leave a comment on each of them because we will choose a few random comments and those stampers will each win a grab bag of deeply etched, pre-cut Gina K. Designs stamps! To see the full list of winners check the Big News forum at Stamp TV a couple of days after the hops!!

Sun Kissed Autumn STV Kit: I love all the images from the new StampTV Kit! Lots of possibilities, I really wanted to create a scene and this is the result :)

Directions
  • Make card base from Ocean Mist Cardstock.(5" x 5")
  • Cut a card panel from White Cardtsock (4.5" x 4.5")
  • Stamp girl image in Memento Tuxedo Black. Stamp mailboxes in Memento Rich Cocoa (this image is from  Country Roads Set)
  • Create the valley grass with a piece of paper and Peeled Paint Distress Ink. Just sponged around the edges, after using PPDI, add a little bit of Weathered Wood and Vintage Photo Distress Ink.
  • To create the grass: Stamp grass part from the mailboxes image (from Country Roads Set), just color that part with a Marker and stamp it several times :)
  • Color images with Copic Markers.
  • Stamp sentiment in Black Ink (Archival)
  • Paper pierced the top half part of the panel.
  • Die-cut clouds, ink all edges and add it to card.
  • Create a bow with the bow-easy and adhere it to card.

Card Recipe
  • Cardstock: Ocean Mist, White (Gina K. Designs)
  • Stamps: Country Roads (Gina K. Designs)
  • Ink: Peeled Paint Distress, Weathered Wood Distress, Vintage Photo Distress (Ranger), Memento Tuxedo Black, Memento Rich Cocoa (Tsukineko), Copic Markers.
  • Embellishments: Seam Binding Ribbon.
  • Accessories: Bow-easy, Pop dots, Cloud dies (SNSS), Paper piercing set

-------------------------------------------


Fall Foliage: This is the new "Free with 3" Set!!

Directions:
  • Make card base from Ivory Cardstock. A2 size.
  • Cut a panel from Chocolate Cardstock. (4" x 5.25")
  • Cut a panel from Ivory Cardstock (3.75" x 5"). Mat this with Cholocate piece, add a strip of Patterned Paper  from Sun-Kissed Autumn Collections. Add stitches.
  • Die-cut, emboss and stencil 4x Ivory Cardstock.
  • Stamp leaves on White Cardstock ink Spiced Marmalade and Tea Dye Distress Ink. Cut them out and ink all edges with same color ink and Vintage Photo Distress Ink.
  • Stamp sentiment in Spiced Marmalade Distress Ink.
  • Add squares and leaves to card panel.
  • Add card panel to card base with Medium Pop dots.

Card Recipe:
  • Cardstock: Ivory, White, Chocolate (Gina K. Designs)
  • Patterned Paper: Sun-Kissed Autumn Collection (Gina K. Designs)
  • Ink: Spiced Marmalade, Tea Dye, Vintage Photo (Ranger)
  • Accessories: Squares Nestabilities (Spellbinders), Medium Pop dots, Sponges, Sewing machine.

All the items in bold can be found at Gina K. Designs Store


Thanks for stopping by!
Have a great day!!

Tuesday, August 14

Gina K. Designs Inspirational Blog Hop Day 2: Light Hearted Wishes, American Made and Stippled Nature


The Design Team for Gina K. Designs welcomes you to another fabulous Inspiration Blog Hop!!! Gina and the Design Team will inspire you with many beautiful ideas! And as you hop through their blogs, make sure to leave a comment on each of them because we will choose a few random comments and those stampers will each win a grab bag of deeply etched, pre-cut Gina K. Designs stamps! To see the full list of winners check the Big News forum at Stamp TV a couple of days after the hops!!

Light Hearted Wishes: Fantastic set illustrated by Tami Mayberry.

Directions:
  • Make card base from White cardstock. Stamp sentiment in Black Ink.
  • Stamp bulb image on White Cardstock in Memento Tuxedo Black. Color image with Copic Marker. Die-cut, emboss and stencil image with Rectangle Nestabilities.
  • Die-cut and emboss a piece of Wild Dandelion Cardstock with Fleur de Lis Nestabilities. Mat this with image.
  • Add image to card.
  • Add folded ribbon to bottom of card. Add Mini gold headnails.

Card Recipe:
  • Cardstock: White, Wild Dandelion (Gina K. Designs)
  • Ink: Memento Tuxedo Black (Tsukineko), Copic Markers.
  • Embellishments: Dandelion Grosgrain Ribbon, Mini gold headnails, Star Dust Stickles (Ranger)
  • Accessories: Rectangle Nestabilities, Fleur de Lis Rectangle Nestabilities (Spellbinders), Large Pop dots, Scor-tape.
----------------------------------

American Made: Beautiful set illuestrated by Becky Oehlers. I am going to be using this set a lot to create cards for Operation Write Home :)

Directions:
  • Make card base from In the Navy cardstock.
  • Cut a panel from Red Hot Cardstock.
  • Cut a panel from White Cardstock. Stamp image in Navy and Red ink. Stamp stars at the bottom of white piece with Aged Mahogany Distress Ink.
  • Adhere red stirched ribbon around.
  • Cut out front image and adhre it to card panel with Pop dots.
  • Adhere card panel to card front.

Card Recipe:
  • Cardstock: In the Navy, Red hot, White (Gina K. Designs)
  • Ink: Barn Door Distress, Aged Mahogany Distress (Ranger), Navy (Ink It Up).
  • Embellishments: Red Stitched Ribbon (Gina K. Designs)
  • Accessories: Pop dots, Scor-tape.
----------------------------

Stippled Nature: This set is full of really nice of bold images! First set designed by Beth Silaika

Directions
  • Make card base from White Cardstock.
  • Cut a piece of White Cardstock (3.75" x 5"). Stamp leaves in Memento Summer Sky. Ink only edges of leave image with Memento Bahama Blue Ink. I intentionally stamped them off-set.
  • Mat this piece with a slightly bigger piece of Blue Raspberry Cardstock.
  • Stamp leaves onto Vellum paper in Memento Bahama Blue Ink, let them dry and cut them out.
  • Stamp Sentiment on White Cardstock in Memento Danube Blue. Die-cut, emboss and stencil it with Fancy Tags Two Dies.
  • Add sentiment to card with Large Pop Dots.
  • Add Vellum leaves to card. Add a little bow from Lemondrop twine.

Card Recipe
  • Cardstock: White, Blue Raspberry (Gina K. Designs), Vellum (LSS)
  • Ink: Memento Summer SKy, Memento Bahama Blue, Memento Danube Blue (Tsukineko)
  • Embellishments: Lemon Drop Twine (The Twinery)
  • Accessories: Fancy Tags Two (Spellinders), Large Pop dots.

All the items in bold can be found at Gina K. Designs Store


Now, check out all the amazing designs and inspiration: 
Thanks for stopping by!
Have a great day!!

Monday, August 13

Gina K. Designs Inspiration Blog Hop Day 1: Basket Additions 3 and Country Roads


The Design Team for Gina K. Designs welcomes you to another fabulous Inspiration Blog Hop!!! Gina and the Design Team will inspire you with many beautiful ideas! And as you hop through their blogs, make sure to leave a comment on each of them because we will choose a few random comments and those stampers will each win a grab bag of deeply etched, pre-cut Gina K. Designs stamps! To see the full list of winners check the Big News forum at Stamp TV a couple of days after the hops!!


Basket Additions 3: Super cute set, Melanie has done it again :)

Directions:
  • Make card base from Kraft Cardstock. 5" square card.
  • Add stitches to card front.
  • Cut a panel from Cranberry Tart (4.25" square), ink all edges with White Ink.
  • Die-cut a piece of Patterned Paper with Beaded Squares Nestabilities.
  • Stamp images (basket from Holiday Basket Set) on White Cardstock in Memento Tuxedo Black, color images with Copic Markers. Die-cut, emboss and stencil image with Square Nestabilities.
  • Mat pieces and adhere them to card base.
  • Stamp sentiment on White Cardstock in Aged Mahogany Distress Ink. Die-cut and emboss it with Gromment tags.
  • Add tag to card with twine.

Card Recipe
  • Cardstock: Kraft, White, Cranberry Tart (Gina K. Designs)
  • Patterned Paper: Road Map (October Afternoon)
  • Ink: Memento Tuxedo Black (Tsukineko), Aged mahogany Distress (Ranger), White Craft Ink (JoAnn's), Copic Markers
  • Embellishments: Beige Lace, Twine (The twinery)
  • Accessories: Square Nestabilities, Beaded Square Nestabilities (Spellbinders), Crystal Lacquer, Scor-tape, Sewing machine
------------------------------------------------


Country Roads: I love this new set by Theresa Momber. It's looks a lot like the small country are I live now. Actually, we used to own a truck just like this one, but it was turquoise/aqua color. It belonged to my FIL and it was a lot of fun to have it.

Directions:
  • Make card base from Ivory Cardstock.
  • Paper pierced opposite corners.
  • Stamp images on Watercolor Paper in Black Archival Ink. Color images with Inktense Watercolor Pencils.
  • Die-cut, emboss and stencil farm image with Labels 8 Nestabilities.
  • Cut out truck.
  • Stamp sentiment on Watercolor Paper in Vintage Photo Distress Ink. Die-cut, emboss and stencil it with Labels 14 Nestabilities.
  • Add images to card front.
  • Die-cut fence on Brown Cardstock. 

Card Recipe:

  • Cardstock: Ivory (Gina K. Designs), Brown, Watercolor (LSS)
  • Ink: Vintage Photo Distress, Black Archival (Ranger) , Inktense Watercolor Pencils.
  • Accessories: Labels 8, Labels 14 Nestabilities (Spellbinders), Fence die (SNSS), Paper piercing set, Pop dots, Scor-tape.
All the items in bold can be found at Gina K. Designs Store
Now, check out all the amazing designs and inspiration: 
Thanks for stopping by!
Have a great day!!

Saturday, August 11

You fill my life with... LOVE

Hello my friends!! Today I am blogging over at Latina Crafter, but since the post there is in Spanish, I want to share it here as well in English :)

For today's card I am using  one of the new sets for the August Release! This set is called "Llenas mi vida de.." (You fill my life with..) This set is super cute, full of nice images and sentiments.

Directions:
  • Make card base from Pink Cardstock. (A2 size)
  • Cut a panel from Kraft Cardstock. (3.25" x 4.5") Stamp the sentiment in Versamark Ink and add White Embossing powder. Heat it up.
  • Add Kraft panel to card base and add zig-zag stitches. Tie on ribbon and add a bow.
  • Stamp hearts on Ivory Cardstock in Barn Door Distress Ink and bottle in Aged Mahogany Distress Ink, cut them out.
  • Add Lace Washi Tape to tag.
  • Attack some Lace and Twine to bottle image. Add hearts to  tag with small pop dots. Add bottle to tag.
  • Add extra hearts to card.
  • Add pearls.

Card Recipe:
Hope you like it.
Have a fantastic day!!

Thursday, August 9

Congratulations

Hello my friends! Today I have a very CAS card for you. Using Latina Crafter products! Now, they are carrying Washi tape and I got these 2 and couldn't resist to make a simple card for you. The sentiment says: "Congratulations niece"

Directions:
  • Make card base from Pink cardstock.
  • Cut a card panel from White Cardstock (3.75" x 5"), adhere washi tapes.
  • Stamp sentiment in Vintage Photo Distress Ink.
  • Add panel to card base.
  • Add mini gols headnails.
  • Add crocheted flower and a gold brad.

Card Recipe:

Hope you like it!!
Have a fantastic day!

Wednesday, August 8

I'm so glad I have you

Hello my friends! Hope you are having a great day! I apologize for my lack of posts, I am working really hard on Design Team assignments and other surprises I have for you. From today, you will find a post every day (except weekends) for the next 2 weeks!
Anyway, today I am hosting a challenge over StampTV, so check it out there and hope you can play along with me :)

I have a pretty card for you today! using the Heat Embossing technique. I used to use it a lot when I started stamping, this time I combined it with some watercoloring, love the results!!

For my card I stamped the image from "Seeds of Kindness" set on White Cardstock in Versamark Ink and added White Embossing powder, I colored it with Distress Inks : Peeled Paint, Tumbled Glass and Victorian Velvet. Then die-cut and embossed the image with Circle Nestabilities and matted it with Scallop Circles Nestabilities.
The Patterned Paper is from "Petals & Wings" by Gina K. Designs.


I am submitting this card to:
Hope you like it!
Have a great day!

Tuesday, August 7

Heartfelt Creations Release Time "Ornamental Light Collection"

Hello! Heartfelt Creations is pleased to introduce the Ornamental Light Collection. This collection is a refreshing twist to the traditional Christmas genre. The Decorative Metal Fixtures Die compliments the ornamental lights, and cheerful Christmas themed stamps giving easy detail and decoration to any project. There are 6 new PreCut Stamp Sets, one 12x12 Paper Collection, and one beautiful new exclusive Spellbinders die designed for Heartfelt Creations.


Christmas Yuletide Candle

Directions:
  • Stamp image on White Tissue Paper in Memento Tuxedo Black.
  • Color image with Markers and set to dry.
  • Cut out image, leaving an inch extra white paper around the the edge of the image.
  • Cover image with wax paper and heat it up using embossing heat gun. The tissue paper will melt into the candle.
  • Add stickles and liquid pearls after the candle has cooled off.


Products Used on My Project:
  • HCPC 3489 Festive Yuletide Doorway PreCut Set

Other Products:
  • White Candle
  • White Tissue Paper. Wax Paper
  • Ink: Memento Tuxedo Black (Tsukineko)
  • Accessories: Markers: Stampin' Up: Ruby Red, Creamy Caramel; Copic Markers: C01, E20, R27, R35, R80, E37, YG95.Star Dust Stickles, Ruby Red Liquid Pearls, Embossing heat gun

--------------------------
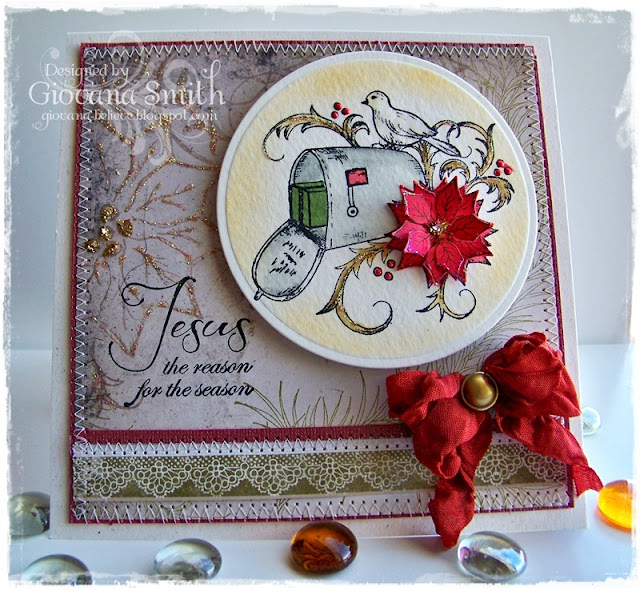
Jesus the reason for the season

Directions:
  • Make card from Neutral Cardstock. 6" square.
  • Mat Red Carpet Cardstock and Patterned Paper. Add stitches. Adhere it to card base.
  • Stamp Sentiment in Black Ink.
  • Add glitter and gold gala glitz to poinsettia from Patterned Paper.
  • Stamp image on Watercolor Paper, color it with Watercolor Pencils. Die-cut, emboss and stencil image with Circle Nestabilities.
  • Stamp Poinsettias on White Cardstock, color them with Copic Markers and die-cut them.
  • Adhere image to card base with Double Dots.
  • Adhere layered poinsettia and add Gold Gala Glitz.
  • Add glitter to image.

Products used on this Project:
  • HCPC 3490 Holiday Mail PreCut Set
  • HCPC 3493 Yuletide Sentiments PreCut Set
  • HCPC 3415 Petite Poinsettia PreCut Set
  • HCDP1 225 Frosty Blanket Paper Collection
  •  Layered Poinsettia Shapeabilities
  • Circle Nestabilities
  • Grand Calibur
  • Antique Rose Pee Wee Glitter Kit
  • Gold Gala Glitz
  • Gold Pearl Brad
  • 3-D Crystal Lacquer
  • Designer Dries Clear Glue
  • Metal Glue Tip
  • Double Dots

Other Products:
  • Cardstock: Neutral (Stampin' Up), Red Carpet (Bazzill), Watercolor Paper (LSS)
  • Ink: Black Archival (Ranger), Derwent Inktense Watercolor Pencils.
  • Accessories: Seam Binding Ribbon (etsy), Sweing machine, Scor-tape.
All the products in blue can be found at the Heartfelt Creations Store

BIG GIVEAWAY ALERT!!! Leave a comment on the Heartfelt Creations blog by August 14th and you will be eligible to win the entire release valued at $145.92

Hope you like my creations!
Have a great day.

Friday, August 3

Best Wishes

Hello my friends! Hope you all are having a nice Friday. Mine is pretty good so far :) Today I am going to craft while my daughter plays with her friend. I know I will have a lot of "mom, can I do this", "mom, can I eat that", LOL, but that's ok. I love my child and I love my crafty time too.

So, today I have a card I made for "Dare to Get Dirty", have you checked it out yet? Lots of prizes and fantastic challenges!!

My card has a pretty cool flower, do you like it? I made the flower with Coffee filters!!

Instructions:
  • Form a 5 x 5-inch card from Ivory Cardstock.
  • Cut a 4.5 x 4.5-inch piece of Cranberry Tart.
  • Cut a piece of Patterned Paper smaller than Cranberry Tart piece.
  • Punch a piece of Coordinated Patterned Paper using Loops punch. Adhere it to previous piece and add stitches.
  • Stamp sentiment in Aged Mahogany Distress Ink.
  • FLOWERS: Flat as much as possible a couple of coffee filters. Mist them with Candy Apple Glimmer Mist, wait few minutes to dry. Stamp flowers and then cut die-cut them with coordinated dies. Assemble flowers from biggest to smaller. Add a brad and add to card.
  • Add twirl pearls.

Card Recipe:
  • Cardstock: Ivory, Cranberry Tart (Gina K. Designs)
  • Patterned paper: Lost & Found Two "Blush" (My Mind's Eye)
  • Stamps: HCPC 3474 Heartfelt Expressions, HCPC 3468 Tattered Blossoms (Heartfelt Creations)
  • Ink: Aged Mahogany Distress (Ranger), Candy Apple Glimmer Mist (Tattered Angels)
  • Embellishments: Etcetera Brad (Bo Bunny),  Say it with Pearls (Want2Scrap), 
  • Accessories: HCD 722 Tattered Blossoms Die (Heartfelt Creations), Loops Punch (Martha Stewart Crafts), Sewing machine, Scor-tape, Grand Calibur
Hope you like it!
Have a great day!

Thursday, August 2

Sweet 'n Sassy "August Release Time"


Welcome to the Sweet 'n Sassy Stamps August Release Celebration!  All of the Design Divas are excited to kick things off today with a fun blog hop full of inspiration using the sets that will be available for purchase in the store right now!!!! Yes! you read that right, the new stamps are available in the store right now, you don't have to wait until later for that!
Also, this month we have a New Release Celebration Format, lots of challenges and more chances to win free stamps.
Here are the projects I have for you today:

Back to School Rhubarb: This set has a couple of beautiful Rhubarb images and fantastic sayings!

Directions:
  • Make card base from White Cardstock. 5" square card.
  • Mat a piece of Red Cardstock and Patterned Paper. Add stitches.
  • Stamp Rhubarb image on White Cardstock in Memento Tuxedo Black. Color it with Copic Markers. Die-cut image with Decorative Plaque Die.
  • Stamp saying on Green Cardstock in Barn Door Distress Ink. Die-cut it with Banner Die.
  • Die-cut a Mini Scallop Border and adhere it to card panel. Tie on ribbon, and create a triple bow with bow-easy. Adhere it to card.
  • Add die-cut image and sentiment to card with Pop dots.
  • Add Crystal Lacquer to backpack, apple and heart nose.

Card recipe:
  • Cardstock: White, red and Innocent Pink (GKD)
  • Patterned Paper: Hometown Summer (Pink Paislee)
  • Stamp: Back to School Rhubarb (Sweet 'n Sassy Stamps)
  • Ink: Memento Tuxedo Black (Tsukineko), Barn Door Distress (Ranger)
  • Embellishments: White Seam Binding Ribbon
  • Accessories: Banner Dies, Scallop Border Die, Decorative Plaque Die (Sweet 'n Sassy Stamps), Sewing machine, Bow-easy, Pop dots.

-----------------------------------------------

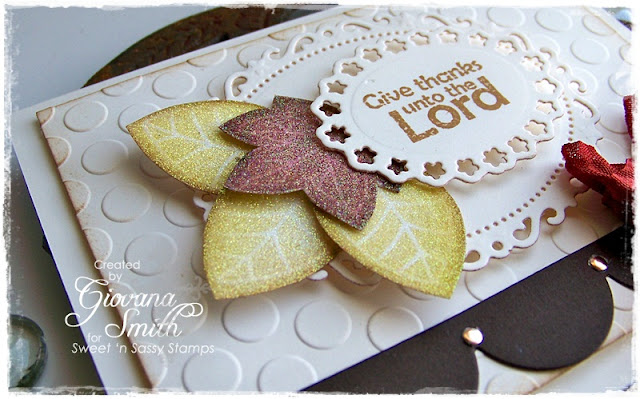
Leaf Silhouettes: I love this set!! Fall is my favorite season and this set is going to make my Thanksgiving projects a lot easier :) I created this "Glittery leaves", they are super easy. I am planning on making a Tutorial to any one who wants to learn how to make this.

Directions:
  • Make card base from Ivory Cardstock. A2 size.
  • Cut a panel from Ivory Cardstock (5" x 3.75"). Emboss panel with Seeing Dots Embossing folder and ink all edges.
  • Die-cut a Big Scallop border in Chocolate cardstock. Adhere it to card panel.
  • Stamp sentiment on Ivory Cardstock in Vintage Photo Distress Ink. Die-cut and emboss it with Floral Oval Nestabilities.
  • Die-cut and emboss a bigger Floral Oval piece.
  • Leaves: Cover a piece of White Cardstock with a piece of Tape Sheet. Apply Shell White Microfine Transparent Glitter. Stamp leaves direct on glitter. Cut them out and ink all edges.
  • Adhere big Oval piece to card panel. Add leaves and sentiment.
  • Create a triple bow with bow-easy, add a green pearl brad and adhere it to card panel.
  • Add panel to card base and tiny gold nail heads to scallop piece.

Card Recipe:
  • Cardstock: Ivory, Chocolate (GKD)
  • Stamps: Leaf Silhouettes (Sweet 'n Sassy Stamps)
  • Ink: Vintage Photo Distress, Walnut Stain Distress, Peeled Paint Distress (Ranger)
  • Embellishments: Mini gold headnails, Green Pearl Brad (American Crafts), Seam Binding Ribbon (Etsy)
  • Accessories: Large Scallop Border Die (Sweet 'n Sassy Stamps), Floral Oval Nestabilities (Spellbinders), Seeing Spots embossing folder (Provo Craft), Shell White Microfine Transparent Glitter (Art Glitter)
Here is the list of participants:


Hope you like my creations.
Have a fantastic day!!