Friday, October 30

Sweet friend

Hello friends!
I have a  sweet card for you today!

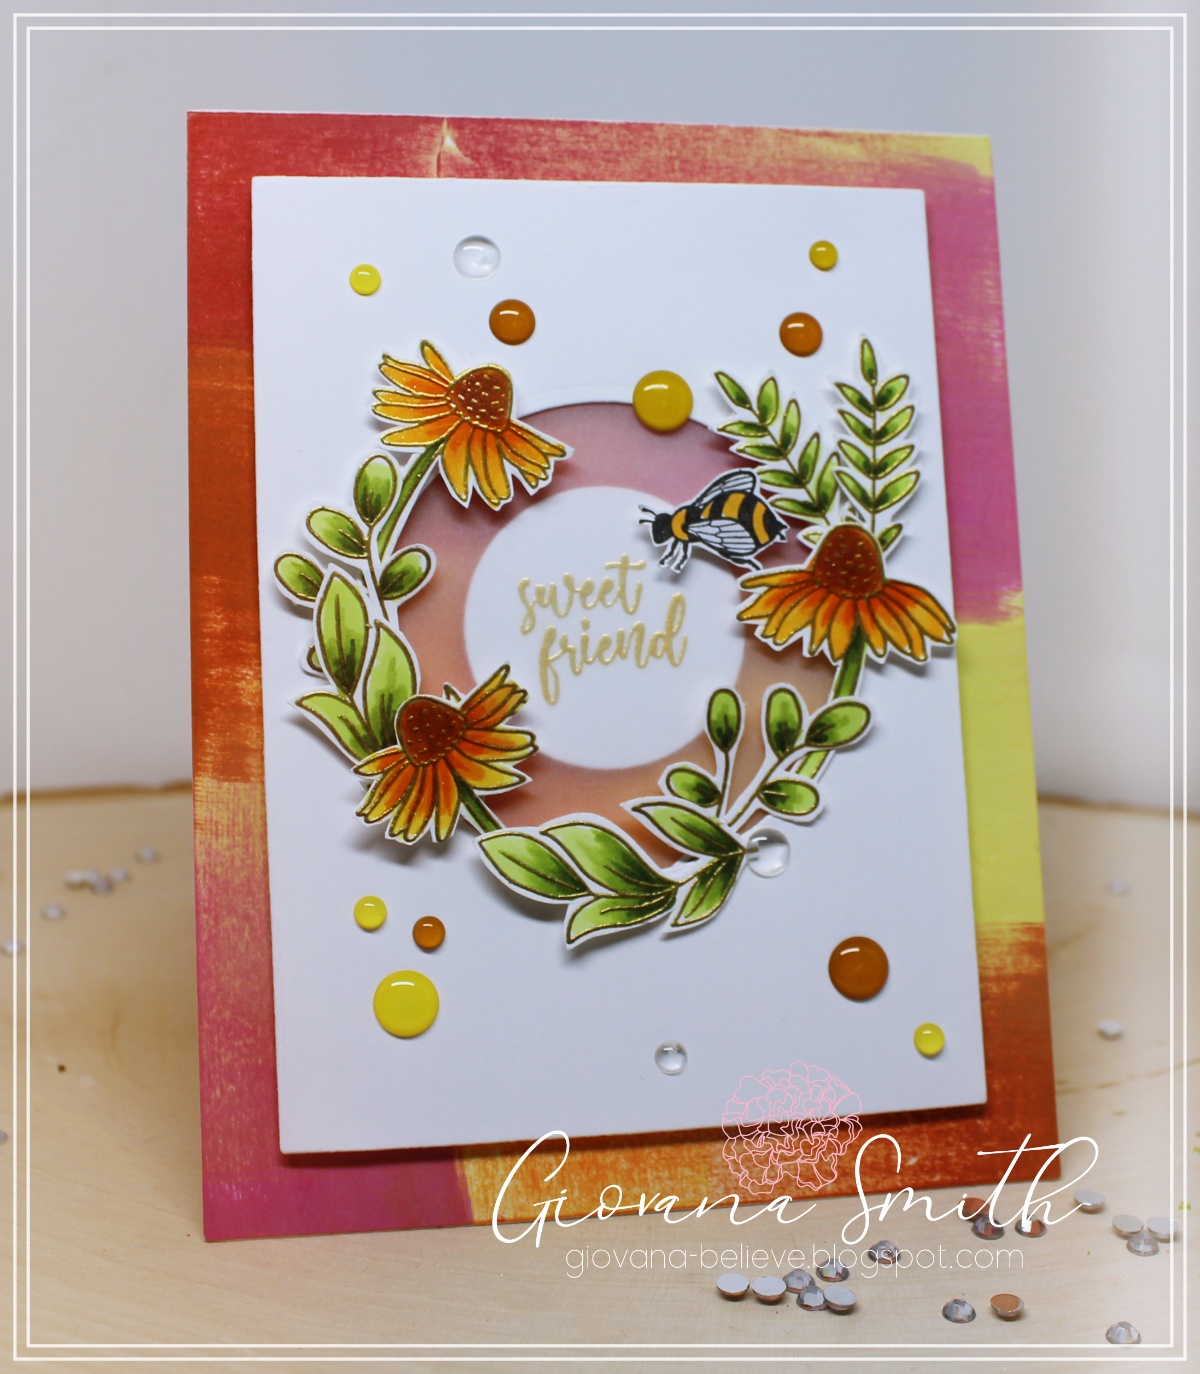
For this card I used the new Sweet as Honey set from the Buzzworthy Collection from Spellbinders!
I used few of the stamps from this set, so cute and lots of possibilities.

Details:
Stamp images on white cardstock in light ink color, color them with marker, I used Copics here.
Do not remove images from your Misti, you will restamp the images again with versamark watermark and gold embossing powder, let fussy cut out them.
On a white card base, just drag your ink pads, have fun! Doesn't have o be perfect, love this way to make my own backgrounds.
Die-cut a circle on a white cardstock panel, adhere images around.
Die-cut a small circle and stamp Sweet friend in Versamark Watermark and gold embossing powder.
Adhere a piece of vellum behind the white panel
Adhere sentiment on card base, then adhere white panel with foam tape.
Adhere the little bee on vellum side.
Add enamel dots to embellish.


Entering this project to:

Hope you like it.
Have a wonderful day!

Wednesday, October 28

Die-cut Obsession: May your days


Hello friends!

The Impression Obsession Design Team have set aside a couple days a month to share some fabulous new Impression Obsession die projects! Have fun checking out what our Designers have made today. Today's participants can be found on the Impression Obsession Blog.

I have a super cute and easy with non Christmas colors card!
For this card I used the Merry Word Block Die.

Details:
Adhere Stick-It on white cardstock, then die-cut the Merry Word Block twice.
Peel backing and adhere them together, gently mist Shimmer Gold Spray and set aside to dry.
On a white cardstock piece, blend Worn Lipstick, Wilted Violet and Broken China Distress Oxide Inks.
Mist Shimmer spray to blended panel.
Die-cut panel with biggest Checkered Frame Die.
Adhere panel to a white card base.
Adhere Merry Word Block to panel.
Embellish card to enamel dots.


Hope you like it!
Have a wonderful day!

Saturday, October 24

Thanks!

 Hello friends!
Happy Saturday to you all!

Today I have a super quick and easy Fall card for you!
Fall colors are my favorite, and I have been enjoying them all around this new neighborhood.
Here few pictures of my Milo and the lovely trees from the neighborhood and my backyard :)


Anyway, details for this card:
Fussy cut out leaves.
Die-cut Large Frame in patterned paper and mustard cardstock.
Cut a piece of copper glitter cardstock and adhere it behind mustard piece.
Adhere Large frame on front of white card base.
Adhere center part with foam tape.
Adhere leaves with foam tape.
Die-cut sentiment from Alphabet Typewriter LC in brown cardstock
TIP: Adhere Stick-It on back of cardstock before die-cutting, then peel the backing and ready to adhere it to your card.
Embellish with enamel dots.


Hope you like it!
Have a wonderful day!

Friday, October 23

Bee Happy

Hello friends!!
How are you doing today?!
I hope you are staying safe and healthy, maybe enjoying the cool weather, 
over here the weather is changing, getting a lot cooler and pretty Fall colors.

I am happy to share with you this project using the new Sweet as Honey stamp set from 

FSJ Buzzworthy Collection.


This collection is so pretty! 
The Sweet as Honey set is the one I used for this card.
I made a slimline card and I love hw it turned out!!

Details:
Stamp the big flower on white cardstock in light ink, color image with markers,
here I used Copic markers and clear Sparkle to add the shimmer to image.
After image is colored, put it back on your MISTI and stamp it with Versamark Watermark and add gold embossing powder, heat set.
Fussy cut out image and set aside.
Stamp the honeycomb in yellow and then add little bits of light brown to the image
and re-stamp image.
Stamp sentiment.
Adhere flower with foam adhesive.
Embellish card with enamel drops.


Hope you like it!

And before I go, Spellbinders has a sale going on!
The Bonus Clearance Sale!
Bonus Clearance Savings Additional 15% off

Have a wonderful day!

Wednesday, October 21

Old is New: Spooky!


Hello friends!
Sometimes we get so busy with new released stamps that we forget about our old favorites. The Impression Obsession team has set aside a couple days a month to share some new projects using some great older stamps. You can see the list of today’s participants on the Impression Obsession blog.

I have a spooky card for you, well not really spooky, actually it's cute ;)
I got inspired by the colors from the new Art Nudge.

Details:
Stamp the cute Jarkin and Starkin pumpkin images on white cardstock in Chocolate Ink.
Color images with markers, I used Copics. Fussy cut images.
Stamp Grunge Web on white cardstock in Versamark Watermark Ink, add white embossing powder and heat set.
Blend Rusty Hinge Distress Ink on panel.
Die-cut a Button Card Tag in Vellum cardstock and adhere it to panel.
Tie ribbon on tag.
Die-cut Spooky from Halloween Stitched Words in copper glittery and black cardstock.
Adhere panel to a kraft piece and adhere it to a ivory card base.
Adhere pumpkins to card with foam adhesive.
Finally embellish card with black enamel dots.


Hope you like it.
Have a wonderful day!

Friday, October 16

Impression Obsession Slim Scenes Hop Day 2


The Impression Obsession Slim Scenes Stamps Release Hop starts today!
Each day (October 15th & 16th) you can find a list of participants h on the Impression Obsession Blog at 6am.
There will be THREE $25 Impression Obsession Gift Certificates as giveaways chosen randomly from comments on the Design Team blogs over the hop - so the more you comment through our Slim Scenes Hop the more chances to win!
All comments for all of the event days will be open until Monday November 2nd at midnight CT.
All winners will be announced on Tuesday, November 3rd.
All of the new stamps and dies are available now! You can find them all HERE.

Warm Winter Wishes
Very simple, just add your favorite dies and your card is done!
Details:
Stamp Snowy Night on white cardstock in Navy Ink.
Stamp Warm Winter Wishes in Versamark Watermark , then add Gold Embossing Powder.
Rub white pigment ink around the saying.
Die-cut trees from Three tree dies in white cardstock and patterned paper.
Die-cut Cute Truck in patterned paper and silver cardstock.
Glue Shaved Ice on the white snowy part, then adhere dies with foam tape.
Adhere panel to a 3.5" x 8.5" white card base.


Being there
This card was made in no time!!
Details:
 Stamp Cloudy Sky on white cardstock in Baby Blue Ink, you need to stamp it 2 or 3 times.
Stamp the Mountain Layers in 3 different colors, here I used Ocean, Teal and Peacock Ink.
Stamp Being there sentiment in Navy Ink.
Adhere panel to a white card base.
Add a frame.