Saturday, October 4

It's World Card Making Day!!


Hello friends! Hope you all joined the celebrations for World Card Making Day! Today, I played with a couple of challenges from Latina Crafter. I really tried to play and joined more challenges, but sadly a bad headache sent me to take a nap and relax for awhile.

Now, I want to show you the cards I created with 2 of the 3 challenges posted HERE, each sketch has a theme.

My first card follows the sketch + Christmas theme. I used a piece of gold crafting metal sheet heat embossed the image in black.  The image is from the  "Nativity" set and the sentiment is from "Adorad al Salvador".  For the blackground I used the dot stencil and distress ink to create a soft area.


The second sketch + "Pink" theme. I wanted to create a CAS card and I really love how it turned out. This card was done in no time, I stamped the ribbon in pink ink, then I used a fine black marker to outline the image. I used the dot stencil again to create a bottom border, I used distress inks for this. Then, I stamped the sentiment in red ink, it means "Hope, love, faith" Finally, I added a swirl die-cut panel in pink cardstock, stitches and ribbon and the card was done. The image and sentiment are from "Dando la pelea" set.


I am submitting this card to:

**You can join the celebrations from WCMD over at Latina Crafter. The challenges are open to everybody until October 10th, you can use any products you own** 

Hope you like them!
Have a fantastic day

Friday, October 3

Sweet 16 Invite

Hello friends! It's Friday!! And today I have a fun and sweet card for you using some fun and soon-to-be-released dies from Top Dog Dies!!

For my card I sued the sketch from Sketch Saturday. I wanted my card simple and elegant and I think I scored it :)


I made my card in Spanish "Estás invitado" means "You are invited" and I thought a cute sweet 16 in pink would be perfect.

Here are the details:
  • Make card base from White cardstock.
  • Mat a piece of Pink cardstock and Patterned Paper, add stitches.
  • Die-cut a couple of frames in pink cardstock and one in white.
  • Stamp sentiment on White frame
  • Add ribbon and twine to lower label.
  • Add labels to card panel.
  • Die-cut vintage number in gold metal sheet. Adhere them to white frame with hot glue.
  • Add pearls.


These are the dies I used:

Submitting this project to:
Hope you like it!!
Have a fantastic day!

Falling leaves

Hello friends! Hope you are starting a great day! Fall is here for sure, weather is getting cooler and leaves are falling and changing colors, ahhhh, my favorite season for sure. Do you like Fall? or do you prefer warmer weather? Just curious.

Today, I want to show you a card I made using this beautiful image "Falling Leaves" stamp set by Sweet 'n Sassy Stamps.

Here are the details:
  • Make a card base from white cardstock. A2 size.
  • Cut a card panel from white cardstock, stamp image in orange and red ink.
  • Outline some of the leaves with a fine black markers, then add a little shadow with a white gel pen. Using Distress ink, color the background.
  • Mat piece with a slightly bigger piece of orange cardstock and add stitches.
  • Die-cut a leave from Leaf Silhouettes Die set, stamp coordinated image and sentiment. Ink all edges with Vintage Photo Distress Ink. 
  • Add panel to card base, add leave with foam adhesive.


Hope you like it!
Have a great day!!

Thursday, October 2

Crafter's Companion October Challenge.


Hello friends! Hope  you all are having a great day! I've been  a little bit sickie, just need more hours on the day to "sleep more" and "do less". Oh well, we always can dream about it.

Today, I am bringing you the brand new Crafter's Companion Challenge "Buttons & Bows"

And more fun news, you can use ANY product you have to participate, read all the rules and details HERE.

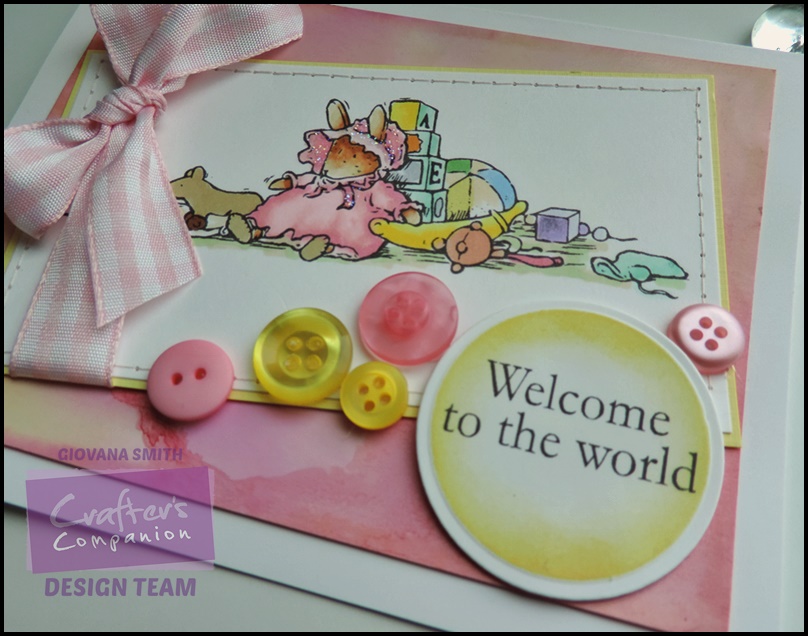
This is the card I created for this challenge, I used a brand new stamp Poppy's Babies from the Brambly Hedge Collection.

Here are the details:

  • Create a card base from Ultra Smooth Premium White Cardstock. A2 size.
  • Cut a panel from Glossy White cardstock (3.75" x 5"), scribble Spectrum Noir Markers CR6, DR5, SB4, PP2 on a plastic bag, spray alcohol on it and then rub your glossy piece to get the colors, set aside to dry.
  • Stamp image on Ultra Smooth Premium Cardstock, color image with Spectrum Noir Markers
    • Mouse: TN1, TN2, TN3, TN4
    • Dress: PP1, PP2, PP3
    • Ball: LY1, TB1, LG3, TN1
    • Cubes: BT1, BT2, CT1, CT2, OR1, IG2
    • Little cube: LV1, HB1
    • Other toys: CT1, CT3, BT1, BT2, EB2, EB3, 
    • Floor: LG2, EB1
  • Stamp sentiment on White cardstock. Die-cut, emboss and stencil it with Circle Dies.
  • Add glossy piece to card base, then add image (I matted it with a yellow piece and added stitches), tie ribbon on image.
  • Add yellow and pink buttons.
  • Add sentiment with foam adhesive.


Submitting this project to:


Hope you like it!!
Have a fantastic day!

Tuesday, September 30

Heartfelt Creations September Alumni Blog Hop

Hello friends! It's time for another Heartfelt Creations Alumni Blog Hop! I made this card last month but never blogged about it and today is the perfect occasion.

This is a 6" x 6" card, and believe it or not super easy to make.

Here are the details:

  • Stamp the Sun Kissed Fleur on a piece of Sun Kissed Fleur Patterned Paper in Versamark ink, then add white embossing powder and heat set.
  • Die-cut flowers with Sun Kissed Fleur Die, ink all edges with Vintage Photo Distress Ink. Mount flowers to create different sizes.
  • Die-cut Leaves Swirl from Gift Ensemble set, paint them with Green Paint.
  • Die-cut a lattice from Raindrops on Roses set in White cardstock.
  • Cut panels from Yellow and Light blue cardstock, Patterned paper. Add them all to card base. Add die-cut pieces, sentiment and sequins.


This is the list of participants:

Don't forget to leave a comment in ALL the blogs participating in this hop for your chance to win a $25 Gift Certificate to Heartfelt Creations Store!
You have until October 3rd midnight (Eastern Time) to leave a comment. Good luck!!

Hope you like my project.
Have a great day and have fun hopping!

Monday, September 29

It's National Coffee Day!

Hello friends!! Hope you all are having a great Monday! Today is a great reason to celebrate, especially is you "love coffee" because "I DO" LOL.

Today, I am participating in a fun blog hop "Coffee Lovers Blog Hop", isn't that fun? Just coffee lovers sharing coffee projects = coffee heaven.


And this is the card I made, I used a set and coordinated dies from Latina Crafter. Sorry about this picture, natural light was not cooperating.

Here are the details:


The saying says: A cup of coffee and you, the best combo

Submitting this project to:
Hope you like it!
Have a great day and drink a cup of coffee ;)

Friday, September 26

You bring great joy to my life

Hello friends! Hope you all are having a great Friday! Today I am sharing with you a pretty card I made using the new Flowers in Bloom Die that coordinates with Flowers in Bloom Stamp Set.
This card is super easy to make, mists and markers and you are good ;)


Here are the details:

  • Make a card base from Light blue cardstock. A2 size.
  • Stamp image on a piece of white cardstock in Memento Tuxedo Black ink. Color image with markers, here I used Spectrum Noir.
  • Die-cut image with coordinate die.
  • Die-cut a cover piece and create a border frame.
  • Die-cut a rectangle piece, mist this piece with green and yellow sprays. 
  • Adhere rectangle piece to frame  with foam adhesive.
  • Then add the flower piece with foam adhesive. Add some sparkle to the flowers with Clear Stella Pencil.
  • Stamp sentiment on a banner, adhere it to card.
  • Add pearls and you are done! 


Are you ready for the a new Sweet Perks Club? The October deals are posted, ger yours before they are gone!! Check them out HERE

Submitting this project to:

Hope you like it!
Have a fantastic day!

Wednesday, September 24

Gift Card Holder Tutorial

Hello friends! Today I am bringing you a super easy and fun tutorial using a couple of new Signature Dies from Top Dog Dies, these dies will be available September 26th.

So let's get started.

  • Cut a panel from Glossy Cardstock 5.75" x 11", fold cardstock piece in half (5.75" x 5.5") and die-cut under the straight line, like creating a card using the Top Dog Die Signature Emerson Die.


  •  From the center line, score at 1" each side, as seen in the picture.


  •  Fold center score line like creating a little book.


  •  At this point you can decorate your gift card holder any way you like. Here I used a  ziploc bag, used 4 Spectrum Noir markers and sprayed alcohol, then rub the front of my gift card holder and set aside to dry, you can check out the tutorial about this technique HERE


  •  Add strong adhesive and closed that side.


  •  Decorate the inside if you wish, here I stamped the sentiment from Birthday Innies set, insert your Gift Card.


To finish the project I tie on fuchsia satin ribbon, I stamped a Happy birthday sentiment on a little tag from Top Dog Dies Mini Tags Die Set, then tied it on the ribbon.

These are the dies I used for this project:
TDD Signature Beatrix Die

TDD Signature Emerson Die


TDDMini Tags Die Set
Submitting this project to:


I hope you like this project!
Have a fabulous day!

Tuesday, September 23

What adventures!

Hello friends! Hope you all are having a great day! Today is the day!! The new Brambly Hedge Collection is here!!
Beautiful images, if you enjoy coloring these sets are for you!!

Today, I am sharing a card I made using The High Hills Set, I really loved how this image turned out. When I colored this image I was picturing a whole family picking apples by the river, and trying to get the ones floating on the river.

Here are the details:

  • Make a card base from Yellow cardstock, this is 6" square.
  • Stamp image on a piece of Ultra Smooth Premium White Cardstock in Black Ink. 
  • Colored image with Spectrum Noir Markers and Blendable Pencils, this is the list of the ones I used:
    • Greens: LG2, LG2, LG3, DG3 / 108
    • Water: IB1, BT1, BT2, TB2, TB3 / 065
    • Boat: TN2, TN3, TN5, TN7 / 101
    • Mice: TN1, TN2, TN3 / 092
    • Leaves: GB6, OR1, DG2 / 057
    • Apples: CR6, CR8
    • Basket: EB2
    • Sky and sun reflection: 067, 014
  • Cut image to 5.75" x 3.5", add a 0.25" strip of orange cardstock and add stitches.
  • Stamp sentiment and die-cut it with circle dies. Die-cut a scallop circle from orange cardstock, adhere it to sentiment piece and add it to the right top corner .
  • Add pieces to card base.
  • Tie-on twine and make a bow.
  • Die-cut a swirl from Leaf Swirl Die, mist it with green color and add it to card.
  • Add Star Dust Stickles to apples and Crystal Lacquer to create some river waves.


Submitting this project to:

Hope you like it!
Have a fantastic day!

Monday, September 22

Thank you!

Hello friends! Happy Monday to you all! I am posting a little late than usual, well, a lot late, but I hope you like this card. I made a card the other day using the September challenge (Sketch + Stitches) from Latina Crafter and I lost it, well, it must be somewhere and I am pretty sure I will find it some day, hopefully soon :)


Anyway, since I needed to make a new one, I decided to add few challenges and something more "Fall"

Here are the details:

  • Make a card base from White cardstock.
  • Cut a panel from Patterned Paper, this one has a newspaper/chevron combo, but I took the dot stencil and added white embossing paste to create more textured.
  • Stamp the image from Prairie/Pioneer Girl on white cardstock in Memento Tuxedo Black, color image with markers, I used Spectrum Noir:
    • Skin: TN2, FS1
    • Hair: TN3, TN5, TN7
    • Dress, Apron, Bonnet: LY1, LY3, OR1, OR3
    • Shoes: EB2
    • Basket: GB3, GB9, BT1
  • Die-cut image using a tag die, ink all edges with Tumbled Glass Distress ink.
  • Die-cut a couple of pieces of short and tall grass from Patterned paper, ink all the edges with Vintage Photo Distress Ink, then add zig-zag stitches to short grass pieces.
  • Mat embossed background panel with a larger piece of orange cardstock and add stitches.
  • Add all pieces to card base.
  • Add ribbon to tag, stickles to bonnet and dress.
  • Die-cut and stamp sentiment on a small banner.


Submitting this project to:
Hope you like it!
Have a fantastic day!

Friday, September 19

Autumn Mum Greetings.

Hello friends! Sharing today a couple of cards I made using the brand new stamp "Autumn Mum Greetings" from Sweet 'n Sassy Stamps.

If you have not had a chance to check out the new stamp sets and dies released by SNSS this month, head on over to the Sweet 'n Sassy Stamps Store to see what's new! 


For my first project, I stamped the mum twice om white cardstock in Memento Tuxedo Black, color them with Spectrum Noir Markers and the cut them out (I didn't have the dies yet). I cut a panel from White cardstock (3.5" x 4.75"), dry emboss about less than 3/4 of the panel, then I color some areas with a fine brush and Distress Inks, added a piece of tape ribbon, hemp and the flowers. I stamped the sentiment on a small tags. Add all pieces to a pink card base. I added few strokes of Clear Wink of Stella to the flower.


For my second card, I kept it very CAS. I stamped the flowers in red and green ink. The sentiment was stamped on a piece of white cardstock and I took advantage of a scrap piece and kept the shape of it, added a piece of dark red cardstock and added stitches. Added more stitches to all the sides and added it to a white card base. Finally, added clear and red rhinestones, super easy!


I am submitting these projects to:
For more gorgeous samples just click on the links below.  
If you have made a card using any of the new stamps and dies from the September Release feel free to add your card to the gallery.  We'd love to see your creations as well!  The Linky List will close on Thursday, September 25, 2014.

Hope you like my projects!
Have a great day!

Thursday, September 18

Congratulations! Sneak peek

Hello friends! Today, I have a sneak peek from a super sweet set, part of the "Brambly Hedge" collection from Crafter's Companion, it will be released next week!!
The image and sentiment are part of the new Poppy's babies set, very cute set, you are going to love all the images in this set :)

Here are the details:

  • Die-cut a couple of pieces of  Pink Cardstock using the Elegant Stamping Frame Die. Score and adhere one piece to create a card base.
  • Stamp the image on a piece of Ultra Smooth Premium White Cardstock in Black Ink.
  • Color image with Spectrum Noir Markers, I used the following:
    • Crib 1: TN3, TN5, FS3, FS6; Mouse: TN1, FS1, FS2; Blanket: FS4, Toy & PJs: LY3
    • Crib 2: TN2, TN4, LY1, LY2;  Mouse: TN1, FS1, FS2; Blanket: CT2, GB6.
    • Crib 3: TN2, TN4, TN5,  Mouse: TN1, FS1, FS2; Blanket and top: TB1, TB2, BT1
    • Floor: BG1, BG2
    • Toys on floor: TB3, LG4, CR4, TN1, FS1, FS2
  • Die-cut, emboss and stencil image with the square die from the Elegant Stamping Frame Die set. Tie on ribbon.
  • Cut a slightly bigger square piece from patterned paper and adhere it to card base.
  • Add image to card base with circle foam adhesive. 
  • Stamp sentiment, die-cut it and adhere to image with foam adhesive.
  • As a final touch add Stickles to cribs

Submitting this card to:

Hope you like it.
Have a great day!

Wednesday, September 17

BOO Brooch!! + Tutorial

Hello friends! Happy Wednesday! I am heading outside to do yard work before the weather changes it to COLD in no time, yes, that happens every year, so far this week has been really pleasant. I think today it going to be the last mowing  of the season, and also time to harvest all the pumpkins and any other vegetable, my kitchen counter is already full {wink, wink}

Ok, today I have a very cool and different project, I created a brooch using Top Dog Dies. I had fun making this project and I hope you like it! I used felt, but this can be easily translate into a paper project.


  • Sew border together, then pull the sides to give the shape you want.


  • Sew the orange pieces , one of each side of the purple border.


  • Glue the cat and the word BOO, add cheese cloth to back, black ribbon and create a bow with orange ribbon. 

Here is my daughter with the brooch put on her t-shirt. You can add it to your purse or backpack! 


Hope you like it!
Have a fantastic day!!