Friday, March 18

Gina K. Designs Release Inspiration Hop: Celebrate in Style & Stenciled Silhouettes

Welcome to the Gina K. Designs Release Inspiration Hop!  We are excited to share with you two of the stamp sets released last night "Celebrate in Style" which is free with $35.00 or more purchase and available only this month and "Stenciled Silhouettes" which is out Free with Three, get 3 Gina K. designs sets and you get this for free!!!

Celebrate in Style

Directions:
  • Make card from White cardstock.
  • Mat Wild Dandelion and Patterned Paper (from the new StampTV kit), ink all edges of PP and add zig zag stitches. Adhere to card.
  • Die-cut and emboss a piece of Wild Dandelion using Label 3 Nestabilities.
  • Stamp image on White cardstock in Memento Tuxedo Black. Stamp the image twice on Patterned Paper, add some shade with Copic Markers. Cut them out and glue first image, then glue only top part of second image, add small pop dots on bottom part. Add Star Dust Stickles on top of dress. Die-cut, emboss and stencil it with Circle Nestabilities.
  • Adhere image to Label die-cut. Adhere to card with Pop Dots.
  • Add Pearls in each corner.
  • Stamp sentiment on White cardstock in Vintage Photo Distress. Die-cut, emboss and stencil with Fancy Tags Dies. Adhere to card with Foam tape.
  • Add Seam binding Ribbon.

Card recipe:

Stenciled Silhouettes.

Directions:
  • Make card from Lemon Drop Cardstock.
  • Create a front base with White Cardstock and Patterned Paper. Punch bottom corners. Ink all edges.
  • Adhere ribbon and folds. TIP: In order to make a perfect smooth fold, after folding your ribbon, add tiny bits of Fabric-Tac Adhesive, it dries really fast and makes your fold nice and even :)
  • Tie twine bow in button and adhere to card.
  • Stamp sentiment.
  • Stamp image on White cardstock, use Glue pad, add glitter.
  • Die-cut, emboss and stencil image with Label 8 Nestabilities.

Card Recipe:

For even more samples of these new sets, please visit each of the GKD Design Team blogs listed below and leave a comment. The more blogs you comment on, the more chances you have of winning!  Tomorrow, Gina will announce on her blog the randomly chosen winners who will each win one of these fabulous new stamp sets!

Hope you like my projects!
Have fun hopping :)

PS: Today is my sweet Rebecca's birthday!! She is turning 7! I am a proud mama :)

Thursday, March 17

Tonight is Gina K. Release Party!! and a sneak peak

Hello my friends!! Have you heard the news? Yes, StampTV is turning 2!! and to celebrate, we are having a Release" Party tonight with a brand new StampTV kit!!Awesome sets will be revealed, videos, contests, challenges! It is going to be awesome.

Now, let me show a sneak peak of one of my creations I will be showing you tonight.


Yes, I know I am a teaser :). Don't forget, the party is at StampTV 7-9 pm Central Time. We will be there :)

Wednesday, March 16

Heartfelt Creations projects :)

Hello my friends! Hope you are having a great day! Today is Wednesday and I have some pretty cards using Heartfelt Creations stamps.

Framed Scene

Directions:
  • Make card from Silver cardstock. 4.75" square.
  • Stamp image from HCPC 3369 Outside My Window PreCut Set on White Cardstock in Memento Tuxedo Black. Color image with Copic markers: YG63, YG95, C1, C3, B000, B23, BG15.
  • Mat image with a piece of Black Cardstock. Add to card base. Add Stickles to River.
  • Die-cut and emboss Oval Frame using HCD 710 Decorative Oval Window Die and Grand Calibur.
  • Add frame to card with foam tape.
  • Add pearls in each corner.
  • Add a stripe of 1/4" Scor-tape on bottom part of card. Add Teal Gala Glitz.

Heartfelt Creations Products used:
  1. HCPC 3369 Outside My Window PreCut Set.
  2. HCD 710 Decorative Oval Window Die.
  3. Gala Glitz Teal.
  4. Grand Calibur

Sharing your Grief

Directions:
  • Make card from White cardstock. A2 size.
  • Die-cut a piece of White Cardtsock using Label 8 Nestabilities. Dry emboss this piece using Textile embossing folder., ink all edges.
  • Using the same die, trace it on Gold cardstock. Cut it out.
  • Mat white and gold piece together. Adhere to card.
  • Stamp sentiment from HCPC 3377 Sympathy Sentiment PreCut Set on White cardstock in Espresso Ink. Adhere to card with foam tape. Add a couple of Gold Nailheads.
  • Die cut a couple of butterfies using HCD 702 Decorative Butterfly-Border Diecut on Gold Cardstock.
  • Adhere butterflies to card. Add pearls.

Heartfelt Creations Products used :
  1. HCPC 3377 Sympathy Sentiment PreCut Set.
  2. HCD 702 Decorative Butterfly-Border Diecut.
  3. Label 8 Nestabilities.
  4. Grand Calibur
Hope you like them.
Have a great day!

Sunday, March 13

Thank you Spellbinders.

The Gina K Designs team would like to welcome to you this special Spellbinders Thank You Blog Hop. Recently Spellbinders generously gifted each member of our Design Team with the amazing new Grand Calibur!!! What an exciting gift for sure and we are absolutely enjoying this fabulous machine. We have made some special cards and projects to showcase the new Grand Calibur and why we are loving it so much. Thank you so very much Spellbinders!!!

I created this card to say Thank you Spellbinders for this generous gift, I sure love it and I use it a lot :) It is so easy to die-cut, emboss and stencil all your pieces at once, saves you lots of time. I hope you are enjoying the hop and if are here from Gina's blog, you are in the right place :)

For my card I used Square and Oval Nestabilities and Fleur de Lis Dies and the great Grand Calibur.

Thanks so very much.

Directions:
  • Make card from White cardstock.
  • Mat Bubblegum Pink cardstock and Patterned Paper, add stitches. Tie ribbon around and adhere to card.
  • Stamp basket on White Cardstock, color it with Copic Markers. Stamp flowers in a separate piece of White cardstock, color it and cut it out.
  • Die-cut Basket piece using Square Nestabilities. Emboss and stencil as well. Mat this piece with a Bubblegum piece. Add stitches.
  • Die-cut a piece a of Bubblegum piece using Fleur de Lis dies and the Grand Calibur. Cut one side of it and adhere it to the bottom part of stitch image. Adhere to card.
  • Add flowers to image with foam tape. Add Crystal Lacquer and set to dry.
  • Stamp sentiment on White cardstock. Die-cut, emboss and stencil it with Oval Nestabilities using Grand Calibur Machine.
  • Add sentiment to card with foam tape.

Card Recipe:
Hope you like it!
Have fun hopping, your next stop is the wonderful Janice!.

Have a great day!

Saturday, March 12

Scrappy Saturday Challenge: Spring is Here!

Hello my friends and welcome to another Scrappy Saturday Challenge. This week challenge is something I am waiting for: SPRING!!! and it is sponsored by Anabelle Stamps. One lucky winner will win a Stamp set!!


So, our challenge is Spring is near, Green is here!!


Here is my card: Thinking of you

Direction:
  • Make card from cardstock.
  • Offset Cardstock and patterned Paper and add stitches. Ink all edges and adhere to card.
  • Stamp roses on White Cardstock in Memento Tuxedo Black. Color roses with Copic Markers. Die-cut image with Oval Nestabilities, emboss and stencil it. Add Crystal Lacquer on it and set to dry.
  • Adhere to card with foam tape.
  • Tie Lemon Drop Baker twine around and add a Button.
  • Stamp sentiment in Walnut Stain Distress ink.

Card Recipe:
  • Cardstock: White, Grass Green (GKD)
  • Paper: Material Girl (Cosmo Cricket)
  • Stamps: Buds & Vases, Framed Greeting (Gina K. Designs)
  • Ink: Memento Tuxedo Black (Tsukineko), Walnut Stain, Crushed Olive (Ranger Industries)
  • Embellishments: Lemon Drop Twine (The twinery), Green Button (GKD)
  • Accessories: Sewing machine, Foam tape, glue dots, Crystal Lacquer.
The deadline for this challenge is Friday, Mar 18th at 11:49 PST. I hope you can play along with us, you can post your creation HERE.

Have a great day!

Thursday, March 10

Sweet baby

Hello my friends and Happy Thursday! Weekend is almost here and my to-do list is so long I don't know I will be able to do everything I want. Anyway, last night I treated myself with some good crafting time and I created this super cute baby card :)
I just love the sketch from CardPatterns and the colors from Off The Wall Craftiness, so this is my card.


Directions:
  • Make card from Cardstock.
  • Punch out a border of Ocean Mist Cardstock. Adhere Patterned Paper, ink edges and add stitches. Adhere to card.
  • Add floral yellow ribbon.
  • Stamp image on White cardstock in Memento Tuxedo Black Ink. Color it with Copic Markers. Die-cut piece with Rectangle Nestabilities, emboss and stencil. Add Crystal Lacquer to image and set to dry.
  • Stamp sentiment on White cardstock in Walnut Stain Distress Ink. Adhere to image.
  • Adhere image to card with foam tape.

Card Recipe:
  • Cardstock: White, Ocean Mist, Innocent Pink (Gina K. Designs)
  • Paper: Little Yellow Bicycle.
  • Stamps: Basket Blessings (Gina K. Designs)
  • Ink: Memento Tuxedo Black (Tsukineko), Walnut Stain Distress (Ranger).
  • Embellishments: Butter Ruban Ribbon (American Crafts).
  • Accessories: Sewing machien, Rectangle Nestabilities (Spellbinders), Flower punch (Martha Stewart), Crystal Lacquer, Foam tape, Sponges, Scor-tape.
Hope you like it!
Have a great day!!

Wednesday, March 9

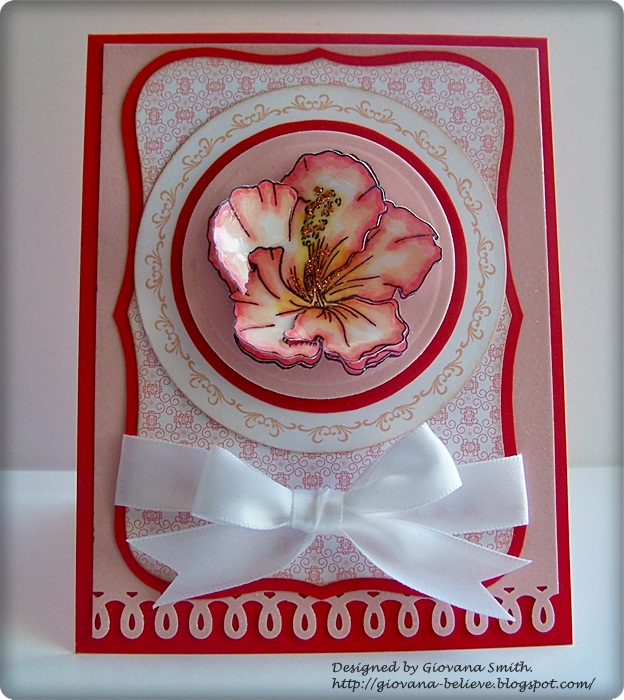
Pretty in Red & Pink

Scroll down if you are looking for my Heartfelt Creations post "ALERT" You can win the whole collection!!

Hello my friends, I have a pretty card for you today, I made it last weekend, but I have been so busy that I didn't have time to blog, but here it is.

Directions:
  • Make card from Red Cardstock.
  • Cut a piece of Glitter Pink Cardstock, punch bottom border and adhere to card.
  • Die-cut Red cardstock and Patterned paper using Label 8 Nestabilities. Ink edges of PP. Tie ribbon around and adhere to card.
  • Stamp circular border on White Cardstock in Tea Dye Distress Ink. Adhere to card.
  • Die-cut red and pink cardtsock using Circle Nestabilities.
  • Stamp image 3 times on White Cardstock in Memento Tuxedo Black. Color them with Copic Markers: E21, R22, R35, Y13. Cut them out and create a 3D flower. Add Crystal Lacquer on top flower and Stickles.
  • Add flower to card.

Card Recipe:
  • Cardstock: Lipstick Red, White (GKD), Pink Glitter (DCWV)
  • Paper: PTI
  • Stamps: Mother's Nature Gift (JustRite)
  • Ink: Memento Tuxedo Black (Tsukineko), Tea Dye Distress (Ranger Industries)
  • Embellishments: White Satin Ribbon (Offray), Stickles (Ranger Industries)
  • Accessories: Label 8 Nestabilities, Circles Nestabilities (Spellbinders), Border Punch (Martha Stewart), Foam tape, Crystal Lacquer.
I am submitting this card to:
  1. Joan's Gardens: JustRite Challenge.
  2. Stampin' Sisters in Christ: Flowers.
  3. Moxi Fab World: Stamping with Markers.
Hope you like it!
Have a great day!

It's Heartfelt Creations Release time!!

Hello my friends! I am so excited some of the projects I've created with the new stamps from Heartfelt Creations. You are going to love them, they are fantastic!!

Thinking of you

Directions:
  • Make card base from White cardstock. A2 size card.
  • Dry emboss a piece of White cardstock using Textile Folder, Mat this with a slightly bigger piece of Rich Razzleberry cardstock. Tie ribbon around, make  a bow and add a pearl. Adhere to card.
  • Stamp image from HCPC3371 Dutch Iris Oval PreCut Set on White cardstock in Memento Tuxedo Black Ink. Color image with Prismacolor Pencils. Die-cut image with Large Oval Nestabilities.
  • Stamp Iris image and bulbs from HCPC 3373 Dutch Iris Medley PreCut Set, color them with Prismacolor  Pencils as well. Die cut images with HCD 711 Decorative Dutch Iris Die.
  • Add Iris and bulbs to main image with Clear Glue. Add Gold Gala Glitz on Iris and Crystal Lacquer.
  • Die-cut an Oval piece of  Rich Razzleberry cardstock. Mat image with this piece with Foam Tape.
  • Adhere image to card.
  • Stamp sentiment on White cardstock in Memento Sweet Plum. Die-cut this piece with Fancy Tags Dies, emboss and stencil it. Adhere to card.


Heartfelt Creations products in this card:
  1. HCPC 3371 Dutch Iris Oval PreCut Set.
  2. HCPC 3373 Dutch Iris Medley PreCut Set.
  3. HCD 711 Decorative Dutch Iris Die
  4. Large Oval Nestabilities.
  5. Fancy Tags Shapeabilities.
  6. Dries White Glue.
  7. Gold Gala Glitz.
  8. Crystal Lacquer

In Sympathy

Directions:
  • Make card from White cardstock. 5" square card.
  • Cut a piece of White cardstock 4.5" square. Stamp Image from HCPC 3375 Flora Grande 1 PreCut Set in Versamark Ink. Add Gold embossing powder and heat it up. Stamp a extra flower, heat emboss and cut out the center part and adhere with foam tape.Stamp Sentiment from  HCPC 3377 Sympathy Sentiments PreCut Set in Walnut Stain Distress Ink.
  • Mat this piece with a 4.75" square piece of Gold Cardstock.
  • Adhere to card.
  • Add Gold Nailhead to flower
Heartfelt Creations Products used in this card:
  1. HCPC 3375 Flora Grande 1 PreCut Set.
  2. HCPC 3377 Sympathy Sentiments PreCut Set.
Submitting these cards to:
  1. Stampin' Sisters in Christ: Flowers
For more inspiration, visit the Heartfelt Creations Blog and also leave a comment there for your chance to win the whole Dutch-Iris Collection!! This is an awesome prize!!

Hope you like my projects.
Have a great day!!

Monday, March 7

I got rejected too :) - "Happy Birthday" card

Hello my friends!! Hope you are having a good Monday. My day is good so far. Well, last Friday I got some happy e-mail from Paper Craft Magazine, they accepted 1 of the cards I submitted for the next Go To Sketches issue, I got happy, but also I realized the 10 others I submitted got a NO-NO. Honestly, I didn't know what to expect, after reading that they were more than 2750 cards for only 288 spots! now I can say I am happy you are going to see at least 1 of my cards there.
Said this, I have 10 extra cards to post on my blog :), this is one of them (sketch #7)and also fits few challenges:

Also, Dawn is showcasing the rejected cards on this fabulous post, check it out HERE


Directions:
  • Make card from White cardstock.
  • Stamp image in Memento Tuxedo Black Ink. Color it with Copic Markers.
  • Stamp sentiment in Walnut Stain Distress Ink.
  • Add Gold Gala Glitz on flowers.

Card Recipe:
  • Cardstock: White (Gina K. Designs)
  • Stamps: Inside & Out, Spring Basket (Gina K. Designs)
  • Ink: Memento Tuxedo Black (Tsukineko), Walnut Stain (Ranger Industries)
  • Embellishments: Gold Gala Glitz (Art Glitter)
  • Accessories: Scor-buddy, Dries Clear Glue.
All products in bold can be found at Gina K. Designs Online Store :)


Hope you like it.
Have a great day!
Keep submitting, never give up :)

Sunday, March 6

Scrap-Mart Blog Hop "Heartfelt Creations Stamps"

Hello my friends! Welcome to Scrap-Mart Blog Hop featuring "Heartfelt Creations Stamps" This whole week, you are going to enjoy beautiful and wonderful creations made by the Scrap-Mart and Heartfelt Creations Design Teams. This is going to be awesome!!
If you are here from Eva's blog, you are in the right place.
For this Blog Hop I made 2 cards and I hope you like them :) I am submitting these card to the Moxi fab World : Stamping with Markers Challenge. I love to color!!

I am so sorry

Directions:
  • Make card from Kraft Cardstock. 4.5" square card.
  • Mat Ivory Cardstock and Patterned Paper, add stitches and ink all edges.
  • Dry emboss top part with Textile Embossing folder.
  • Tie Ribbon around and add a pearl.
  • Stamp sentiment on Ivory Cardstock in Walnut Stain Ink. Die-cut, emboss and stencil piece with Circle Nestabilities. Adhere to card with foam tape.
  • Stamp daffodils on White cardstock. Color images with Copic Markers. Mat together with Glue and foam tape to create a 3D focal. Add Crystal Lacquer and Cooper Stickles. Add to card.
  • Add Pearls on opposite corners. 
Card Recipe:
Have a wonderful Birthday

Directions:
  • Make card from Pink carstock. 5" square card.
  • Cut a piece of Ivory Cardstock, punch bottom border.
  • Ink all edges of Patterned Paper, adhere to Ivory cardstock and add stitches. Adhere to card.
  • Die-cut a piece of Ivory Cardstock using Label 3 Nestabilities.
  • Create a frame using Label 3 Nestabilities, emboss and adhere to previous piece.
  • Stamp sentiment and adhere to card.
  • Stamp images on White Cardstock in memento Tuxedo Black. Color images with Copic Markers. Die-cut images. Create a 3D image with foam tape. Add Crystal Lacquer to images. Adhere to card with foam tape.
  • Add ribbon and pearls.
Card recipe:
  • Cardstock: Innocent Pink, Ivory, White.
  • Paper: Clothesline (Little Yellow Bicycle)
  • Stamps: HCPC 3360 Exotic Fuchsia PreCut Set, HCPC 3363 Inspire Me Sentiments PreCut Set (Heartfelt Creations)
  • Ink: Memento Tuxedo Black (Tsukineko), Tea Dye Distress (Ranger Industries), Walnut Stain Distress (Ranger Industries)
  • Embellishments: Seam Ribbon, Pearls.
  • Accessories: HCD 709 Springtime Medley Die (Heartfelt Creations), Label 3 Nestabilities (Spellbinders), Border Punch (Martha Stewart), Crystal Lacquer, Sewing machine, Copic Markers, Foam tape, Sponges.
Now hop over to Anita's blog and enjoy her wonderful creations. Visit the Scrap-Mart blog for more information :)

Thanks so much for stopping by!
Hope you like my creations.
Have a great day!

Saturday, March 5

Heartfelt Creations "Thank you" Blog Hop.

* This is my second post, if you are here for the Scrappy Saturday Challenge, please scroll down. Thanks!

Hello my friends!! Hope you are having a great day and welcome to our Heartfelt Creations "Thank you" Blog Hop. This blog hop is to say Thanks so much to Linda and Emma Lou for the wonderful 6 months as a Heartfelt Creations Designers. I am truly honored to be part of this wonderful group.


Today, you are going to enjoy lots of wonderful projects from the Design Team. If you are here from the very talented Debbie, you are in the right place. Now let me show you the card I created for today's blog hop.

Here is my "THANKS" card:

Directions:
  • Make card from cardstock.
  • Mat Ivory Cardstock and Patterned paper and add stitches.
  • Add a strip of Scor-tape on the bottom of the card, ruffle ribbon and add stitches.
  • Die-cut swirl border twice, emboss and stencil as well. Adhere to card.
  • Stamp Daisy flowers on Vellum cardstock in Pearlescent Rust Ink. Die-cut all flowers.
  • Bend ends of flowers up and add glitter. Mount flowers and add Gold Gala Glitz in the center. Add to card with foam tape.
  • Stamp sentiment from Swirly Autumn Leaves set on Ivory Cardstock in Walnut Stain Ink. Die-cut, emboss and stencil piece. Adhere to card.
  • Add a couple of pearls.

Card Recipe:
Now head over to our very talented Clare and enjoy what she has created for you today!
Hope you like my card. Have a great day!!
Happy hopping.

Scrappy Saturday : Challenge #46 - Woodland Friends‏

Hello my friends! Welcome to another Wee Memories Scrappy Saturday Challenge. This week our challenge theme is Woodland Friends .


You can create any type of card using woodland creatures/nature products and it is sponsored by Serendipity Stamps.


One lucky winner we'll get a Stamp Set as a prize!!

For my card I used the Mustang image from Serendipity. I realy like this horse, it looks so much like my neighbor's horse, her name is Ginger :) and my daughter's favorite horse. I also got inspired by the Mojo Monday Sketch and the Moxie Fab World: The Stamping with Markers Challenge.

Thank you card:

Directions:
  • Make card base from Ivory Cardstock.
  • Mat Chocolate Brown Cardstock and Patterned Paper. Punch border on Ivory Cardstock, add PP. Adhere to matted piece and add stitches.
  • Add ribbon and paper flower. Tie a bow on button and add to flower. Adhere to card.
  • Stamp image in Walnut Stain Ink. Color it with Copic Markers (E31, E33, E35). Die-cut image with Rectangle Nestabilities, emboss and stencil it with Light blue ink. Adhere to card with foam tape.
  • Stamp sentiment, ink all edges and adhere to card.

Card Recipe:
  • Cardtsock: Chocolate Brown, Ivory.
  • Paper : Wanted (Cosmo Cricket)
  • Stamps: Mustang (Serendipity), Sentiment from Mimosa (SEI).
  • Ink: Walnut Stain, Antique Linen (Ranger), Bashful Blue (SU).
  • Embellishments: Ivory Satin Ribbon, Mulberry Paper flowers (Prima), Turquoise button (GKD), Caribbean Twine (The twinery)
  • Accessories: Sewing machine, Bow border punch (Martha Stewart), Rectangle Nestabilities (Spellbinders), Copic Markers, Glue dots, Foam tape
The deadline for this challenge is 11.59pm PST on Friday, March 11,  2011. For some more design team inspiration and challenge details, click here

Hope you like it!
Have a great day!

Friday, March 4

Easter Basket

Hello my friends! Hope you are having a wonderful day! I have a cute project for you today; an "Easter Basket". I really love making this basket and I hope you do too. You can get the basket directions HERE over at StampTV. The stamp set I used is  "Chocolate Bunnies" by Gina K. Designs.


I am submitting this project to:
Hope you like it!
Have a great day!

Thursday, March 3

Joan's Gardens Blog Hop

Hello my friends! I am so excited to be participating in Joan's blog hop and also present to you the awesome GRAND PRIZE!! that can be yours, all products from JustRite!

This prize package includes the following JustRite products:
 
  • acrylic block set – $8.95
  • mini binder box - $9.95
  • mothers natures gifts – 16.95
  • fancy tags- 19.95
  • happy everything -32.95
  • nested frame dies  24.95
  • nested sentiments dies  24.95
  • 3 ¼” block -12.95
  • Fancy frames  19.95
  • Inspires me  19.95
Wouldn't you love to win this grand prize from JustRite stamps,  with a value of over $191.   In addition to this fabulous grand prize, there will also be additional prize packages from Joan's Garden's to give you 2 additional chances to win.

You will have until next Thursday morning (March 10) 6:00 AM EST to link your card/project over at Joan's blog. There are only two requirements for this week's challenge:

• Create a card/project using ONLY JustRite stamps (any JustRite stamps and matching dies are acceptable) Do not use any other brand stamps. You may use any card stock, design paper and embellishments you want.

• You must be subscribed to Joan's Gardens blog to win.  This allows you to receive all updates about challenges and sales, etc.

The winner for the grand prize package from JustRite Stamps will be chosen from a Random drawing and will be announced Friday morning (March 11). This person will also be entered in the End of the Year drawing for a $100 gift certificate from Joan's Gardens. You may enter this challenge more than once, but each card/project must be made with only JustRite stamps.

Here is my card using Mother's Nature Gift Set.

Directions:
  • Make card from cardstock.
  • Mat a piece of Chocolate Brown Cardstock and Patterned Paper (ink all edges). Add a strip of Pink Glitter cardstock and punch the bottom border. Add to card and add stitches.
  • Tie ribbon around.
  • Stamp circle border on Ivory Cardstock in Tea Dye Distress Ink. Die-cut and emboss  piece using Circle Nestabilities.
  • Stamp flower image 3 times on White Cardstock in Memento Tuxedo Black. Color them with Prismacolor Pencils and cut them out in different sizes.
  • Cover images with Versamrk Ink and UTEE and heat it up.
  • Die-cut a piece of Pink Glitter cardstock using Circle Nestabilities. Add it Ivory Cardstock with foam tape. Add flower.
  • Add rhinestones to embellish.


Card Recipe:
  • Cardstock: Ivory, Chocolate Brown, White (Gina K. Designs), Pink Glitter (DCWV)
  • Patterned Paper: Little Yellow Bicycle.
  • Stamps: Mother's Nature Gift (JustRite)
  • Ink: Memento Tuxedo Black (Tsukineko), Tea Dye Distress (Ranger), Prismacolor Pencils.
  • Embellishments: Ivory Satin Ribbon (Offray), Pink Rhinestones (Kaisercraft).
  • Accessories: Sunburst Border Punch (Fiskars), Circle Nestabilities (Spellbinders), Sewing machine, Medium glue dots, Foam tape.

TWO more chances to win another a great prize! Leave a comment on each of the 12 Guest Designers below + Selma  and Joan's .
Out of the fourteen blogs, there are two "mystery" blogs, each with a prize package from Joan's Gardens. For a chance to win, be sure to leave a comment on all fourteen blogs.  


Giovana -----> You are here!
Vicki

Have fun hopping!
Have a great day!

Wednesday, March 2

Thinking about Spring

Hello my friends! Hope you are having a great and warm day! Here has been so cold I am looking forward to a really nice comfy and warm Spring.
Talking about Spring, I have some projects to warm you up :) using Heartfelt Creations Stamps :)

Decorative Eggs Set:

Directions:
  • Stamp egg images onto White Cardstock in Memento Tuxedo Black. Color them with Copic Markers: B000, B23, Y17, R22, R46. Cut them out and cover them with Crystal Lacquer. Set to dry.
  • For Mini card: Stamp image on bottom part of White Cardstock (4.25" x 5.5") in Memento Tuxedo Black. Color image with Copic Markers: B21, B23, Y13, Y17, E31, E35, R22, R46, YG93, 0
  • Die-cut image using the biggest Label Die from Label 8 Nestabilities. Score image in half and fold.
  • Sponge Green Ink to create grass and light blue for sky.
  • Add Crystal Lacquer and Copper Stickles. Set to dry.
  • Stamp Image and die-cut, emboss and stencil with smallest die from label 8 Nestabilities.
  • For Egg Pot: Decorate pot with some Gree tissue paper for grass. Stick eggs and glue one little egg (blue). Add colored eggs with glue dots and foam tape to create some dimension.
  • Tie pot with green raffia.

Heartfelt Creations products used in this project:
  1. HCPC 3368 Egg-Citing Day PreCut Set.
  2. HCPC 3366 Wrought Iron Cross PreCut Set.
  3. Label 8 Nestabilities.
  4. Crystal Lacquer.
  5. Grand Calibur

Stained Glass Lily Card:
  • Make card from Ivory Cardstock. A2 size.
  • Stamp Lily flower on a piece of White Cardstock from HCPC 3370 Easter Lilies PreCut Set. Mask flower and stamp Background image from HCPC 3364 Stained Glass Background PreCut Set in Memento Tuxedo Black.
  • Color Lily with Copic Markers.: YG95, E11, E21, Y17. (Color an extra flower)
  • Color background using sponges in circular motion, inks used: Daffodil Delight, Broken China, Memento Tangelo, Worn Lipstick. After sponging the BG, apply a coat of Mod Podge and set to dry about 30". After that apply VersaMark Ink all over the image and UTEE, heat and repeat one more time. This will give your background piece a very natural Cathedral Glass look.
  • Apply Versamark Ink and UTEE to extra Lily.
  • Mat this background piece with a Yellow piece of Cardstock. Distress all edges.
  • Tie Melon Satin Ribbon around and add a bow. Add Lily to card with foam tape

Heartfelt Creations products used in this project:
  1. HCPC 3364 Stained Glass Background PreCut Set.
  2. HCPC 3370 Easter Lilies PreCut Set.

Green Angel Trumpet Card:
  • Make card base from Green Cardstock.
  • Add a piece of Yellow cardstock (5.5" x 3.75") to front and add zig-zag stitches.
  • Cut stripes of Patterned Paper (5" x 1.25") and mat them with a darker piece of Yellow Cardstock. Add straight stitches. Adhere to card.
  • Stamp image from HCPC 3362 Angel Trumpet Flower PreCut Set on White Cardstock in Memento Tuxedo Black. Color it with Copic Markers" YG95, Y13, Y15, Y17, 0. Color and cut out an extra image.
  • Die-cut and emboss image using Label 3 Nestabilities and Grand Calibur.
  • Add to card. Add extra image with foam tape. Embellish card with white buttons and Green Baker twine.

Heartfelt Creations Products used in this project:
  1. HCPC 3362 Angel Trumpet Flower PreCut Set.
  2. Label 3 Nestabilities.
  3. Crystal Lacquer.
  4. Grand calibur
Hope you like them!
Thanks so much for stopping by.
Have a great day!