Tuesday, June 10

Together forever

Hello friends!! Feels like long time since my last post, I have been a bit busy, school is over and my daughter is home and already bored, LOL. I told her she could get a lot done if she helps around the garden, but she prefers the phone and her kindle, (not for too long, shhhh, don't tell I say it)

Anyway, I didn't work yesterday so I had time to craft and create few things for upcoming releases and also this pretty card.
Wedding season is here and this card is perfect for that occasion, the image reminds me one scene from the "Fireproof" movie.


This is the card I made using one of the new stamps from Latina Crafter. I used the sketch from Poppy Sketches + Harlequin Pattern, and this is the card.


I used the set "Diamantes" to create the background, stamped the border in versamark ink and added White embossing powder, then sponged the sides with Old Paper Distress Ink.
I created a panel, then stamped the stamp border from  "Sellos postales"  and salt and pepper image from "Me complementas" set, the sentiment is also from the same set. I used a border die to create the scallop piece.
Added ribbon, pearls and a heart wood veener. 

The sentiment says: Together forever like salt and pepper.


Submitting this project to:
Hope you like it!!
Have a great day!

Thursday, June 5

Happy Father's Day

Hello friends! Happy Thursday to all of you. Today I have a super cute and fun "Father's Day" card. Isn't this bear adorable?! I had a lot of fun coloring it, I used Spectrum Noir Markers and Blendable Pencils to color the image. I don't know, but anytime I color I get so relaxed, what about you?

Here are the details:

  • Make card base from Yellow textured cardstock. 6" square.
  • Cut a panel from Raspberry cardstock, 5.5" square piece, set aside to mat image piece.
  • Stamp image from Popcorn Collection "Father's Day" set on a piece of White Premium Cardstock in Memento Tuxedo Black.
  • Color image with Spectrum Noir Marker and Blendable Pencils. Here is the list of the ones used:
    • Grass: LG1, LG2, CG1 - 046, 047
    • Bear: TN1, TN2, TN3, TN4, TN5 - 088, 090
    • Pots: OR1, TN5, TN7 - 022
    • Dirt: EB1, EB2, EB3, EB6
    • Duck: LY1, LY2, LY3 CT1, OR1, OR2 - 015
    • Chair: IG1, IG2, IG3, IG4, IG5 - 014
    • Newspaper: BG1, BG2
    • Couch Pillow: BT3, BT4, BT5
    • Basket: TB1, TB2, TB3
    • Cup: BT2, TN3, TN4
  • Die-cut or create a cloud and create background, sponging around the cloud in Tumbled Glass Distress Ink.
  • Stamp sentiment in StazOn Midi Ink Pad - Spiced Chai.
  • Mat image with raspberry piece and add stitches.
  • Add a couple of white clouds.


Submitting this project to:

Hope you like it!
Have a great day!

Wednesday, June 4

Top Dog Dies: Gelato Flowers and embossed leaves

Hello friends! Today, I am sharing a super easy tutorial over at the Top Dog Dies blog! I used gelatos, heat embossing and Christmas Patterned Paper!! Yes, I really liked the newspaper patterned, but since it was Christmas theme, I decided to use my gelatos and give it another look. Great way to stretch your supplies {wink, wink}

Anyway, this is the final card.


  •  Close up of the pretty flowers and shiny leaves.


Top Dog Dies used:


Hope you like it!
Have a fantastic day!!

Monday, June 2

Graduation Cards!!

Hello friends!! Hope you all are starting a great week. I am getting a cold, not fun at all, but I have to keep moving. This week is the last school week for my child, oh boy, she is excited to take a break, I am pretty sure she will be bored in 2 days, LOL and wanting to come back to school soon.

Anyway, today I want to share with you a couple of Graduation cards I created for a friend. She needed one for a boy and a girl, I tried a new technique and I love the results!!

Here they are:

Girl's Graduation card: This is an A2 size card. I followed this tutorial from Splitcoaststampers, super easy and fun! The sentiment is from a digi stamp from Sweet 'n Sassy Stamps, die-cut and embossed with Oval Nestabilities. As always I added zig-zag stitches, I thought the big flower ribbon could be perfect.
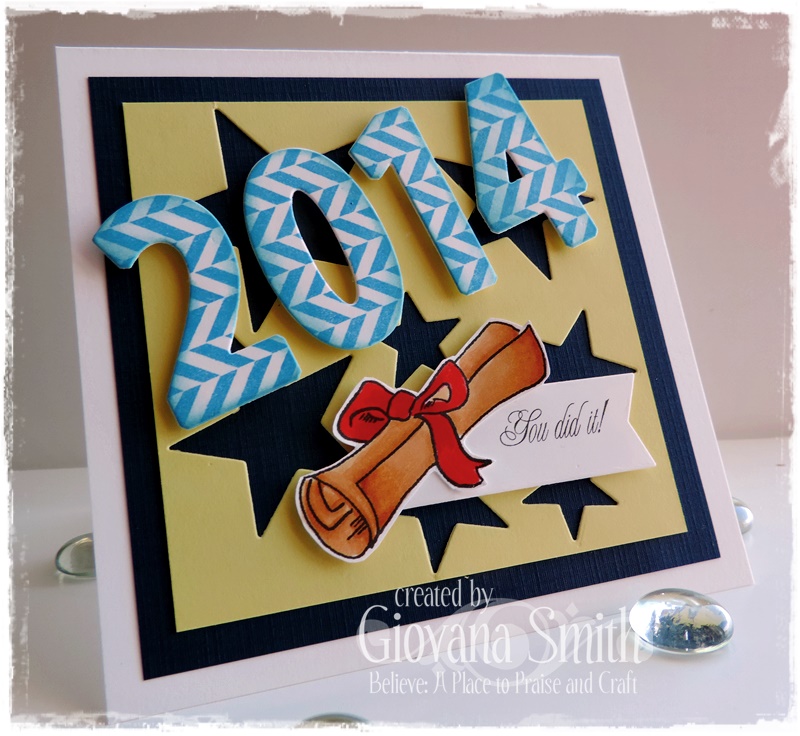
Inside was decorated with 2014, the die numbers are from Sweet 'n Sassy Stamps, the border die is Laurel Lace Border Die from Top Dog Dies


Boy's Graduation Card: This one is the other one, a masculine one, super simple. This card is a 5"x5". The blue panel is 4.5" x 4.5" square and the yellow panel is 4" x 4" square. I created the background using star dies in different sizes I used the negative part (save the little stars for a different project). Then die-cut 2014 (I glue 2 pieces together to make it thicker), stamp chevron (from Hero Arts) in blue ink and ink all edges. Add the numbers to card with dimensionals.
color digi image from this set, cut it out, die-cut sentiment banner from same digital set and add them to card with dimensionals.


Submitting this project to:
Hope you like them!
Have  fantastic day!!

Friday, May 30

Friday Feature: Happy Happy Set and Dies.


Hello sweet friends and welcome once again to Sweet 'n Sassy Stamps  April Release Friday Feature!
The Design Divas have some darling samples for you to see today as we feature one of our new stamp sets and matching dies available at the Sweet 'n Sassy Store.
Happy Happy is a fun set perfect for creating uplifting cards that will bring a smile to the recipient's face.

Happy Happy & Happy Happy Dies
  • Set measures 4" x 6"
  • Set includes 4 images & 8 sentiments
  • The kite measures approximately 1" x 3 3/8"
  • Designed by Korin Sutherland
  • Stamp set priced at $15
  • Coordinates with Happy Happy Dies
This is the card I created for you today, a very Happy Happy card. I remember when I was a kid, my siblings and I going to the big park to flight our kites, it was so much fun! Also, going to my grandparent's house and playing outside with my cousins, goodness!! great memories!

Back to the project, few days ago, I bought textured cardstock for a really good price, and since the colors are pastel, I decided to create a cute card with them.
I also had the perfect kite patterned paper, happy colors and happy images :) I think the happy face gives the images a very sweet detail. The kite was paper pieced, I added the kite and sun with dimensionals, added zig-zag stitches and voila!!


Our challenge to you this week is Child's Play.  Put a child in your scene or use something a child would like to do.
The first 11 cards in the hop were created for your inspiration by the design team.  As you hop along, leave a little love behind, then create your own child card and use the linky tool to add it to the gallery!
Just a few guidelines to remember as you play:        

  • You don't have to use a Sweet 'n Sassy image to enter (although we sure love when you do!)
  • You'll have until Thursday, June 5th at midnight EST to enter
  • We'll draw 1 winner from this week's challenge to receive a $10 credit to Sweet 'n Sassy Stamps!
  • Please use code SNSFFC14 when uploading to Splitcoaststampers or other galleries 
  • Share a link to your creation below.

Thanks for joining us today!  Be sure to check back again on Friday, June 6th to see if you won and to check out our brand new June Release!
-----


Thursday, May 29

Purple Butterfly

Hello friends! Hope your day is fantastic, I am having lot of internet problems lately, not fun at all. I am writing this post very quick just in case my connection goes down again.

I created this pretty card using one of the colors I don't use very often "purple", I used to love purple when I was a teenager, LOL, but now not so much.

Here are the details:
Submitting this project to:

Hope you like.
Have a great day!!

Wednesday, May 28

Welcome Baby Pop Up Box

Hello friends! Hope you are fantastic Wednesday. Today I have a little tutorial, showing you how I make this Pop Up Box using Top Dog Dies!! You can check out different versions at Splitcoaststampers, mine is a little different.

Let get started:
  • You need a piece of cardstock 4.25" x 12"
  • Score piece at 2.75", 5.5", 8.25" and 11" (the little line score line at 3" was my mistake, pretend it's not there ;)

  • Turn around your piece of cardstock and score it at 2" all the way down.


  • Cut each score line from the 2" side all the way to the middle line. Cut the last line in an angle (as shown in picture)


  • Add adhesive and create the box. 


Submitting this project to:


Hope you like it and give it a try!
Easy and fun to make.

Have a great day!!

Tuesday, May 27

Heartfelt Creations Alumni May Blog Hop

Hello friends! Welcome to another Heartfelt Creations Alumni Blog Hop! Spring is here and I really wanted to share a fun "garden-like" card. I created a long skinny card, this one is 3.5" top x 6" long.

Here are the details:

  • Create a card base from Texture light blue cardstock. 3.5" x 6".
  • Cut a piece of yellow textured cardstock and patterned paper from Sun Kissed Paper Collection, add a piece of yellow cardstock on top and add zig-zag stitches. Add panel to card base.
  • Stamp birdhouse image from Spring Season Set in black ink on White cardstock. colored image with markers. Here I used Spectrum Noir.
  • Cut image and mat it with a piece of yellow cardstock. Add  straight stitches. Add piece to card base.
  • Stamp open leaf and color it with markers. Die-cut it with coordinated dies.
  • Stamp Sun Kissed Fleur flowers on Purple vellum, die-cut them with Sun Kissed Fleur Die.Mount 3 flowers and add it to card. Add pearl to flower.
  • Die-cut a little butterfly from Garden Romance Die set, add it to image.


Now it's your time to join us! One lucky winner will be choosing from one of the participant blogs and win a $25 Gift Certificate from Heartfelt Creations!! You have until Friday, May 30th at midnight (Eastern Time) to leave a comment.

Here is the list of participants:

Thanks so much for stopping by and happy hopping!

Monday, May 26

Wishing you well

Hello friends! Hope you all are having a great day, I am here tired, my daughter is sick, hopefully she will feel better soon, school is almost over and she has a lot of activities planned before school is out.

Although I didn't make this card for her, I think this is what I wish for her. This card was made for a girl who had a horse accident, my friend asked me if I had or could make a card for her and of course I say yes .

Here are he details:

  • Make card base from White cardstock. A2 size.
  • Mat together a piece of pink cardstock and patterned paper (PTI), add straight stitches.
  • Die-cut a scallop border in green cardstock and add it to panel, add zig-zag stitches.
  • Die-cut a scallop circle in red and circle in white cardstock.
  • Stamp polka dot flowers in yellow and red ink. Die-cut images with coordinated dies.
  • Stamp leaves in green ink, die-cut image with coordinated die.
  • Stamp little dots on white circle piece in yellow and pink ink.
  • Add die-cut pieces to circle. Add pearl.
  • Stamp sentiment in black ink.
  • Add circle piece to card base with dimensionals.
  • Add little pearls to scallop piece.


Hope you like it!
Have a beautiful day!

Friday, May 23

Wishing you a lovely day.

Hello sweet friends and welcome once again to Sweet 'n Sassy Stamps 
April Release Friday Feature!
The Design Divas have some beautiful samples for you to see today as we feature one of our new stamp sets available at the Sweet 'n Sassy Store.
The doodled flowers in Sunshine & Flowers is a sweet set perfect for creating whimsical cards for that special someone!


Please join us for this week's April Release Blog Hop Feature and Challenge!

Today's feature is:


  • Stamp set measures 4"x 6"
  • Set includes 8 images & 3 sentiments
  • The large flower image is approximately 2 1/2" x 3 3/4"
  • Designed by Diane Zechman
  • Stamp set priced at $15


  • For this project I die-cut 3 little labels from White cardstock and stamped the flower in different spots. Colored the flowers with Spectrum Noir Markers: CR4, CR5, CR6 and GB6, then stamped the sentiment in Coffee Archival Ink, added the little labels to white panel with dimensionals, added a strip of Patterned Paper.
    After the card as finished, I covered the petals with Stickles and the centers of flowers with Crystal Lacquers.


    Our challenge to you this week is to Make it Colorful... use at least 5 colors on your card (not including black & white).
    The first 11 cards in the hop were created for your inspiration by the design team.  As you hop along, leave a little love behind, then create your own Colorful card and use the linky tool to add it to the gallery!

    Just a few guidelines to remember as you play:
                
    - You don't have to use a Sweet 'n Sassy image to enter (although we sure love when you do!)
     - You'll have until Thursday, May 29th at midnight EST to enter
    - We'll draw 1 winner from this week's challenge to receive a $10 credit to Sweet 'n Sassy Stamps!
    - Please use code SNSFFC13 when uploading to Splitcoaststampers or other galleries 
    Share a link to your creation below.

    Thanks for joining us today!  Be sure to check back again on Friday, May 30th to see if you won and to check out the next Friday Feature & Challenge!

    Thursday, May 22

    Little Cutie

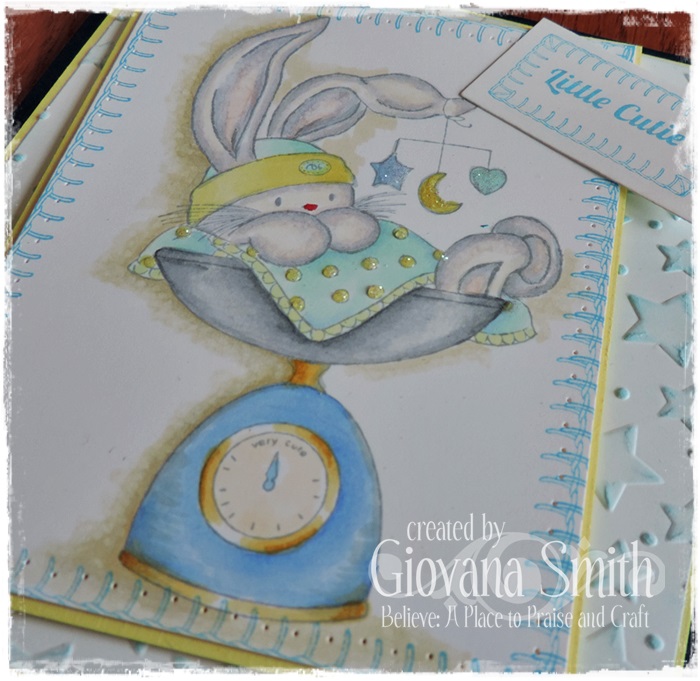
    Hello friends! Today I have a very sweet card, as you may know, I love to create baby cards and this one is super cute! I used the Bebunni Bundle of Joy Set from Crafter's Companion.

    Here are the details:

    • Make card base from Blue Textured cardstock. 5" x 5.5"
    • Emboss a piece of White cardstock using Starry Eyed embossing folder. Ink emboss stars with blue ink. Mat this piece with a slightly bigger piece of Yellow Cardstock. Add to card base.
    • Stamp bunny on Ultra Smooth Premium White Cardstock in Memento London Fog Ink. 
    • Color image with Spectrum Noir Markers, here is the list of markers used:
      • Bunny: IG1, IG2, IG3. BG2, FS2, FS5, TN1
      • Blanket: BT1, BT2, BT3, TB2, LY1, LY3
      • Scale: GG1, GG2, GG3, TB1, TB2, TB3, GB1, GB9, FS1
      • Hat: LY1, LY2, LY3, BT1, BT2, BT3
      • Mobile: TB2, LY3
      • Outline: BGR1, BGR2
      • Shade: EB1, EB2, IG1
    • Stamp edges to blanket with Electric Blue Radiant Neon Ink Pad 
    • Stamp sentiment on White cardstock in  Electric Blue Radiant Neon Ink Pad .
    • Add image and sentiment to card with dimensionals.
    • Add Crystal Lacquer and glitter to mobile and blanket.

    Submitting this project to:


    Hope you like it!
    Have a great day!

    Wednesday, May 21

    Felt Headband with Top Dog Dies.

    Hello friends! Today I have a super cute and easy project using the new Top Dog Dies Pretty Petals Die set, I created a cute headband for Miss. E, she has been waiting too long "according to her" for me to finish this project. She loves it and I think you will too.

    Here are the details:
    •  Mix colors and glue them together. I used hot glue.
    •  Play with them until you find the perfect position.
    •  Glue a felt circle to hold all the flowers together.
    •  Glue circle with flowers to elastic headband. Add little pearls to flowers.

    •  Then, add an extra circle to cover the elastic band from the flower.

    And here is the project done! And my beautiful model is Miss E. She enjoyed the photo session ;)


    Hope you like it and give it a try.
    Have a great day!