Monday, May 19

Sweet 'n Sassy Stamps and Add a Little Dazzle Blog Hop!

Welcome to the Sweet 'n Sassy Stamps & Add a Little Dazzle joint blog hop! We're so excited to be sharing some fabulous creations featuring the wonderful products from both companies in today's hop.  Our teams have created some fabulous projects for you to enjoy so please grab your favorite beverage or snack and cozy up for a great blog hop!

First we'd like to share a little bit about the two companies...
http://www.sweetnsassystamps.com/
We are a small family owned company specializing in wholesome/Christian clear stamp designs. We also carry a wide range of coordinating dies and digital stamps. We have been in business for over 6 years and have been so very blessed to be a part of the paper crafting industry. Our stamps are a lot of sweet and little bit of sassy. :) We invite you to check us out and enter coupon code ALDSNSS to save 15% on your order! Coupon good through May 31st.


http://www.addalittledazzle.com/wp-content/uploads/2012/11/logo-lady.png
We specialize in an exclusive line of craft metal sheets that helps you take your crafting to the next level. Whether you are a seasoned or new crafter, our craft metal sheets will help you create unique projects that will make you stand out among the crowd. Are you ready to take your crafting to the next level? Add a Little Dazzle Craft Metal Sheets will help you turn the ordinary into the extraordinary. We invite you to visit our blog and receive a FREE BONUS TUTORIAL when you purchase the Add a Little Dazzle Sampler Pack. This special offer is good through Wednesday, May 21st.

I have 2 projects for you!! Working with this line of craft metal is fantastic, easy to work with and super fun!.

Each day is a gift: Love all the dimension in this project. Beautiful.
For this project I used the sketch from Sweet Sunday Sketch #220


Here are the details:
  • Make card base from White cardstock, A2 size.
  • Cut a panel from Red Cardstock (3 1/8" x 4.75"), mat it with a smaller White piece, add straight stitches.
  • Die-cut a Decorative Frame using Wondrous White Metal Sheet, then emboss it with an embossing folder, sand the emboss part with a sanding block, after that apply Golden Glitz Delicata ink, set aside to dry.
  • Cut a piece of Wondrous White Metal Sheet, prepare it with embossing buddy, then stamp a blossom from Thankful Blossom Set in Versamark Watermark Ink, add red embossing powder and heat set (Apply the heat from behind the piece, so you don't burn the powder, also use tweezers to hold the craft metal sheet) After it cools, die-cut piece with coordinated Blossom dies.
  • Repeat the same with leaves, Bend the ends to give a more natural look.
  • Add frame, blossom and leaves to card panel.
  • Stamp sentiment from Celebrate Today set in Jet Black Archival Ink.
  • Die-cut a border using Lacey Eyelet Border Dies and Perfect Peacock Metal Sheet. Add border to panel.
  • All card panel to card base.


It's the little things: This card was very quick to make and the picture just doesn't make justice on how pretty it is. The shimmer from the Scarlet Red Metal Sheet is beautiful.
I used the sketch from Seize the Sketch.


Here are the details:


Submitting these projects also to Simon Says Wednesday Challenge: Die-Crazy.

Now how about we get to that blog hop! Be sure to stop by and comment on each of the DT blogs for a chance to win 1 of 2 prize packs from both companies valued at $25! You have until Monday, May 26th to enter. The winners will be announced on both company blogs by Friday, May 30th.

Hope you like my projects!
Have a fantastic day!
------

Sunday, May 18

Thank you for everything

Hello friends!! Hope you are having a fantastic day. Today, I have a Clean and Simple card for you, it took me only 13 minutes!! Pretty good, right? I used Thankful Blossoms Set and Thankful Blossom Dies, and Typewriter Text Background set.

Here are the details:

  • Cut a card base from Pink Cardstock. A2 size.
  • Cut a piece of Watercolor paper 3.5" x 4.75", mist it with Taxi and Estate Green colors. Set aside to dry.
  • Stamp blossom in red ink and leaves in green ink. Die-cut pieces with coordinated dies.
  • After watercolor paper is dried, stamp Typewriter Text background in Vintage Photo Distress ink.
  • Stamp sentiment in Jet Black Archival Ink,
  • Adhere the blossom and leaves to panel with foam adhesive. Die-cut a large scallop border and adhere it behind panel.
  • Add red sequins.
  • Add panel to card base with foam adhesive.

Submitting this project to:


Hope you like it!
Have a wonderful day.

Friday, May 16

SNSS Friday Feature and Challenge: You're a Star

Hello sweet friends and welcome once again to Sweet 'n Sassy Stamps April Release Friday Feature!
The Design Divas have some fun samples for you to see today as we feature one of our new stamp sets and matching dies available at the Sweet 'n Sassy Store.
You're a Star is a fun set perfect for creating cards for many different occasions!

Please join us for our April Release Blog Hop Feature and Challenge!
Today's features are: You're a Star & Star Dies


  •  Set includes 5 images & 17 sentiments
  • The large star measures approximately 1 7/8" x 2"
  • Designed by Korin Sutherland
  • Coordinates with Star Dies
  • Stamp set priced at $15

This is the project I have for you today. I started stamping the stars in random places, then I created a stencil with the stars, used to add Versamark Watermark ink , then added UTEE and heat set, added about 3 coats of UTEE, as you can see it on the stars. Then I die-cut the first 2 layers, stamped the #!, added an extra layer of cardstock and stitches. Finally added the panels to a card base.


Our challenge to you this week is to make a Congrats card.
The first 11 cards in the hop were created for your inspiration by the design team.  As you hop along, leave a little love behind, then create your own Congratulations card and use the linky tool to add it to the gallery!

Just a few guidelines to remember as you play:            
  • You don't have to use a Sweet 'n Sassy image to enter (although we sure love when you do!)
  • You'll have until Thursday, May 22nd at midnight EST to enter
  • We'll draw 1 winner from this week's challenge to receive a $10 credit to Sweet 'n Sassy Stamps!
  • Please use code SNSFFC12 when uploading to Splitcoaststampers or other galleries 
  • Share a link to your creation below.

Thanks for joining us today!  Be sure to check back again on Friday, May 23rd to see if you won and to check out the next Friday Feature & Challenge!

Thursday, May 15

Look Deeply into Nature

Hello friends! Hope you all are having a great day, I started my day a little late than  usual, but in serious need of coffee.

Today, I have a beautiful card for you. I love these poppies! they looks so real and love to color them too. I used Poppies and Daisies Set. For this card I used the new Spectrum Noir Blendables Pencils.

Here are the details:

  • Make card base from White cardstock. 5.5" square card.
  • Cut a panel from Red Cardstock (5" square), mat it with Patterned Paper.
  • Emboss a piece of Red cardstock using Splendour Embossing folder, add it to panel and add straight and zig zag stitches.
  • Stamp Image on Watercolor Paper in Jet Black Archival Ink, Color image with Spectrum Noir Blendable Pencils: I used these pencisl:
  • Blend color with Blending solution. Die-cut image with Label dies.
  • Stamp sentiment on White cardstock in Jet Black Archival Ink. Die-cit with Circle Dies.
  • Add image and sentiment to card base using foam adhesive.
  • Add pearls and bow.


Submitting this project to:

Hope you like it!
Have a fantastic day.

Wednesday, May 14

Thanks so much

Hello friends! Happy Wednesday, yay! midweek is here, that means we have survived Monday and Tuesday and getting ready for Thursday and Friday, LOL!! Ok, just trying to be funny, just trying ;)

Anyway, I have a super cute card using brand new dies from Top Dog Dies! Have you seen them yet? If not, you should. Four new sets have been released and I used 3 of them for this card.

Here are the details:
  • Cut a piece of Pink Cardstock 9"x 4.25". Score at 2.5" and 6.75". Fold sides to create card base.
  • Die-cut a couple of Top Dog Dies Laurel Lace Border Die using Textured vellum cardstock.
  • Cut stripes of white cardstock (.25"), adhere them to border die and add zig zag stitches to both sides.
  • Add borders to front open panels.
  • Inside: Cut a piece of White cardstock (4" x 4.25"). Die-cut a couple of Top Dog Dies Decorative Corner Dies in Pink Cardstock, added them to opposite corner. Add zig-zag stitches to all sides.
  • Stamp image and sentiment on panel.
  • Die-cut flowers from Top Dog Dies Pretty Petals Die set in strawberry felt and vellum textured cardstock.add a little pearl and glue flower to right pane.
  • Add Honeydew Twine through the little holes from the borders to make and bow and close the card.


These are the dies used in this project:


Submitting this project to:

Tuesday, May 13

Happy Birthday from owl of us!

Hello friends! Hope you are having a great Tuesday! Today I have a really cute card using brand new stamps from Latina Crafter. This card was made using Some Birdy's Birthday set. I used the May Sketch from Latina Crafter as well, you can join us HERE.


Here are the details:
  • Make card base from white cardstock. A2 size.
  • Mat a piece of Strawberry cardstock and patterned paper, add zig zag stitches, stamp sentiment in Jet Black Archival. Add panel to card base.
  • Stamp image on White cardstock in Memento Tuxedo Black. Color image with markers. I used Spectrum Noir and this is the list of markers used:
    • Right owl: BT1, BT2, BT3, LG1, LG2, LG3, DG2, GB7, OR1, OR2, HB1
    • Middle owl: TN1, TN2, TN4, TN5, TN9, GB7, FS4, FS1
    • Left owl: PP1, PP2, PP3, LV1, LY1, LY3, GB4
  • Die-cut, emboss and stencil image with rectangle die. Mat piece with strawberry cardstock, add dimensionals and adhere it to card base
  • Die-cut balloons, add them to card.
  • Add ribbon
  • Add Star dust stickles t owls' hats.


Submitting this project to:

Hope you like it.
Have a great day!!

Friday, May 9

Friday Feature: Lots-a-Lots

Hello sweet friends and welcome once again to Sweet 'n Sassy Stamps 
April Release Friday Feature!
The Design Divas have some fabulous samples for you to see today as we feature one of our new stamp sets and matching dies available at the Sweet 'n Sassy Store…Lots-a-Spots clear stamp set 


  • Includes 6 images & 7 sentiments
  • Largest image measures approximately 1 7/8" x 1 5/8"
  • Designed by Korin Sutherland
  • Stamp price $11

This is the card I created for you today, here are the details:
  • Make card base from white cardstock. 5" square card.
  • Cut a panel from Aqua and Yellow cardstock.
  • Cut a panel from light gray cardstock, stamp dots in Radiant Neon Electric Yellow and outside circles in Radiant Neon Electric Blue.
  • Add panel to card panels, add faux stitches and strips of washi tape.
  • Die-cut a banner in White and Aqua cardstock. Stamp sentiment in Jet Black Archival ink.
  • Add a triple bow from Light blue twine.


For this project, I used the sketch and color combo from VIva La Verve


Our challenge to you this week is to use a polka dots on your creation.
The first 12 cards in the hop were created for your inspiration by the design team.  As you hop along, leave a little love behind, then create your own ..... card and use the linky tool to add it to the gallery!

Just a few guidelines to remember as you play:
            
- You don't have to use a Sweet 'n Sassy image to enter (although we sure love when you do!)
 - You'll have until Thursday, May 15th at midnight EST to enter
- We'll draw 1 winner from this week's challenge to receive a $10 credit to Sweet 'n Sassy Stamps!
- Please use code SNSFFC11 when uploading to Splitcoaststampers or other galleries 
Share a link to your creation below.

Thanks for joining us today!  Be sure to check back again on Friday, May 16th to see if you won and to check out the next Friday Feature & Challenge!


Thursday, May 8

Happy Mother's Day! + Tutorial

Hello friends! Second post today, sharing with you a card I made last night just for fun! I have to confess that the mojo has left, but I hope it will come back soon, most of my projects have been done in advance, but last night I got an idea and tried it out and I loved the results!
I had in mind the CutCardStock challenge, to create or re-create a technique, so I thought that using a piece from a background die-cut to create a small window would be fun, so this is the process. I would love if you like this tutorial, would like my project HERE, just in the inklinz you can click "like" I will appreciate it very much.

So, let's get started.

Hope you like it.
Have a great day!

For You

Hello friends! Hope you all are having a fantastic day. Today I have a very Clean and Simple card for you using this cute image from Poppies and Daisies set, part of the "A Little Bit Sketchy" Collection by Crafter's Companion. I used the new Spectrum Noir Blendable Pencils, they are great, they are smooth, make your coloring easy.

Here are the details:
  • Make a card base from Ivory Cardstock. 5" x 5" square card.
  • Cut a panel from Yellow cardstock and a slightly smaller piece of patterned paper, pierce all the sides and add to card base with foam adhesive.
  • Stamp the daisies on a piece of Watercolor paper in Jet Black Archival Ink.
  • Color images with Spectrum Noir Blendable Pencils, these are the pencils I used: 013, 017, 022, 057 and Spectrum Noir Paper Stumps and blending solution.
  • Die-cut piece with Circle dies.
  • Die-cut a Bella Doily Die from yellow cardstock.
  • Add doily to card base with foam adhesive, add image on top of doily piece with foam adhesive as well.
  • Stamp sentiment on a piece of Ivory Cardstock in Olive Archival Ink. Die-cut piece and add it to image.
  • Finally, add little bits of Star Dust Stickles to center of flowers.

Submitting this project to:
Hope you like it!!
Have a fantastic day.

Wednesday, May 7

Happy Birthday


Hello friends! Happy Wednesday, today I have a very special post for you. Top Dog Dies is having a preview of new dies and you can get them this Friday May 9th!! Also, if you are on Facebook, you have the chance to win one of the new set just by leaving a comment!!

Ok, now let me show you the project I have for you today. I used the Alaina Lace Border Die! Love it!

Here are the details:

  • Make a card base from Ivory Cardstock. 5"x5" square card.
  • Cut a panel from Yellow (4 3/8" square) and Ivory (4.25") cardstock and adhere them together.
  • Adhere a piece of double sided sticky paper on a piece of Ivory Cardstock, remove the other sticky side and apply ultrafine glitter, then using the new Top Dog Dies Alaina Lace die, die-cut 2 pieces.
  • Adhere pieces to panel. Add a strip of Yellow and Ivory cardstock and stamp sentiment.
  • Die-cut flowers from yellow and red felt. Sew a button and adhere it to card.
  • Finally, add little pearls to each corner.


  • Cardstock: Ivory (GKD), Yellow (SU)
  • Stamp set: Lots to Say (Reverse Confetti)
  • Ink: Coffee Archival (Ranger)
  • Accessories: Ultrafine Glitter, clear button, Pearls (SU), Double sided sticky page (Scor-tape), dimesnionals.

These are the dies I used, a couple of more days and you will be able to get them!

Submitting this project to:


Hope you like it!
Have a fantastic day!

Monday, May 5

Homenaje a mamá con Latina Crafter


The DT from Latina Crafter is giving you a lot of great ideas for the very special person in our lives "Mom", since my mom is not here anymore, I made a card for my little sister, who is a mom of 4, the card says "Sister, you are always in my heart. Happy Mother's Day"


Hola amigas, el "Equipo de Diseño" de Latina Crafter el día de hoy les quiere regalar ideas para esa persna especial en nuestras vidas, Mamá!! Mi mamita linda me mira desde el cielo, por eso para esta ocasión preparé esta tarjeta para mi linda hermanita (si es linda y es la bebita de los hermanos) jejeje. La tendré que mandar pronto para que le llegué a tiempo.

Esta es una tarjeta del estilo "Shaker card", una técnica bastante sencilla con resultados lindísimos. Qué les parece? Esta idea del background la tenía en mi cabeza y me encanta que haya resultado como lo había envisionado.

The saying says " Sister, you are always in my heart. Happy Mother's Day"

Aquí les dejo la lista de materiales utilizados:
Gracias por acompañarnos a celebrar a Mamá, no se olviden de recorrer todos los blogs, después de visitarnos a todas, escríbanle a Diana a diana@latinacrafter.com para que reciban un regalito super especial.

**For this project I used the sketch from Seize the Sketch**


Espero les guste mi trabajo, no olviden pasar por el blog de Latina Crafter para ver los otros proyectos hechos por el Equipo de Diseño.

Un abrazo!

Friday, May 2

Friday Feature: Love Birds Stamp and Die Set.

Hello sweet friends and welcome once again to Sweet 'n Sassy Stamps New Release Friday Feature!
The Design Divas have some fabulous samples for you to see today as we feature one of our new stamp sets and matching dies available at the Sweet 'n Sassy Store…Love Birds clear stamp set and Love Birds Die Set


  • Stamp set measures approximately 6" x 4"
  • The branch measures approximately 4 1/4" x 2"
  • The love birds measure approximately 2" x 1 1/4"
  • Designed by Korin Sutherland
  • Stamp set priced at $15
  • Die set priced at $14.50
  • Bundle Price is $26.50

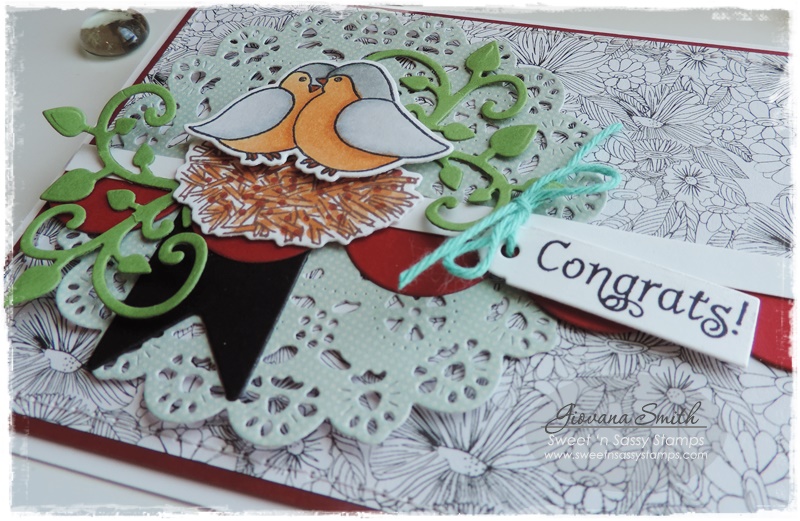
Here is the card I made using these sets. I used the couple bird couple and nest. The images were colored with Spectrum Noir markers. Die-cut a large scallop, mini tag for the sentiment and banner. Added all the pieces to the card panel. Then added leaves and attached the sentiment with twine.


You are invited to join us! 

Our challenge to you this week is to use a bird on your creation.
The first 12 cards in the hop were created for your inspiration by the design team.  As you hop along, leave a little love behind, then create your own BIRD card and use the linky tool to add it to the gallery!

Just a few guidelines to remember as you play:
            
  • You don't have to use a Sweet 'n Sassy image to enter (although we sure love when you do!)
  • You'll have until Thursday, May 8th at midnight EST to enter
  • We'll draw 1 winner from this week's challenge to receive a $10 credit to Sweet 'n Sassy Stamps!
  • Please use code SNSFFC10 when uploading to Splitcoaststampers or other galleries 
  • Share a link to your creation below.


Thanks for joining us today!  Be sure to check back again on Friday, May 9th to see if you won and to check out the next Friday Feature & Challenge!

Thursday, May 1

CAS Masculine Card

Hello friends!! Hope you all are having a great day. Today I have a very "Clean and Simple" masculine card, no coloring required. I used this beautiful scene stamp from Crafter's Companion "Windmill Reflection"

By the way, this month's Crafter's Companion challenge theme is "Masculine" you can find all the info and how to submit your projects HERE

Here are the details:


What do you think?

Submitting this card to:
Hope you like it.
Have a fantastic day!