Saturday, February 8

February Release Blog Hop Day 1: Bloom & Grow

Welcome to DAY 1 of our February Release Blog Hops!

featuring "Bloom and Grow" 

 
Today the DT is thrilled to share the new Bloom & Grow stamp set with you.  This 4"x6" set includes 6 images that can be used together for layering or to create backgrounds.  It also includes 6 beautiful sentiments that have to do with blooming and growing---a lovely new set to get you thinking Spring.

  
  • Large Flower Petal image measures approximately 1.5" x 1.5"
  •  Designed by Korin Sutherland
  • Stamp set is $15

These are the projects I have for you today.

For this card, I stamped the flowers and stems on Ivory Cardstock in Distress Inks, then did some fussy cut, bended the petals and mounted them together, then added a small clear rhinestone in the center. For the sentiment I just did a little crazy cut, LOL. I die-cut a doily from white cardstock, cut it in half, adhere in to my cardstock/PP panel, added lace and stitches. The added my flowers, sentiment and swirl rhinestones.
I used the Cardabilities Sketch as an inspiration for this project.


++++++++++++++++++++++++++++++++++++++++++++++++++
 
This second project is super easy!!  You know, sometimes I get in the mood for CAS projects :) so I decided to follow the Fusion Sketch and give it a try. So, for this card I used red and pink Distress Inks for the flowers, green for the stem and Jet Black Archival for the sentiment, I added a bit of Liquid Pearls and punch the bottom corners.  


The DT has shared their gorgeous samples in the thumbnails below.  Stop by each of their blogs and comment for a chance to WIN one of (2) $20 gift codes to our store!

Don't miss these other opportunities to win:
(1) $20 gift code drawn from all comments on Friday's release blog post
(1) $20 gift code drawn from all comments on full reveals in our SCS forum
(1) $20 gift code drawn from all participants in our release challenge hosted on blog

The deadline to comment for a chance to win is midnight EST Friday, February 14th.  The list of winners will be announced on our blog by Monday, February 17th.

Thanks so much for joining us!  Enjoy the hop!

Wednesday, February 5

Top Dog Dies Valentine Blog Hop


Hello friends!! Today is a very exciting day, the Top Dog Dies Design Team is having a super cool Valentine's Blog Hop!!  Sharing ideas so you can get inspired and create, and better yet, if you use Top Dog Dies.

If you came from Amy's blog, you are in the right spot, if not please visit the Top Dog Dies Blog to find the right order of the hop.

Now, let me show you the projects I have for you today.

I {heart} you card: Love the way this card turned out!! A little bit of shabby chic goodness. Pretty papers and stitches (I love my sewing machine).

Here are the details:
  • Make card base from White Cardstock. A2 size.
  • Cut a panel from patterned Paper 3.75" x 5" and another one in contrast color 3.25" x 4.5". Die cut a piece of red cardstock using Heart Border Die, adhere it to panels and add zig zag stitches. Cut the bottom part to create a banner.
  • Die-cut a Heart Doily in Vellum textured Cardstock. Ink all edges with Vintage Photo Distress Ink. Adhere it to card panel with dimensionals.
  • Die-cut the I {heart} U from Heart Mini Album Finishers in red cardstock. Adhere them to heart, add 3D Crystal Lacquer to heart and then sprinkle clear glitter. Set aside to dry.


Top Dog Dies used in this project:

Submitting this project to:
 +++++++++++++++++++++++++++++++++++++++++++++++++++++++++++

Be Mine Tag: You may know I have a little passion for Mixed Media projects! So, I thought I could share a MM project today. This is super shimmery IRL.

Here are the details:
  • Die-cut a couple of small tags from chipboard using Tag Album Die.
  • Glue tags together.
  • Paint tag with White paint (I used Snow Cap Acrylic Paint), after it dries, add African Jade Twinkling H20 paint. Set aside to dry.
  • Die-cut a Heart Doily from Patterned Paper, ink all edges with Vintage Photo Distress Ink.
  • Die-cut a couple of Wildflowers, 1 from White cardstock and 1 from Patterned Paper, glue them unevenly, set aside.
  • Die-cut the little tag from Alexa Frames Set using Patterned Paper, stamp sentiment in Jet Black Archival Ink (sentiment from SNSS Valentine Critters)
  • Now that your tag is dried, use a stencil, here I used a Mini Chicken Reverse Wire stencil, apply a coat of Embossing paste and set aside to dry.
  • After dries, add lace and ribbon, add doily heart to the side, wildflowers and sentiment.
  • Finish details, ink all edges of tag with Vintage Photo Distress Ink, ribbon, button and twine. 


Top Dog Dies used for this project:
Submitting this project to:

 Now, it's your turn to hop to Karen's blog and see her fantastic creation.
 
What about a giveaway!! One random person will win the Top Dog Dies Heart Mini Album and Heart Mini Album Finishers Set (valued at $42)! You need to register via the Rafflecopter widget on the Top Dog Dies Blog page, you have until Sunday, February 9th.
 
  
Hope you like my projects!
Have a fantastic day, I would love to red your comments.


Tuesday, February 4

You & Me

Hello friends!! Today, I want to show you a super cute card I created with another Bebunni set "Perfect Couple", this is the perfect set for your Valentine projects.

Here are the details:
  • Cut a piece of Coastal Cabana Cardstock 11" x 5", folded in half to get a 5.5" x 5" card.
  • Cut long .5" stripes of  Strawberry Slush Cardstock and add them around all sides.
  • Stamp image on Ultra Smooth Premium White Cardstock in Black Ink. Color image with Spectrum Noir Markers.
  • Spectrum Noir Markers used:
    • Bunnies: PP4, PP3, PP2, PP1, BT4, BT3, BT2, BT1...
    •  Heart: CR8, DR3
    •  Shade: GB4, BG2, BG1
    •  Tag: BG1
  • Die-cut and emboss image and sentiment using Spellbinders Dies.
  • Add image to card, cover heart with 3D Crystal Lacquer, then sprinkle clear glitter and set aside to dry.
  • Add sentiment and rhinestones.
  • Add a little twine bow to pink bunny.


I am submitting this card to:

Hope you like it!
Have a fantastic day!!

Saturday, February 1

Oh la la

Hello friends! Hope you are having a nice and easy Saturday, mine is going to be a bit busy, but exciting at the same time, my daughter is participating in a Robotic competition and she is super excited and nervous, I am so very proud of her! I can wait to see what the future will bring for her, and she is only 9!!

Anyways, can you believe it is February already?! Crazy!! I know, pretty soon we are going to be thinking Christmas again, ok, I am just kidding ;)

Since it's the first of the month is time for another sketch challenge over at Latina Crafter Blog, so this is my interpretation of the sketch.


Here are the details:
  • Make card base from White cardstock. A2 size.
  • Cut a panel from Kraft cardstock (5" x 3.75"), adhere patterned paper from this kit,  add center panel and add stitches.
  • Die-cut a doily (Top Dog Dies) from Kraft Cardstock, adhere it to pane, cut side of the doily to fit panel.
  • Stamp sentiment from Oh la la set on manila tag in Espresso Archival Ink, ink all edges with Vintage Photo Distress Ink. Add it to panel.
  • Add lace, felt heart, button with twine (all these item from the same kit mentioned above).
  • Stamp image from Oh la la set on patterned paper in Espresso Archival ink, cut it out and add it to card. 


I am submitting this card to:

Hope you like my project.
Thanks so much for stopping by!

Friday, January 31

Hope canvas (Picture Tutorial)

Hello friends!  Hope you are having a fantastic day, I have been a bit quite around here, sorry about that. I am behind the scenes working on some new projects you will see very soon.
Today, I want to show you another picture tutorial I created for eclectic Paperie. I forgot to take few pictures and some didn't turn out good, but I hope you like this one and inspire you to create.

Here are the details (Sorry, I forgot to take few pictures)
 
  •  Paint all the circles with Ginger Peach Twinkling H2O, set aside to dry, it will take few minutes. (Ohhh, I love this color!)
 
 
  • Add your circles, leaves, stems to your canvas with seal glue. Take your Faber Castell Black Big Brush pen and define all edges, then add a button to each center flower, Iwent ahead and wrote "hope" with my black marker.
 
 
This is final product!  I added Gold 3D Stamp Paint to some of the borders, I used my finger since I wanted a rough look.  

Hope you like it! I would love to read what do you think about this project.
Have a fantastic day!

Tuesday, January 28

Heartfelt Creations Alumni January Blog Hop

Hello friends, it's time for another Heartfelt Creations Alumni Blog Hop!! Just for hopping along and leaving a comment in every participant blog, you have the chance to win a $25 Gift Certificate to the Heartfelt Creations Store!! You have until January 31st at midnight (ET) to leave a comment.

This is the project I have for you, on Sunday, I found out about the birthday to a sweet lady who doesn't like to celebrate or even mention about her birthday, so since I didn't have my project all done, I decided to make a birthday card for her, ad although her birthday is on the 31st, I will be giving her this card today since I will be teaching at church, craft night are always fun!!

So I based my card on this sketch from Sketchbook Saturday.


Here are the details and products I used:
  • Make card base from Kraft Cardstock. A2 size.
  • Cut a panel from White Cardstock 5" x  3.25.
  • Adhere ribbon and lace (from this kit). Stamp the flower center from the Dahlia Bouquet set in Pink ink.
  • Stamp Small Tattered Blossoms flowers on patterned paper, die-cut flowers using coordinated dies. Ink all edges with red ink, mount flowers together and add a red dewdrop on each center.
  • Die-cut a couple of vines from Sweet Juliet Set, adhere them behind the flowers.
  • Stamp sentiment from Bold Vintage Floret in Jet Black Archival. (I stamped only half of the sentiment)
  • Adhere flowers to panel and add little bits of Star Dust stickles to some of the petals.
  • Add panel to card base with dimensionals.
  • Add a couple of score lines to the bottom of front card.


Now, this is the list of participants:

 Thanks so much for stopping by!!
Enjoy the hop.

Monday, January 27

Special Friend

Hello friends!! Hope you are having a fantastic day! Today, I want to show you a new card I made using this super cute image from Special Friend stamp set, this is one of the Barkley Everyday Collection sets from Crafter's Companion USA. I love them all!!

Here are the details:
 

I am submitting this card to:
  • The Card Concept: Texture: Zig zag stitches, doilies :)
  • Runway Inspired: Inspired by the colors, flowers :)
Hope you like it!
Have a fantastic day!

Saturday, January 25

El Amor está en el aire Blog Hop

Spanish post alert!! This is a Valentine Blog Hop!! You are welcome to hop along and leave a comment for your chance to win a nice Card Kit!!


El Equipo de Diseño del Latina Crafter les invita a disfrutar de nuestro primer blog hop del año 2014 "El Amor está en el aire", con muchas ideas y proyectos inspiradores para todas ustedes.
No se olviden de dejar sus comentarios en todos los blog, al final elegiremos una ganadora via random y la afortunada recibirá un lindo "Kit".

Para esta oportunidad, les he preparado una tarjetita bastante sencilla, pero con mucho detalle, inspirada en este tutorial con un poquito de mi propia inspiración.

Aquí les indico los pasos:
  • Coratr un pedazo de cartulina blanca, 9" x 4.5", doblarla en la mitad y tenemos nuestra tarjeta base de 4.5".
  • Cortar un pedazo de cartulina de dimensiones 3.75" x 3.75", cubrir la pieza con tape.
  • Cortar tiras de papel, aprox 0.5" y agregarlo al pedazo de cartulina en la dirección deseada. Cortar los excesos de papel.
  • Die-cut la palabra Amor, die-cut un extra con cartulina blanca, colocar la pieza, agregar los pedacitos de las letras "A" y "o" de Amor del primer die-cut.
  • Die-cut coranzocitos en cartulina roja y agregarlos con dimensionales.
  • Agregar ribbon o cinta y twine.
  • Agregarlo a la base de tarjeta.
 
No se olviden de dejar sus comentarios en todos los blog participantes, el premio es un super kit!! La ganadora sera elegda via random y sera anunciada el día 1 de febrero en el blog de Latina Crafter.  Al final del recorrido, brinca nuevamente al blog de Latina Crafter y deja tu nombre allí :)


Este es el listado de los blog participantes:
Gracias por acompañarnos!!

Thursday, January 23

Happy Valentine's Day

Hello friends! Today I have a very cute Valentine card using my new "Valentine Critters" set! Anytime I look at this set,  I smile :) I think all the images in this set are adorable.

This card is super clean and simple, yet cute! I stamped the elephant image on a piece of White Cardstock and colored it with Spectrum Noir Markers: DGR1,3,6; GG1,2,3,5; BGR1,2,3; FS5. Then I stamped the sentiment in Jet Black Archival ink and added a piece of chevron patterned paper, added zig-zag stitches. Die-cut a tiny heart and added it with dimensionals. Finally I added Crystal lacquer to the heart balloons and sprinkle clear glitter. After that was dried, I added the panel to a red card base.


I am submitting this card to:


Hope you like it!
Have a fantastic day!

Monday, January 20

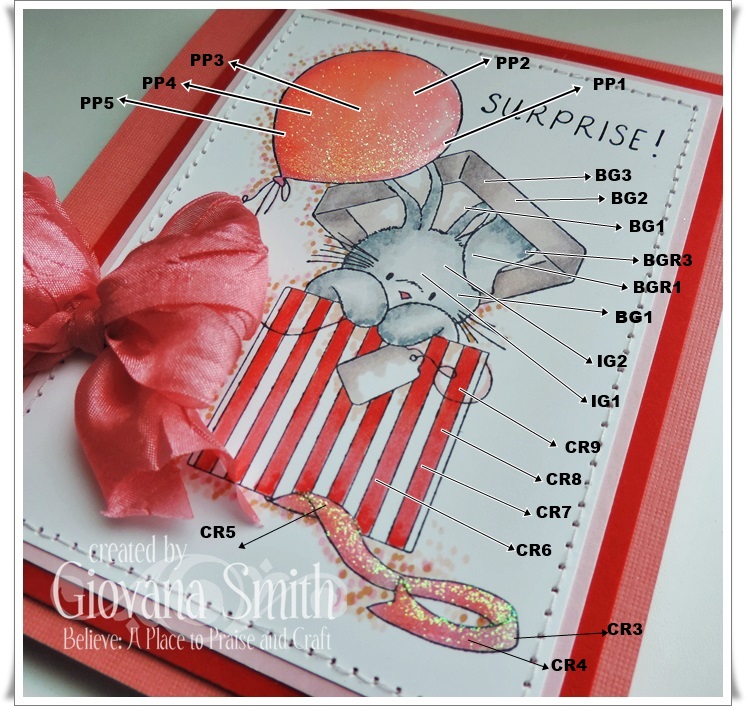
Surprise!!


Hello friends! Hope you are starting a great week, today I have this cute bunny card using Bebunni Peek-A-Boo Set  from the Bebunni Collection. I made my card pretty pink-y girl-y style, LOL.

Here are the details:
  • Make card base from Pink Textured cardstock. Top folded. Card size 5" x 6"
  • Stamp image on Ultra Smooth Premium White Cardstock in Memento Tuxedo Black Ink.
  • Color image with Spectrum Noir Markers, this is the list of markers I used:
    • Bunny: IG1, IG2, BG1, BGR1, BGR3
    • Balloon: PP1, PP2, P3, PP4, PP5
    • Box Top: BG1, BG2, BG3
    • Box Bottom: CR6, CR7, CR8, CR9
    • Ribbon: CR3, CR4, CR5, CR6
    • Dots: TN3, CR5, FS8
  • Stamp sentiment in Black Ink.
  • Mat stamp piece with Pink and Red Cardstock, add straight stitches.
  • Adhere panel to card base.
  • Add 3D Crystal Lacquer to balloon and ribbon, sprinkle clear glitter and set aside to dry.
  • Create a big bow and adhere it to card.


Hope you like!
Have a great day!

Friday, January 17

Hello there (Picture tutorial)

Hello everyone! Hope you are having a great day! The germs have visited this residence and we are feeling a bit sick, so since I don't have anything new, I want to share a tutorial I made few weeks ago for eclectic Paperie. This technique is fun!!

Let's get started!

Start with a piece of Distress Watercolor, stamp Joy image (by Catherine Scanlon) in Versamark Watermark ink, apply Seafoam White embossing powder over image and heat set.


Add Blood Orange Gelato over flowers and spread them with the tip of your finger (or sponge)


Mix Acqua Dolce & Banana Gelatos to create a green color, spread all over the leaves, color the center of the image with Banana Gelato. With the help of a baby wipe, remove excess.


Add Gold Gelatos to all the image edges. After that, spray the whole piece with  Sunflower Sparkle Perfect Pearls Mists, set to dry, your piece will shimmer beautifully!


Create a dot background, apply White embossing paste using Fancy Pants Dots Stencil.


This is a very fun part! I wanted a match ribbon for my project, but any of the ribbon I own matched this project, so I decided to create my own!! Super easy!

You need Seam binding ribbon, Blood Orange Gelato and Sunflower Sparkle Perfect Pearls Mists


Color your ribbon with your Blood Orange Gelato, as much or as little you want, then spray your ribbon with Sunflower Sparkle Perfect Pearls Mist!


Click on the picture so you can see all the beautiful shimmery ribbon!!


This is the final result, I put all the pieces together, created a triple bow and added pearls to the flowers! I really love how vibrant these colors are together!


I am submitting this project to:
 
Hope you like it and give it a try!
Have a beautiful day.

Thursday, January 16

Mixed media inserts

Hello friends!! Hope you all are having a great day! Today, I want to show you another mixed media project I created yesterday, this time they are inserts for my Z Becky Brown bag. For this bag I used Ziva Windsor Blue inserts, added Gold Ferro Metallic Effect Paint randomly, set aside to dry, After few minutes I painted the inserts withPool Acrylic Paint (Ranger) and Twinkling H2O -Olive Vine, then masked the inserts with a Ranger Swirl Mask. Finally I stenciled flowers using Embossing Paste, colored the flowers with paint and let it dry.

These inserts were made in about 2 hours, so if I can do it, you can too!! Did I mention that mixed media/coloring/painting is so relaxing? I love it!!

I am submitting this project to:


Hope you like it as well!!
Have a fantastic day!