Hello!!! Are you excited to start the celebration for "World Card Making Day"? Well, Gina K. Designs has a fantastic SALE going on to celebrate WCMD!
Friday, October 5
World Card Making Day with Gina K. Designs!!
Hello!!! Are you excited to start the celebration for "World Card Making Day"? Well, Gina K. Designs has a fantastic SALE going on to celebrate WCMD!
I will come back later with more stuff to celebrate this day!! Stay tune.
Giovana
Thursday, October 4
Especially for you
Hello my friends! Welcome to another Heartfelt Creations Wednesday project! My project for you today is a Clean and Simple card, very easy to make in less than 10 minutes :)
Also, Heartfelt Creations has posted the semifinalists and you can vote for your favorites and also get a chance to win a $50.00 GC. At the same time you can vote for your favorite DT members, hope you can give me your vote :)
Here is the card I ade for you today.
Directions:
Heartfelt Creations Products Used on this Project:
Other Products:
All the products in blue can be found at the Heartfelt Creations Store
Hope you like it!
Have a fantastic day!!
Also, Heartfelt Creations has posted the semifinalists and you can vote for your favorites and also get a chance to win a $50.00 GC. At the same time you can vote for your favorite DT members, hope you can give me your vote :)
Here is the card I ade for you today.
Directions:
- Make card base from Ivory Cardstock (A2 size). Stamp sentiment on right side in VIntage Photo Distress Ink.
- Cut a panel from Ivory Cardstock (2.5" x 5.25"), dry emboss piece. Add Lace Tape Ribbon on both sides then adhere it to card front.
- Stamp butterflies on Patterned Paper, cut them out and adhere them to card panel. Add Stickles.
Heartfelt Creations Products Used on this Project:
- HCPC 3499 Delicate Asters and Butterflies PreCut Set
- HCPC3498 Delicate Aster Vase PreCut Set
- HCDP1 226 Delicate Asters Paper Collection
Other Products:
- Cardstock: Ivory (GKD)
- Ink: Vintage Photo Distress, Black Archival (Ranger)
- Accessories: Seeing Spots Embossing folder (Provocraft), Light Pink Lace Tape Ribbon (Love My Tapes), Star Dust Stickles (Ranger), Scor-tape.
All the products in blue can be found at the Heartfelt Creations Store
Hope you like it!
Have a fantastic day!!
Wednesday, October 3
Gina K. Designs Inspiration Blog Hop Day 3: "Primitive Blessings" , "Seasonal Labels"
The Design Team for Gina K. Designs welcomes you to another fabulous Inspiration Blog Hop!!! Gina and the Design Team will inspire you with many beautiful ideas! And as you hop through their blogs, make sure to leave a comment on each of them because we will choose a few random comments and those stampers will each win a Gina K. Designs Grab Bag that could have anything from stamps to paper to embellishments! To see the list of winners check the Big News forum at Stamp TV a couple of days after the hops!!
Primitive Blessings My project is very cute and simple, no sewing machine required, LOL, not even coloring :)
Directions:
- Make card base from Cherry Red Cardstock. A2 size.
- Cut a panel from Patterned Paper. Round all corners and distress all edges.
- Stamp sentiment on Patterned Paper in Black Ink.
- Die-cut and emboss 2 borders in Kraft and Innocent Pink. Adhere them to card.
- Die-cut, emboss and stencil a piece of Patterned Paper using Wonky Rectangles. Stamp image in black Ink. Adhere it to card.
- Die cut and emboss a heart. Add a button and adhere it to card.
Card Recipe:
- Cardstock: Ivory, Cherry Red, Innocent Pink, Kraft (GKD)
- Patterned Paper: Be Happy (MME)
- Stamps: Primitive Blessings (GKD)
- Ink: Vintage Photo Distress (For sponging), Archival Black (Ranger).
- Embellishments: Pearls, Red Button, Hemp.
- Accessories: Wonky Rectangles, Floral Doily Accent Shapeabilities (Spellbinders), Heart die (SNSS), Embossing folder.
===================================
Seasonal Labels: I decided to create another simple card, here I just die-cut and emboss a poinsettia to make it more festive :)
Directions:
- Make card base from Ivory Cardstock.
- Mat Kraft CS and "Blizzard" Patterned Paper, add zig-zag stitches. Add piece to card.
- Stamp label border in Red Ink and saying Black Ink. Die-cut and emboss piece with Fancy Tags Two Dies. Add label to card
- Die-cut and emboss poinsettia. Layer all pieces and adhere it to card. Add a gold nailhead to flower.
- Add swirl bling.
Card Recipe:
- Cardstock: Ivory, Kraft, Cherry Red, Grass Green (GKD)
- Patterned Paper: Blizzard (GKD)
- Stamps: Seasonal Labels (GKD)
- Ink: Black Archival (Ranger), Real Red (SU).
- Embellishments: Gold nail head (GKD), Swirl Bling (Want2Scrap)
- Accessories: Pop dots, Fancy Tags Two, Layered Poinsettia (Spellbinders)
All the items in bold can be found at Gina K. Designs Store
Wednesday, Oct 3 - Primitive Blessings & Seasonal Labels
Gina K - Illustrator Primitive Blessings & Seasonal Labels
- Becky Oehlers
- Beth Silaika
- Carolina Buchting
- Cathy Tidwell
- Deb Felts
- Emily Giovanni
- Giovana Smith
- Lee Murphy
- Lori McAree
- Melanie Muenchinger
- Sharon Harnist
- Suzanne Dean
- Tami Mayberry
- Theresa Momber
- Tina Gilliland
- Vicki Dutcher
Hope you like my projects!
Have a great day!!
Have a great day!!
Tuesday, October 2
Gina K. Designs Inspiration Blog Hop Day 2: Wicked, You say 'Ello & Take Note
The Design Team for Gina K. Designs welcomes you to another fabulous Inspiration Blog Hop!!! Gina and the Design Team will inspire you with many beautiful ideas! And as you hop through their blogs, make sure to leave a comment on each of them because we will choose a few random comments and those stampers will each win a Gina K. Designs Grab Bag that could have anything from stamps to paper to embellishments! To see the list of winners check the Big News forum at Stamp TV a couple of days after the hops!!
Here are the projects I've created for YOU today :)
Wicked: Honestly, I don't celebrate Halloween, but this set is really cute!! Don't you think? This Boo! reminds me my daughter when she was little and was constantly "scaring me", LOL. After that she became boo-boo girl, just don't tell her I told you :)
Directions:
- Make card from White cardstock.
- Stamp Boo! and ghost on White Cardstock. Cut them out. Set aside.
- Stamp fence and ghosts on Sweet Mango cardstock in Black Archival Ink. Stamp stars in London Fog Ink. Add cheese cloth, mat this piece with Moonlight Fog Cardstock, Add stitches.
- Add extra ghost with large pop dots.
- Die-cut or punch a star in Vibrant Violet Cardstock. Add BOO! and adhere it to card with pop dots.
- Tie on twine.
- Add panel to card base.
Card Recipe:
- Cardstock: White, Moonlight Fog, Sweet Mango, Vibrant Violet (GKD)
- Stamps: Wicked (GKD)
- Ink: Memento London Fog, Memento Tangelo (Tsukineko), Black Archival (Ranger)
- Embellishments: Orange Twine, Black Twine (The Twinery).
- Accessories: Pop dots, Scor-tape, Cheese cloth, Star die (SNSS), Sewing machine
================================================
You Say 'Ello: I think this set is the cutest set ever :) Love it very much. My card is a CAS one, but I love it very much.
- Make card base from White Cardstock. A2 size.
- Cut a panel from White Cardstock (5" x 3.75").
- Stamp phone booth on White Cardstock in Red Ink, cut it out.
- Stamp Sentiment and bubble, cut it out.
- Stamp border in Black Ink and cut out piece.
- Adhere stamp images on White Cardstock panel with pop dots. Paper pierced border. Tie on red twine.
- Add panel to card front.
Card Recipe:
- Cardstock: White (GKD)
- Stamps: You Say 'Ello (GKD)
- Ink: Black Archival (Ranger), Real Red (Stampin' Up)
- Embellishments: Red Twine (The Twinery)
- Accessories: Small and Large Pop dots. Paper piercing set.
============================================
Take Note: Another fantastic set by Tami!! I mixed this set with Ticket Trio Set to make a Baby card. I love it!!
Directions:
- Make card base from Kraft Cardstock.
- Cut a panel from Ivory Cardstock (5" x 3.75"). Die-cut scallop borders from Patterned Paper, adhere them to panel and add stitches.
- Stamp notebook lines in Faded Jeans Distress Ink and sentiment and hearts in Red Ink on a manila tag. Add ribbon,treat button with black twine and add tag to panel.
- Die-cut and emboss a piece of Kraft Cardstock with Circle Nestabilities.
- Stamp Ticket and Sentiment on Patterned Paper, cut it out. (If you own the coordinated die, use it here, I just used my scissors :)
- Add panel to card front.

Card Recipe:
- Cardstock: Kraft, Ivory (GKD)
- Stamps: Take Note, Ticket Trio (GKD)
- Patterned Paper: Be Happy (MME)
- Ink: Faded Jeans Distress (Ranger), Real Red (Stampin' Up)
- Embellishments: Red button, Pink Grosgrain Ribbon, Black Twine (the twinery)
- Accessories: Circle Nestabilities (Spellbinders), Pop dots, Scor-tape, Manila tag, Small and Large Scallop dies (SNSS).
All the items in bold can be found at Gina K. Designs Store
Tuesday, Oct 2 - Take Note, Wicked & You Say 'Ello
Gina K
Beth Silaika – Illustrator Wicked
Becky Oehlers – Illustrator You Say 'Ello
Tami Mayberry – Illustrator Take Note
Gina K
Beth Silaika – Illustrator Wicked
Becky Oehlers – Illustrator You Say 'Ello
Tami Mayberry – Illustrator Take Note
Hope you like my projects!
Have fun hopping!!
Monday, October 1
Gina K. Designs Inspiration Blog Hop Day 1: "Beyond Baskets" , "Joyful Holiday"
The Design Team for Gina K. Designs welcomes you to another fabulous Inspiration Blog Hop!!! Gina and the Design Team will inspire you with many beautiful ideas! And as you hop through their blogs, make sure to leave a comment on each of them because we will choose a few random comments and those stampers will each win a Gina K. Designs Grab Bag that could have anything from stamps to paper to embellishments! To see the list of winners check the Big News forum at Stamp TV a couple of days after the hops!!
Here are my projects:
Beyond Baskets: Love this set! Melanie has done it again. This set is a must have, you can mix-match this set as I did here. I used the poinsettias from "Holiday Basket" set.
Directions:
- Make card from White Cardstock 5.5" square.
- Stamp sentiment at the bottom of front card in Black Archival Ink.
- Stamp basket and poinsettias on White cardstock in Memento Tuxedo Black. Color image with markers. Cut them out. Add Gold Gala Glitz to poinsettias.
- Die-cut, emboss and stencil a piece of White Cardstock using Square Nestabilities.
- Die-cut and emboss a piece of All Spruced Up Cardstock using Fleur de Lis Square Nestabilities.
- Mat pieces together and adhere them to card front with small pop dots.
- Tie on Green and Red twine and make a bow.
Card Recipe:
- Cardstock: White, All Spruced Up (GKD)
- Stamps: Beyond Basket, poinsettias from Holiday Basket (GKD)
- Ink: Memento Tuxedo Black (Tsukineko), Black Archival (Ranger), Copic Markers.
- Embellishments: Red & Green Twine (The Twinery), Gold Gala Glitz.
- Accessories: Pop dots, Square Nestabilities, Fleur de Lis Square Nestabilities (Spellbinders)
=============================================
Joyful Holiday: Theresa has created this beautiful Christmas set, I can see tons of possibilities with this set.
Directions:
- Make card from White Cardstock. A2 size.
- Cut a strip of Patterned Paper (1" x 5.5"), mat it with a slightly bigger piece of Cherry Red Cardstock and add zig-zag stitches.
- Cut a piece of Ocean Mist, emboss it with Polka Dots folder, punch corners, mat this with a piece of Cherry Red and add stitches. Add pieces to card front.
- Stamp image on White Cardstock in Memento Tuxedo Black. Color it with Markers. Stamp a couple of poinsettias, color and cut them out.
- Die-cut, emboss and stencil image with Labels 1 Nestabilities. Stamp sentiment.
- Adhere image to card. Add stickles.
- Add extra poinsettias. Add Crystal Lacquer and a pearl.
- Adhere gold tinsel and pom-pom ribbon.
Card Recipe:
- Cardstock: White, Ocean Mist, Cherry Red (GKD)
- Stamps: Joyful Holiday (GKD)
- Patterned Paper: Blizzard (GKD)
- Ink: Memento Tuxedo Black (Tsukineko), Copic Markers.
- Embellishments: Gold tinsel (etsy). Pom-pom ribbon (American Crafts)
- Accessories: Labels 1 Nestabilities (Spellbinders), Polka Dots Embossing folder, Corner Punch (Fiskars), Sewing machine.
All the items in bold can be found at Gina K. Designs Store
Check out all the amazing designs and inspiration:
Gina K
Melanie Muenchinger - Illustrator Beyond Baskets
Theresa Momber - Illustrator Joyful Holiday
- Becky Oehlers
- Carolina Buchting
- Carolyn King
- Cathy Tidwell
- Deb Felts
- Emily Giovanni
- Giovana Smith
- Jimmi Mayo
- Lee Murphy
- Lori McAree
- Michelle Woerner
- Sharon Harnist
- Suzanne Dean
- Tami Mayberry
- Tina Gilliland
- Vicki Dutcher
Have a great day!!
Saturday, September 29
Feliz Dia de Acción de Gracias
Hello my friends! As you can see I am really into "Thanksgiving" (Acción de Gracias in Spanish).
I created this card using the set "Dando Gracias" (Giving thanks) from Latina Crafter. I used the patterned paper from the especial KIT LC is offering to celebrate "World Card Making Day". Now, if you buy this set this week, you will receive 10 glassine bags for FREE!!
Hope you like it!
Have a great day!
I created this card using the set "Dando Gracias" (Giving thanks) from Latina Crafter. I used the patterned paper from the especial KIT LC is offering to celebrate "World Card Making Day". Now, if you buy this set this week, you will receive 10 glassine bags for FREE!!
Hope you like it!
Have a great day!
Friday, September 28
Happy Thanksgiving
Hello dear friends! Hope you are having a fantastic day. I have to confess that lately I have been super busy and didn't have the time to schedule posts as I usually do. BUT I am creating super cute things for YOU!! Next week, you are invited to join us to a super duper Blog Hop you don't want to miss :)
For today I have a card I made using the sketch #404 from Splitcoaststampers and the color inspiration from Touch Twin Markers! In fact, I used the Touch Twin Markers I won a couple or so weeks ago. I really like them, I just wish I could have more :)
The stamp set I used is from "Autumn Bounty" by Sweet 'n Sassy Stamps, (now, it's sold out, but you can get the image in a digital version HERE)
Since I didn't have a red TTM, I decided to do a little bit of Paper piecing, then added Star Dust Stickles. The Patterned Paper is from Fall Collection by Bo Bunny.
Touch Twin Markers used:
Submitting this card to:
Have a great day!
For today I have a card I made using the sketch #404 from Splitcoaststampers and the color inspiration from Touch Twin Markers! In fact, I used the Touch Twin Markers I won a couple or so weeks ago. I really like them, I just wish I could have more :)
The stamp set I used is from "Autumn Bounty" by Sweet 'n Sassy Stamps, (now, it's sold out, but you can get the image in a digital version HERE)
Since I didn't have a red TTM, I decided to do a little bit of Paper piecing, then added Star Dust Stickles. The Patterned Paper is from Fall Collection by Bo Bunny.
Touch Twin Markers used:
- Leaves: YR133, BR104
- Sunflowers: YR23, YR33
- Vase: GG1, PB76
- Pumpkin: YR23, YR33, BR104
- Bow: RP87
- Little flowers: P146, PB73
Submitting this card to:
- Touch Twin Markers Challenge: Color's Inspiration
- Simon Says Challenge: Anything Goes
Have a great day!
Wednesday, September 26
Latina Crafter Blog Hop: "Gracias"
Hola mis amigas, hoy el equipo de Latina Crafter ha preparado un fabuloso Blog Hop con el tema "Gracias", el equipo ha trabajado con diferentes sets y ha creado proyectos muy lindos para todas ustedes :) Damos Gracias a Dios por todo aquello que nos dá, salud, familia, alimentos.
Hello my friends!! The Latina Crafter DT has prepared a fantastic blog hop for all of you with the "Thanks" theme. We have used different stamps sets, enjoy all our projects!
Esta es la tarjetita que les he prepaprado para hoy. El set que usé es "Confianza y Alabanza en el Señor", el Papel es Documented "For the Record 2" by Echo Park Paper, la cinta y la flor son preciosas y hacen muy buena combinación con el papel. Ambos los puedes encontrar en la tienda de Latina Crafter!!
Aqui les presento la lista de paticipantes, no se olviden de dejar sus comentarios y asi tener la oportunidad de ganar un fabuloso KIT!!.
Here is the list with all the participantes, don't forget to leave a comment for your chance to win a fabulous KIT!! Value $112.00!!!
- Giovana ---> ME
La ganadora será anunciada el dia Viernes! The winner will be announced this Friday.
Muchas gracias por visitarme.
Thanks so much for visiting!
Have a great day!
Tuesday, September 25
Best Wishes Tag
Hello my friends! Today I have a tag for you using products from the new Delicate Asters Collection from Heartfelt Creations.
Directions:
Heartfelt Creations and Store Products:
Other Products:
Hope you like it.
Have a great day!
Directions:
- Start by stamping the Asters Flowers on White Cardstock in Milled Lavender Distress Ink. Die-cut them using coordinated dies.
- Use a piece of Sticky Sheet paper and adhere it on Cardstock. Add White Shell Microfine Glitter and and stamp flowers. Die-cut them.
- Stamp leaves on White cardstock in Peeled Paint Distress ink, die-cut.
Cover front of tag with a piece of Delicate Asters Patterned Paper, ink all edges with Vintage Photo Distress Ink. - Stamp butterflies on tag in VersaMark Watermark Ink, add Bridal embossing powder and heat it up.
- Stamp butterflies on fabric, detail edges and adhere it to tag. Adhere flowers and leave and add a pearl.
- Tie on hemp and add a button.
- Stamp sentiment on a piece of Delicate Asters Patterned Paper, add a little piece of ribbon and adhere it to tag.
Heartfelt Creations and Store Products:
- HCPC 3474 Heartfelt Expressions PreCut Set
- HCPC 3495 Bold Delicate Asters PreCut Set
- HCPC 3499 Delicate Asters and Butterflies PreCut Set
- HCDP1 226 Delicate Asters Paper Collection
- HCD 726 Delicate Asters Die
- Grand Calibur
- Sticky Sheet Paper
Other Products:
- Tag: Tim Holtz Collection (Ranger)
- Cardstock : White (GKD)
- Ink: Milled Lavender Distress,Peeled Pain Distress, Vintage Photo Distress Black Archival (Ranger), Sweet Plum, Watermark (Tsukineko)
- Accessories: Button, Pearl, Natural Hemp (Darice), Fabric, Purple and Pink ribbon, Bridal Embossing powder, Embossing heat gun.
Hope you like it.
Have a great day!
Friday, September 21
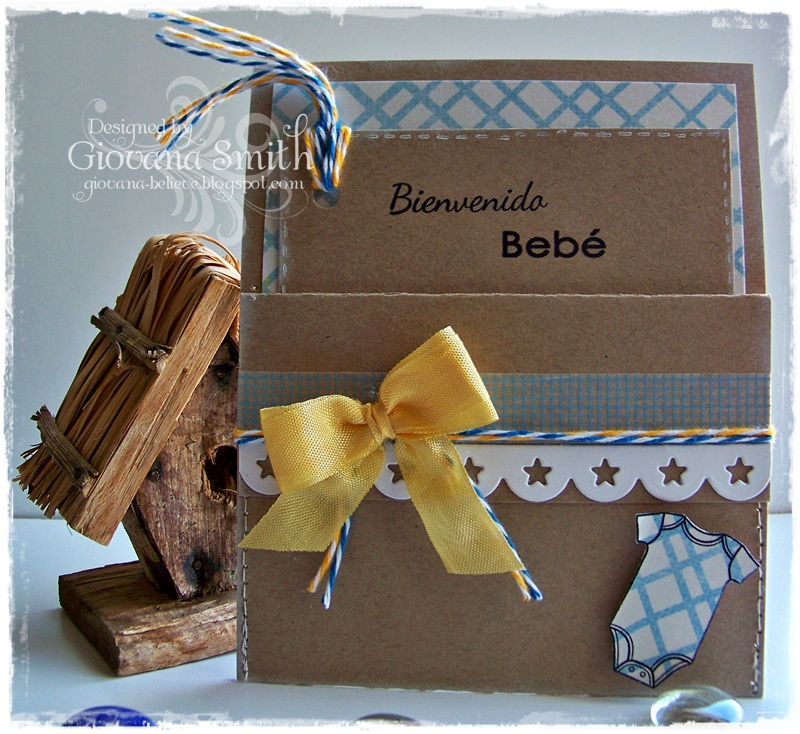
"Welcome Baby" Baby Announcement
Hello my friends! Hope you are doing well wherever you are. Fridays for me are usually "Clean House Day" so I cleaned my house, even my craft room is clean :) But I am so tired now, I wish I could hire the Clean House Fairy, LOL.
Anyway, let me show you the project I have for you today, it's a baby announcement and although it's in Spanish, it's very easy to understand :)
The stamps are from Latina Crafter, aren't those bears cute or what :)
For this project I used the bears and onesie form the set "Bebe" and the baby announcement is from "Presentando Nuestro Bebe" (Introducing our new baby)
Everything was stamped in Black Archival Ink, the bears were colored with Prismacolor Pencils.
I am submitting this project to the Moxie Fab Challenge: "Repetition"
Hope you like it!
Have a great day.
PS: Please keep the people from Central and Eastern WA in your thoughts and prayers, I am surrounded by fires and the smoke is so heavy around here that lots of activities have been suspended due to the bad air. I went outside for 3 minutes and ended up having a headache.
Thanks!
Anyway, let me show you the project I have for you today, it's a baby announcement and although it's in Spanish, it's very easy to understand :)
The stamps are from Latina Crafter, aren't those bears cute or what :)
For this project I used the bears and onesie form the set "Bebe" and the baby announcement is from "Presentando Nuestro Bebe" (Introducing our new baby)
Everything was stamped in Black Archival Ink, the bears were colored with Prismacolor Pencils.
I am submitting this project to the Moxie Fab Challenge: "Repetition"
Hope you like it!
Have a great day.
PS: Please keep the people from Central and Eastern WA in your thoughts and prayers, I am surrounded by fires and the smoke is so heavy around here that lots of activities have been suspended due to the bad air. I went outside for 3 minutes and ended up having a headache.
Thanks!
Wednesday, September 19
Wishing you...
Hello my friends! Hope you are having a great day! I have another pretty card using the new Asters Collection by Heartfelt Creations. This card is very Clean and Simple.
Submitting this project to the Moxie Fab Challenge: Asymmetry
Directions:

Heartfelt Creations and Store Products:
Other Products:
All the products in blue can be found at the Heartfelt Creations Store
Hope you like it!!
Have a fantastic day!
Submitting this project to the Moxie Fab Challenge: Asymmetry
Directions:
- Make card base from Ivory Cardstock (6.5" x 4.25")
- Cut a piece of Patterned Paper from Decorative Asters Collection, adhere it to card front and add zig-zag stitches.
- Adhere ribbon.
- Stamp sentiment in Aged Mahogany Distress Ink.
- Using Ivory Cardstock and Sticky Sheet page, cover the sticky side with Shell White Microfine Glitter, then stamp Bold Delicate Aster images. Die-cut them with coordinated dies.
- Add leaves and flowers to card.
- Add pearl to flower

Heartfelt Creations and Store Products:
- HCPC 3495 Bold Delicate Asters PreCut Set
- HCPC 3497 Script Asters Background PreCut Set
- HCD 726 Delicate Asters Die
- HCDP1 226 Delicate Asters Paper Collection
- Grand Calibur
- Sticky Page
- Shell White Microfine Glitter
Other Products:
- Cardstock: Ivory (GKD)
- Ink: Milled Lavender Distress, Aged Mahogany Distress (Ranger)
- Accessories: Sponges, Ribbon, Sewing machine
All the products in blue can be found at the Heartfelt Creations Store
Hope you like it!!
Have a fantastic day!
Tuesday, September 18
Quinceañera
Hello my friends! Hope your day is good, thanks so much to all of you who sent me e-mails, I really appreciate it. My craft community is so fantastic. Well, let me tell you what happened yesterday to me, I was peeling a squash and in less than a second I peeled my finger nail as well (left thumb), I don't wish anybody the pain I had after it. Today my finger is doing better, but it's really hard to craft, I thought it would be since it is my left hand, but I found out I really need all my fingers and thumbs, LOL.
Anyway, let me show a card I made for Latina Crafter using the set "Sueña" (Dream), perfect for a Quinceañera (tradicional and very important birthday party for a 15 year old girl)
This card fits to the Moxie Fab Challenge" Focal Point".
Directions:
Hope you like it.
Have a great day!!
Anyway, let me show a card I made for Latina Crafter using the set "Sueña" (Dream), perfect for a Quinceañera (tradicional and very important birthday party for a 15 year old girl)
This card fits to the Moxie Fab Challenge" Focal Point".
Directions:
- Make card base from White Cardstock. A2 size.
- Cut a panel from Patterned Paper, ink all edges and add stitches. Add a trip of Washi Tape (Pink hearts), adhere panel to card.
- Add Doily to card.
- Die-cut and emboss a piece of Pink cardstock using Scallop Circle Nestabilities.
- Stamp "Quinceañera" and the crowns on a piece of White Cardstock. Die-cut, emboss and stencil it with Circle Nestabilities. Adhere it to scallop piece and add it to card.
- Add Red Pearls.
- Create a triple bow with bow-easy and adhere it to card.
Card Recipe:
- Cardstock: White, Innocent Pink (GKD)
- Patterned Paper: Be Happy (My Mind's Eye)
- Stamps: Sueña (Latina Crafter)
- Embellishments: White Seam Binding Ribbon, Doily (Latina Crafter), Red Pearls, Heart Washi Tape (Love My Tapes)
- Accessories: Scallop Circle Nestabilities, Circle Nestabilities (Spellbinders), Sewing machine.
Hope you like it.
Have a great day!!
Monday, September 17
Harvest Blessings
Hello my friends! Hope you are having a great week. I feel like I haven't blogged in long time, most of my posts are usually pre-scheduled, I had some family situations in the last couple of weeks, thank God things are looking much better now and I am feeling like my mojo is back as well. In case you wonder, my uncle passed away unexpectedly and my aunt got hospitalized due to some cancer related problems.
Without further ado, let me show you the project I have for you today. In case you didn't know I am hosting a challenge over at the Splitcoaststampers "Sweet 'n Sassy Forum" and this is to use Leaves of Any kind! So, if you have a minute or two, please join us.
My card also fits the Moxie Fab Challenge " Movement Challenge", see all the leaves falling :) Fall is the Air and I love it.
Directions:
Card recipe:
Hope you like it.
Have a great day!
Without further ado, let me show you the project I have for you today. In case you didn't know I am hosting a challenge over at the Splitcoaststampers "Sweet 'n Sassy Forum" and this is to use Leaves of Any kind! So, if you have a minute or two, please join us.
My card also fits the Moxie Fab Challenge " Movement Challenge", see all the leaves falling :) Fall is the Air and I love it.
Directions:
- Create a card base using the biggest die from Labels 8 Nestabilities.
- Stamp image on White Cardstock, color it with Markers. Die-cut, emboss and stencil it with next bigger label 8 die.
- Die-cut grass , then using the same label 8 die, shape it to match white panel.
- Stamp sentiment, cover pumpkin with Crystal Laquer and let it dry.
- Stamp leaves on White Cardstock, cut them out, you can see how to create the glittery leaves HERE.
- Tie Orange Twine around card base.
- Add White panel.
- Add ribbon and leaves.
Card recipe:
- Cardstock: Sweet Mango, White, Green Grass (Gina K. Designs)
- Stamps: Image and sentiment from Rhubarb's Autumn Joys , leaves from Leaf Silhouettes. (Sweet 'n Sassy Stamps)
- Ink: Memento Tuxedo Black (Tsukineko), Black Archival, Peeled Paint Distress (Ranger)
- Embellishments: Pearl, Red Ribbon, Star Dust Stickles
- Accessories: Grass Die (Sweet 'n Sassy Stamps), Labels 8 Nestabilities (Spellbinders), Microfine Glitter.
Hope you like it.
Have a great day!
Friday, September 14
Sweet 'n Sassy "Fall and Frenzy" Blog Hop
Hello stamping friends!! We are so excited about Fall arriving
soon that we've decided to celebrate the season with a
Fall Frenzy Blog Hop & Virtual Stamp Day!
The Design Divas have created some fabulous eye candy for you featuring our wonderful selection of Fall stamps so we hope you'll hop along with us today!
Be sure not to miss a single stop along the way because we'll be drawing one lucky commenter from a random DT blog to win a $25 credit to the store!!
Here is my card using "Rhubarb's Autumn Joys"
Directions:
- Make card base from Kraft Cardstock. A2 size.
- Cut a panel from Ivory Cardstock (5" x 3.75"), ink all edges. Add a piece of Patterned Paper (4.5" x 3.25"), add zig-zag stitches.
- Die-cut a small and large border die, add them to panel and add zig-zag stitches.
- Stamp Rhubarb image on White Cardstock in Memento Tuxedo Black Ink, color image with Copic Markers. Die-cut, emboss and stencil image with Wonky Rectangle Dies.
- Add image to card panel, die-cut fence and add it to card.
- Tie on Tangerine Twine.
- Stamp image on White Cardstock in Black Archival Ink. Die-cut, emboss and stencil it with Label Fourteen Nestabilities. Add sentiment to card with pop dots.
- Add Star Dust stickles to center of Sunflower and Crystal Lacquer to petals.
Card Recipe:
- Cardstock: White, Ivory, Kraft, Chocolate Brown and Grass green (Gina K. Designs)
- Patterned Paper: Forever Fall Collection (BoBunny)
- Stamps: Rhubarb's Autumn Joys (Sweet 'n Sassy Stamps)
- ink: Memento Tuxedo Black (Tsukineko), Balck Archival (Ranger)
- Embellishments: Tangerine Twine (The Twinery)
- Accessories: Small and large Scallop Border Dies, Fence Die (Sweet'n Sassy Stamps), Wonky Rectangles, Labels Fourteen (Spellbinders), Crystal Lacquer, StarDust Stickles (Ranger), Sewing machine.
------------------------------------------
Now, a card using "Autumn Bounty" This set was last week Friday's Feature and now is sold out!! But, you can get it in digital version :)
Directions:
- Make card from Cranberry Tart cardstock. A2 size.
- Cut a panel from Ivory Cardstock (5" x 3.75"), add a piece of Patterned Paper and add stitches. Tie on ribbon.
- Stamp pumpkin image on White Cardstock in Memento Tuxedo Black, color it with Markers. Die-cut, emboss and stencil image with Rectangle Nestabilities.
- Cut image and mat it with Chocolate cardstock.
- Add image to card.
- Stamp sentiment on Ivory Cardstock in Vintage Photo Distress Ink. Die-cut, emboss and stencil piece. Add sentiment to card.
- Create a double bow with Bow-easy, adhere it to card.
- Add pearls.
- Cover pumpkins with Crystal Lacquer, add Star Dust Stickles to leaves.
Card Recipe:
- Cardstock: Cranberry Tart, White, Ivory, Chocolate Brown (Gina K. Designs)
- Patterned Paper: Forever Fall Collection (BoBunny)
- Stamps: Autumn Bounty (Sweet 'n Sassy Stamps)
- Ink: Memento Tuxedo Black (Tsukineko), Vintage Photo Distress (Ranger), Copic Markers.
- Embellishments: Pearls (Want2Scrap), Red Ribbon
- Accessories: Rectangle Nestabilities, Fancy Tags Three (Spellbinders), Crystal Lacquer, Star Dust Stickles (Ranger), Pop dots, Sewing machine
Are you ready to hop around?
Here's the list of blog participating in today's hop:
When you're done hopping be sure to join us for a fun day of challenges over in our Splitcoaststampers forum. We're giving away some fun prizes, too, so don't miss it! We look forward to seeing your fabulous Fall creations!
Happy hopping.
Have a great day!!
Tuesday, September 11
Heartfelt Creation September Release "Delicate Asters Collection"
Hello my friends! It's time again!! We are pleased to introduce the Delicate Asters Collection. You are creative. Show your friends with this unique Aster collection. With beautiful elegant petals and Monarch butterflies, this set will represent you in a lively popping way. The typography makes speaking from your heart quick and easy. Our paper is a great value for those looking to get their money’s worth on materials. Since there are two different designs on the paper’s front and back, you get 24 different designs in one package. Now you have a variety of options when you get bored.
There are 6 new PreCut Stamp Sets, one 12x12 Paper Collection, and one beautiful new exclusive Spellbinders die designed for Heartfelt Creations.
Now, let me show you the projects I created with this beautiful collection.
My Wish for you
Directions:
Heartfelt Creations and HC Store Products:
Other Products:
Cardstock: Light Violet, Burgundy (Bazzill), Ivory, Dark Chocolate, White (GKD)
Ink: Memento Tuxedo Black, Brilliance Pearlescent Poppy (Tsukineko), Aged Mahogany Distress (Ranger), Copic Markers.
Accessories: Pink Ribbon, Pearl, Vesuvius Microfine Glitter (Art Glitter), Bow-easy
For you
Directions:
Heartfelt Creations and Store Products:
Other Products:
All the products in blue can be found at the Heartfelt Creations Store
Now, what about a great Giveaway!! Leave a comment on the Heartfelt Creations blog by September 18th and you will be eligible to win the entire release valued at $145.92 .
Hope you like it.
Have a great day!
There are 6 new PreCut Stamp Sets, one 12x12 Paper Collection, and one beautiful new exclusive Spellbinders die designed for Heartfelt Creations.
Now, let me show you the projects I created with this beautiful collection.
My Wish for you
Directions:
- Make card base from Light Violet Cardstock (6" square card)
- Mat Burgundy and Asters Patterned Paper, add stitches, tie on ribbon. Adhere panel to card base.
- Stamp vase image on White Cardstock in Memento Tuxedo Black Ink, color image with Copic Markers.
- Using Sticky Sheet Paper, apply Vesuvius Microfine Glitter then stamp Asters Flower in Pearlescent Poppy Ink. Die-cut flowers with coordinated dies.
- Mat image with Dark Chocolate Cardstock and add stitches. Add image panel to card.
- Add glittery glowers.
- Stamp sentiment on Ivory Cardstock in Aged Mahogany Distress Ink. Die-cut and emboss it with Beaded Oval Nestabilities. Adhere it to card front.
- Create a double bow and adhere it to card.
Heartfelt Creations and HC Store Products:
- HCPC3494 Delicate Asters PreCut Set
- HCPC 3497 Script Aster Background PreCut Set
- HCPC 3498 Delicate Aster Vase PreCut Set
- HCD 726 Delicate Asters Die
- HCDP1 226 Delicate Asters Paper Collection
- Beaded Oval Decorative Nestabilities
- Sticky Tape Sheet
Other Products:
Cardstock: Light Violet, Burgundy (Bazzill), Ivory, Dark Chocolate, White (GKD)
Ink: Memento Tuxedo Black, Brilliance Pearlescent Poppy (Tsukineko), Aged Mahogany Distress (Ranger), Copic Markers.
Accessories: Pink Ribbon, Pearl, Vesuvius Microfine Glitter (Art Glitter), Bow-easy
-----------------------------
For you
Directions:
- Make card base from Light Violet Cardstock.
- Stamp image on White Cardstock in Memento Sweet Plum Ink. Color image with Copic Markers.
- Die-cut, emboss and stencil image with Rectangle Nestabilities.
- Die-cut and emboss border from Floral Doily Accent Shapeabilities, add it to image and adhere panel to card. Add Gold Gala Glitz to flowers.
- Stamp sentiment (partial) in Aged Mahogany Distress Ink.
- Tie on ribbon, create a bow with Bow-easy and adhere it to card. Add pearl.
Heartfelt Creations and Store Products:
- HCPC 3497 Script ASter Background PreCut Set
- HCPC 3498 Delicate Aster Vase PreCut Set
- Floral Doily Accent Shapeabilities
- Gold Gala Glitz
Other Products:
- Cardstock: White, Green Grass (GKD), Light Violet (Bazzill)
- Ink: Memento Sweet Plum (Tsukineko), Aged Mahogany Distress, Old Paper Distress (Ranger), Copic Markers.
- Accessories: Rectangle Nestabilities (Spellbinders), Green Seam Binding Ribbon (etsy), Pearl, Scor-tape, Sponges.
All the products in blue can be found at the Heartfelt Creations Store
Now, what about a great Giveaway!! Leave a comment on the Heartfelt Creations blog by September 18th and you will be eligible to win the entire release valued at $145.92 .
Hope you like it.
Have a great day!
Subscribe to:
Posts (Atom)