Wednesday, December 10

Holiday Coffee Lovers Blog Hop


Hello friends!! Welcome to my blog and another stop of this fun Holiday Coffee Lovers Blog Hop! I have to say that coffee keep my sanity in place and also keeps me awake, LOL.

Anyway, Christmas time is around the corner and I am so happy to join this fun blog hop! I created a super cute Coffee card, I will buy a Coffee Gift Certificate from my favorite local coffee shop and include it in there for a very special person.

For this card I used a couple of fun Coffee Wood Veneers and a Feliz Navidad Sentiment from Latina Crafter!! Aren't those Wood veneers adorable?!

You can join the fun entering your project at Amy's blog!


Now, what about a fun giveaway?!
Yes, I am giving away a set of Coffee Wood Veneers and a Dots Stencil! Just leave a comment here telling me what your favorite hot beverage is and a way to contact you if you are the lucky winner :)
You have until Sunday, December 14th to enter.


This is the list of all the wonderful sponsors!! Woo-hoo!!

17Turtles Veronica Zalis Chris Franco
Add a Little Dazzle  Butterfly Reflections Ink Color Cast Designs
Create a Smile Hero Arts Kraftin' Kimmie
Kreative Kymona Latina Crafter Neat & Tangled
Newton's Nook Pickled Potpourri Designs Poppystamps
Reverse Confetti Stamp Academy Stamp Simply Ribbon Store
STAMPlorations SugarPea Designs Sweet 'n Sassy
The Alley Way Stamps Two Paper Divas Verve Stamps
Whole Wild World Your Next Stamp Paper Smooches


●●Sponsorship prizes are eligible via random draw from linked hop participants only●●

Hope you like my project!
Don't forget to leave a comment to enter my giveaway!!

Have fun hopping!

Tuesday, December 9

Christmas tags

Hello friends! Today, I have a couple of tags for you, super simple one with enough blank space to write a message for the special one. For these tags I used mostly  Crafter's Companion products.

Tag #1:

  • Die-cut tags using Green Envy Shimmering Cardstock and White Premium Cardstock. Glue them together and mist them with Memento Rich Cocoa Fireworks.
  • Stamp sentiment from  Season's Greetings set (Vintage Christmas Collection) in StazOn Spiced Chai Ink.
  • Stamp ornament from Christmas Bauble Set (Sheena A Little Bit Festive) on a piece of Ultra Smooth Premium White cardstock, color it with Spectrum Noir Markers: CR7, DR5, LY2, CT2, GB2, GB3, GB4.
  • Cut out image and adhere it to tag. Add Star Dust Stickles to ornament., add a twine bow.


  • Tag #2

  • Die-cut tag in red and White cardstock. Glue them together  and spray Memento Rose Bud Firework Spray. Stamp sentiment from Family and Friends set (Vintage Christmas Collection) in StazOn Spiced Chai Ink.
  • Stamp image from Christmas Bauble (Sheena A Little Bit festive) set on a piece of White cardstock.
  • Color image with Spectrum Noir Markers: DG2, DG4, CG4, CR9, DR5. Adhere it to tag. Add Star Dust and Christmas Red Stickles.
  • Add twine and gold thread to tag.


  • Now, I will invite you to visit the Crafter's Companion Blog, we have inspiration, projects, tutorials and giveaways!!

    Submitting these projects to:


    Hope you like my tags!!
    Have a fantastic day.

    Monday, December 8

    Happy Birthday Diana!!

    Acudamos a esta fiesta porque hoy estamos de SoRpReSa!!!!

    Siii...!!! queremos al unísono decir Feliz Cumpleaños a nuestra amiga Diana!!!!,

    A este Ser especial y bendecido que nos hace sentir que crear y realizar proyectos para ocasiones como ésta, sea lo que mas disfrutamos de ser Crafters... Ella hace que disfrutemos tanto el celebrar nuestras fechas especiales!!!!!! y hoy, como su cumpleaños es una fecha super especial venimos a festejar!!!!


    Para esta ocasión especial he preparado una tarjeta sencilla pero hecha con mucho amor, Diana, esta tarjeta te llega un poquito tarde, pero te llega amiga!!
    Aquí utilicé los globitos del set "Las Mañanitas" y luego usé los dies "feliz" y cumpleaños" usando la técnica de inlaid dies, para obtener este resultado, Los globitos fueron pintados con Spectrum Noir Markers, luego los cubrí con Crystal Lacquer y les agregué glitter, como toque final le agregué sequins!!


    Ahora las invitamos a que nos acompañen en esta actividad de alegría!!! visita cada uno de los sitios de nuestro querido equipo de diseño, quienes hemos querido sorprenderla con una celebración mágica llena de cariño y beneplácito !!! Festejemos todos juntos!!!! Salta de blog en blog y no olvides dejar comentarios en cada post.

    El blog hop inicia en: 

    Ahora es tu turno!! Acompáñanos en este dia tan especial para Diana creando algo especial para ella, súbelo a este link y continuemos la fiesta!! A ella le encantará!


    Thursday, December 4

    Merry Christmas

    Hello friends! How are you today? Hope you're having a great day. Today I have a super cute card using just dies from Top Dog Dies!  This card is super simple, other than die-cutting my pieces I added straight stitches to the main panel and that's it!!

    Annndddd I have super exciting news for you, if you purchase $60 from 12/4/14 to 12/7/14 you get this cute Top Dog Dies Ornament and Tag #2 Die set for FREE!!!


    Here are the details for you:
    • Make a card base from White cardstock. A2 size.
    • Cut a card panel from red cardstock, cut a panel from Patterned Paper and add stitches. 
    • Adhere panel to card base. Create a banner from red cardstock and adhere it to card panel.
    • Die-cut ornament from Gold (2 different tones) cardstock, glue them together. Add it to card with foam adhesive. Create a bow from twine and add it to card.
    • Die-cut Top Dog Dies Merry Christmas die set from green and red shimmering cardstock and adhere it to card.
    • Finally, add pearls.


    Submitting this project to:
    Hope you like it.
    Have a wonderful day.

    Wednesday, December 3

    Paper Crafts & Scrapbooking Magazine Special Thanks! Blog Hop


    Hello friends! Today, I am joining a very special blog hop to say Thank you Paper Craft Magazine!
    If you have arrived from Lin's blog, you are in the right place :)

    I remember the first time I got "ever" published!! I received the email on my daughter's 6th birthday (2010), I was so excited I wanted to get the magazine right away, LOL
    And this is my daughter posing with my first published card, isn't she cute and toothless!! Goodness, she has changed a lot since then.


    I will always be very thankful to Paper Crafts Magazine, I got to meet really nice ladies there, Susan, Cath, P. Kelly, Holly, they were always there when I needed extra help. Thanks so much ladies!! It's so hard to me to explain everything I feel now, but I think the feeling is unanimous.

    The crafting community will miss you!!

    I created this simple card, but made with all my love. 
    Wishing you all the BEST!! 


    Card Recipe:
    Cardstock: Ultra Smooth White, Kraft (Crafter's Companion)
    Stamp set: Sentimentals (Crafter's Companion)
    Patterned Paper: DCVW
    Dies: Elegance Stamping frame, Delicate Flower (Crafter's Companion)
    Ink: Spiced Chai StazOn (Tsukineko)
    Embellishments: Lace Tape (Love My Tapes), Gold thread (DMC), Paper flower (Prima), Foam tape.


    Now, hop over to Brenda's blog.

    Hugs!!
    Giovana

    Sunday, November 30

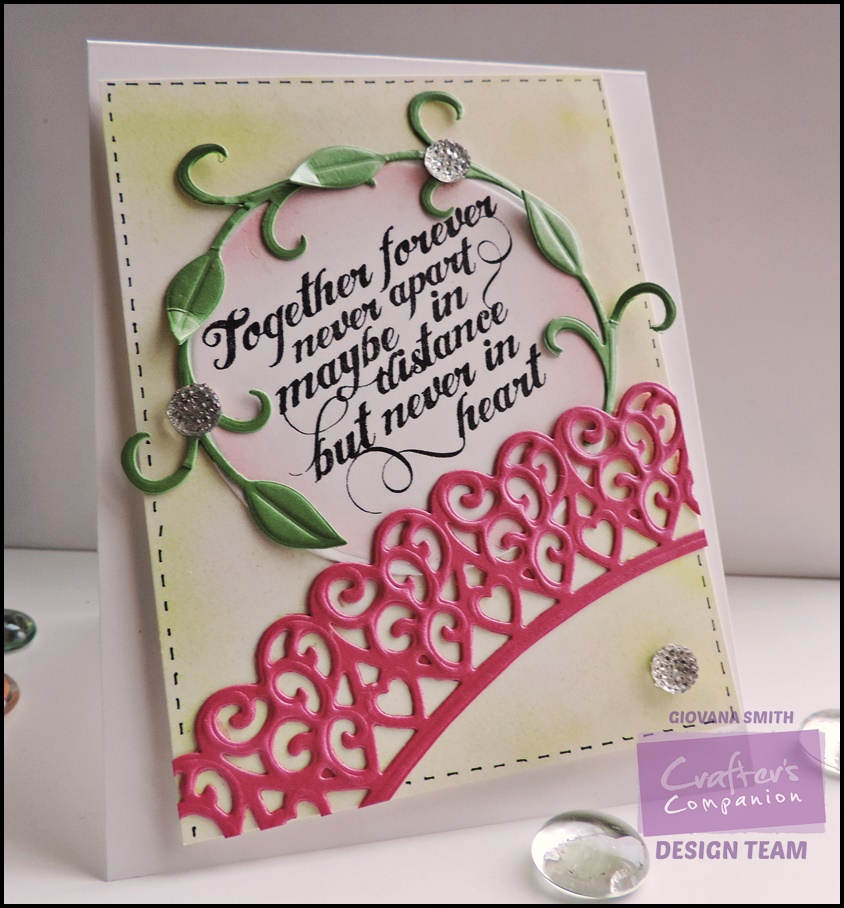
    Together forever

    Hello friends! I know Christmas is just around the corner, but I wanted to show you this project I made with new products from Crafter's Companion. I think this card could be perfect for Valentines, for a loved one who is deployed or someone who is far away from you like my family. I sure miss them a lot!

    Here are the details:


    Hope you like it!
    Have a great day!

    Friday, November 28

    Gable Cupcake Box


    Hello friends! How is your day today? I hope it's good and sweet one! Today, I am super excited to show you a project I am really proud about it. Crafter's Companion has the most amazing Cupcake boxes templates!! They are super easy to use and a fantastic way to send a loved one something sweet to make their day!!

    I used the Gable Cupcake Box, this one can hold up to 6 cupcakes! You can decorate the box with different papers or use just a plain color.

    Here are the details:


    This was a super fun project to make, my daughter thought it would be the perfect gift to give to a school friend!

    Hope you like it.
    Have a fantastic day!

    Merry Christmas in November

    Hello friends! Hope you are having a relaxing day after all the fun a food, enjoy your leftovers!!
    Today, I am sharing with you a Christmas card, super easy, you can mass produce this design in no time. Here I used the Christmas Silhouettes Set.

    Here are the details:

    • Make a card base from White cardstock. A2 size.
    • Cut a panel from White cardstock. 3.75" x 5", stamp berries in Versamark Ink, then apply white embossing powder and heat set.
    • Apply light blue and a little bit of Gelatos, mix them with an aqua brush.
    • Stamp sentiment on a piece of Kraft cardstock.
    • Die-cut a large scallop border from White cardstock. Adhere kraft piece to scallop border. Adhere piece to card panel.
    • Die-cut and stamp tree in Golden Glitz Delicata ink. Adhere tree to card panel with foam adhesive.
    • Tie on red twine, add ruby liquid pearls to berries.


    Submitting this project to:
    ++++++++++++++++++++++++++++++++++++++++++

    Sweet 'n Sassy has Black Friday deals!! Check out the store for more details!


    Also, this is my last post as a Design Team Member for Sweet 'n Sassy Stamps. I need t take care of my health and family, in addition of that I have started babysitting again, and the little one needs all my attention. I am not quitting, just cutting on DTs, sometimes you just have to do it.
    I have enjoying these 2 years of great products, amazing images and great friendship!! Thanks so much Korin for the opportunity to design for you.

    Have a fantastic day!!

    Thursday, November 27

    Happy Thanksgiving!!

    Hello friends!! If you are here in the USA, I wish you a very Happy Thanksgiving!! Hope this day is special, full of happiness, memories, laughs and great food!


    I made this cute card using the set Peregrinos/Pilgrims from Latina Crafter, this set has the sentiments in Spanish and English.
    I colored the images with Spectrum Noir Blendable Pencils, then cut them out. I used the Rays stencil from Tim Holtz and Distress Inks.
    Then, I die-cut grass from patterned paper and adhere one direct to card base, then added the Pilgrims and turkey with foam adhesive, then added an extra die-cut grass.
    Finally, I die-cut a banner, stamped the coordinated banner border, then stamped the sentiment.


    Submitting this project also to:
    Latina Crafter has a special deal for all of you!! Add the coupon word GRACIAS and you will receive a 30% off on your order!! Offer ends Monday, December 1st.


    Have a great day!
    Enjoy it with your family, don't forget to eat pie!

    Wednesday, November 26

    Hello my friend

    Hello friends!! Today, I have a beautiful and very simple card for you using new products from Crafter's Companion. This project didn't take too long to make and I love the results, I think the black cardstock makes the the embossing piece really pop!

    Here are the details:

    Don't forget the fantastic Thanksgiving and Black Friday deals!!


    Hope you like it and give it a try!
    Have a fantastic day!

    Happy Holidays!

    Happy Tuesday! Hope your day is full of joy and great things! Today I have a very simple yet elegant card for you. I used the snowflake die set from Top Dog Dies! I wanted to keep it simple, my original idea, was not this one, I wanted to do something more like "inlaid" design, but while playing with the die-cuts I like the white on white design, so I kept it that way.

    I used "White, Silver, Red" courtesy of the Fusion Challenge.

    Here are the details:
    • Make a card base from White cardstock. A2 size.
    • Cut a panel from White cardstock 3.75" x 5".
    • Die-cut snowflakes (x2) from Top Dog Dies Snowflake trio Set in White cardstock. 
    • Die-cut Top Dog Dies Happy Holidays in Red cardstock.
    • Create a layout for your sentiment and snowflakes and adhere them to card panel.
    • Tie on silver organza ribbon.
    • Add pearls to snowflakes.
    • Add panel to card base with foam adhesive.


    Hope you like it! A very simple card, super easy to mass produce and also very elegant.

    Also, don't forget about Top Dog Dies Black Friday Super Sale!! 


    Submitting this project also to:

    Tuesday, November 25

    Heartfelt Creations November Alumni Blog Hop

    Hello friends! Welcome to another Heartfelt Creations Alumni Blog Hop! This month I decided to create a Christmas card using this pretty die!! This card is super simple and easy to mass produce if you decide to CAS this card.

    Here are the details:

    • Make a card base from White cardstock. A2 size.
    • Cut a panel from Patterned Paper 4" x 5.25" and another panel 3.75" x 4.25", add zig zag stitches. Adhere panel to card base.
    • Die-cut Christmas tree from Green Shimmering cardstock and adhere it to panel.
    • Die-cut snowflake from Gold cardstock and adhere to card with foam adhesive.
    • Stamp Merry Christmas from All Seasons Sentiments on White cardstock in Red Ink. Adhere it to card base with foam adhesive.
    • Tie on ribbon, add rhinestones and pearls to tree.


    Here is the list of participants:
    Don't forget to leave a comment in all the blog participating in this blog hop, one random crafter will be chosen from any of the blogs and will win  $25 Gift Certificate to Heartfelt Creations Store. You have until November 28th to leave a comment.

    Hope you like my project!
    Have fun hopping!