Showing posts with label CSS Alummni Blog Hop. Show all posts

Friday, June 24

CSS Alumni Blog Hop: Let's get wordy

Hello my friends! Welcome to another CSS Alumni Blog Hop! This is going to be a fun one, our theme this time is: Let's get wordy! Gina K. Designs is known for including some of the best quotes and sentiments in their sets. For this challenge use a sentiment or quote as the main focal point. Super fun !!

If you are here from Joy's blog, you are in the right place, if not please go to StampTV to start from the beginning so you don't miss any wonderful creation.

Here is my card: I got inspired by the colors from Moxie Fab World "Tuesday Trigger" and the sketch from Skipping Stones.
Friends

Directions:
  • Die-cut a couple of pieces of Smoky Slate CS using Eyelet Circles Nestabilities Dies.
  • Die-cut a piece of Lemon Drop CS, ink all edges and adhere to card.
  • Die-cut and emboss a piece of Patterned Paper from the StampTV Kit using Circle Nestabilities Dies.
  • Cut a strip of Ocean Mist CS, emboss it using Swiss Dots folder, adhere it to PP piece and add stitches.
  • Stamp sentiment on PP in Black Soot Distress Ink.
  • Adhere flower ribbon and pearls.
  • Score one of the Eyelet circles (about 1"), add scor-tape and add front piece.


Card recipe:
All products in bold can be found at Gina K. Designs Store.

Now, it's your turn to hop over to Cheri's blog and enjoy her wonderful creation.

Make sure to leave a comment as you hop along because on Tuesday morning (June 28th), we will randomly choose one of the comments from all the blogs who will get a stamp set of their choice valued up to $24.95!

Have fun hoping!
Thanks for stopping by.

Friday, June 10

CSS Alumni June Blog Hop: Photo Inspiration

Hello my friends and welcome to another fun CSS Alumni Blog Hop! This time around is a Photo Inspiration and it comes from The Party Dress.
If you are here from Deb's blog you are in the right place, if not please go to StampTV and start from the beginning, so you don't miss a thing.

Now, here is a beautiful picture we got for our inspirations and here is my card:


Party Dress card:

Directions:
  • Create a card using a dress template in Red Hot CS.
  • Stamp circles on front of your dress card in Versamark Ink, add Clear embossing powder and heat it up.
  • Stamp scallop border, add Liquid Pearls and set to dry.
  • Die-cut neck part with Oval Nestabilities.
  • Die-cut a White piece using Beaded Oval Nestabilities. Add it to card.
  • Cut a piece of White Ribbon and adhere it to card. Add paper flowers.
  • Stamp sentiment on White CS. in Red Ink, die-cut piece with Oval nestabilities and adhere it in the inside part of your card.

Card recipe:
  • Cardstock: Red Hot, White (Gina K. Designs)
  • Stamps: Elegant Elements, Border Bling (Gina K. Designs)
  • Ink: Real Red (SU), Versamark (Tsukineko)
  • Embellishments: White Ribbon (Gina K. Designs), Liquid Pearls, Paper flowers (Recollections)
  • Accessories: Oval Nestabilities, Beaded Oval Nestabilities (Spellbinders), Scor-tape, Glue dots, Clear embossing powder.
All the products in bold can be found at Gina K. Designs Store.

Now, head over to Karen's blog to check out her wonderful creation!


Have fun hopping.
Thanks for stopping by.

Friday, May 13

CSS Alumni "Sketch Blog Hop"

Hello my friends! Welcome to another CSS Alumni Blog Hop. This time, we have a beautiful sketch by our very talented Melissa Cash.


Now, if you are here from Joy's blog you are in the right place, if not please start from StampTV so you don't miss any of the wonderful creations :)

Here is my take on the sketch.

Directions:
  • Make card base from Kraft Cardstock using Circle Eyelet Nestabilities.
  • Die-cut a piece of patterned paper using Circle Nestabilities, emboss and stencil it as well.
  • Die-cut, emboss and stencil a piece of White Cardstock using Oval Nestabilities, Adhere it to card with tape.
  • Stamp image on White Cardstock in Memento Tuxedo Black, color it with Prismacolor Pencils. Cut out image and add Stickles.
  • Stamp sentimento on White CS in Vintage Photo Distress Ink. Die-cut, emboss and stencil it using Fancy Tags Nestabilities. Cut out right side of tagd and adhere it to card with Foam tape.
  • Adhere cut out image to card.
  • Add 3 Medium Nailheads and bow.

Card recipe:
Now, hop over to Deb"s blog and see what she has done for us today.

Make sure to leave a comment as you hop along because on Tuesday morning (May 17th), we will randomly choose one of the comments from all the blogs who will get a stamp set of their choice valued up to $24.95!

Have fun hopping!
Thanks so much for stopping by.

Friday, April 8

CSS Alumni Blog Hop: Cookie Inspiration

Hello my friends! Welcome to another CSS Alumni Blog Hop. This time it is an Inspiration Hop and the yummy inspiration comes from Better Bit of Butter and these yummy collection of cookies :)
Now, if you are coming from Deb's blog you are in the right place, if not you should start from StampTV so you don't miss a thing.

I got inspired by Premier Wedding Cookie #4 and this is my card.


Directions:
  • Make card from White cardstock. 5" square.
  • Cut a piece of Kraft cardstock (4.5" square). Stamp the Damask image from the new StampTV Kit in Tea Dye Distress Ink. Ink and distress all edges. Add stitches and tie ribbon around. Adhere to card.
  • Die-cut a piece of Ocean Mist Cardstock with Eyelet Circle Nestabilities.
  • Print yellow Grunge Damask Digital Paper, die-cut, emboss and stencil a circle using Circle Nestabilities.
  • Die-cut, emboss and stencil a White piece of cardtsock using Circle Nestabilities. Stamp sentimet on it in Faded Jeans Distress Ink. Adhere it to Yellow Circle. Stamp butterfly on it in Tea Dye Distress Ink. Adhere it to card with Foam tape.
  • Stamp image from Bring the Bling around sentiment and add Liquid Pearls.
  • Stamp butterfly from StampTV set on Yellow Digital paper in Tea Dye Distress Ink, cut it out and adhere it to card. Add a small Gold Nailhead to butterfly.

Card Recipe:
Make sure to leave a comment as you hop along because on Tuesday morning (April 12th), we will randomly choose one of the comments from all the blogs who will get a stamp set of their choice valued up to $24.95!

Now, it is time to hop over to Joy's blog and enjoy her beautiful creation.

Hope you like my card.
Have fun hopping.

Friday, March 25

CSS Sketch Challenge Blog Hop

Hello my friends, welcome to another CSS Alumni Blog Hop, this time is a wonderful sketch designed by Melissa Cash. Ih you have come here from Geri's blog, you are in the right place.


Directions:
  • Make card from Ivory cardstock.
  • Punch a side border of Chocolate Brown Cardstock, add Patterned paper, ink all edges and add stitches.
  • Stamp sentiment and swirl image. Add Liquid pearls on swirl. Tie ribbon around and add pearl. Adhere to card.
  • Stamp image on White cardstock. Die-cut, emboss and stencil it with Circle Nestabilities. Add Stickles on bird. Adhere to card with foam tape.

Card Recipe:
Make sure to leave a comment as you hop along because on Tuesday morning (March 29th), we will randomly choose one of the comments from all the blogs who will get a stamp set of their choice valued up to $24.95!

Now, it is time to visit Jennie's blog and enjoy her beautiful creation.

Thanks so much for stopping by.
Have fun hopping!!

Friday, January 28

CSS Alumni Blog Hop: Sketch

Hello my friends and welcome to another fun CSS Alumni Blog Hop. This time our talented Melissa Cash has designed this fun sketch for this hop. Now, if you are here from Cheri's blog you are in the right place, if not I will invite you to start hopping from StampTV!

This is the sketch:


and this is my card:  I"M CUCKOO for you

Directions:
  • Make card from Ocean Mist cardstock.
  • Mat Chocolate Brown Cardtsock and Patterned Paper. Ink all edges and add straight stitches.
  • Stamp image on White Cardstock in Memento Tuxedo Black. Color it with Copic Markers.
  • Die-cut, emboss and stencil image piece.
  • Cut out an extra colored image and add it with foam tape.
  • Die-cut and emboss a piece of Chocolate Brown Cardstock with Fleur de Lis Dies. Cut out center part, add some adhesive to put it together and add it as a  background frame.
  • Stamp sentiment in Vintage Photo Distress Ink.
  • Finally add 3 pearls.

Card Recipe:
Now, hop over to Jen's blog and enjoy her creations!

Make sure to leave a comment as you hop along because on Tuesday morning (February 1st), we will randomly choose one of the comments from all the blogs who will get a stamp set of their choice valued up to $24.95

Hope you like my card.
Thanks for stopping by!

Friday, January 14

God Bless You

Hello my friends and welcome to the 1st CSS Blog Hop of 2011!! I hope you enjoy your visit here as well as my creation. If you are coming from the talented Deb you are in the right place.
Our first Blog Hop is a color challenge based on Gina's Color Spotlight for this week.


God Bless You: For my card I used Melanie's new set "Where your heart is".

Directions:
  • Make card base from Sweet Corn Cardstock. A2 size.
  • Mat a piece of Fresh Asparagus (3.75" x 5") with Patterned Paper (ink all edges). Add zig zag stitches.
  • Tie ribbon, make a bow and add a paper flower.
  • Stamp sentiment on Patterned Paper in Vintage Photo Distress Ink.
  • Stamp image on White Cardstock in Memento Tuxedo Black. Color it with Copic Markers. Die-cut and emboss image with Rectangle Nestabilities.
  • Using the same die, trace it on Red Hot Cardstock and cut it out. 
  • Add die-cut image to Red Hot piece with foam tape.
  • Add it to cad with foam tape.
  • Apply Crystal Lacquer on hands and set to dry.

Card Recipe:
I used the sketch from CPS!

Now, hop over to Jen's blog and enjoy her wonderful creation.
Have fun hopping.

Friday, November 26

Merry & Bright

Hello my friends! It is time for another CSS Blog Hop and if you are coming from the fabulous Cheri, you are in the right place. This time is an Inspiration Challenge from this picture.

I got inspired by the Classic Christmas colors.

Here is my card:
Merry & Bright.

Directions:
  • Make card base from Lipstick Red Cardstock.
  • Stamp background saying from "Blessed is the Season" onto a White piece of Cardtsock in Gold Pearlescent Ink. Ink all edges and mat it with a piece of All Spruced Up cardstock. Add straight stitches.
  •  Add Gold and Holiday Ribbon to card.
  • Stamp snowflake on a White piece of cardstock in Real Red Ink. Die-cut, emboss and stencil with Circle Nestabilities. Add Star Dust Stickles and Red Rhinestone.
  • Stamp sentiment. Add Rhinestones.


Card recipe:

Now hop over to Joy's blog and enjoy her wonderful creation.

Have fun hopping!

Friday, November 12

CSS Alumni Blog Hop: Color Challenge

Hello my friends (again) and welcome to another CSS Blog Hop. This month, we have a fun Color Challenge and I know you are going to get so much inspiration from all the CSS wonderful ladies. If you have come from Cheri's blog you are in the right place, if not you should start from Stamp TV!

Blog Hop Details:

Create a card or project using the following color combo:
  • White or Ivory
  • Brown
  • Light Blue (Little Boy Blue, Ocean Mist, or Turquoise Sea)
  • Yellow (Lemon Drop, Sweet Corn, or Wild Dandelion)
and this the card I have created.

Friends

Directions:
  • Make card from White cardstock. 5" square card.
  • Cut a piece of Patterned paper (4.5" square), ink all edges.
  • Cut a piece of Lemon Drop cardtsock (3.5" square), ink all edges and adhere to PP piece. Add stitches and adhere to card.
  • Die-cut a piece of Chocolate Brown cardstock using Label 3 Nestabilities.
  • Stamp sentiment on White Cardstock in Walnut Stain Ink. Die-cut piece using Label 3 Nestabilities.
  • Add white piece on Chocolate Brown piece. Add Ice Blue Rhinestones. Adhere to card with foam tape.
  • Ink all edges to Prima flowers. Mount flowers with a yellow brad. Adhere to card. Add Stickles to all edges.

Card Recipe:
  • Cardstock: White, Lemon Drop, Chocolate Brown (Gina K. Designs)
  • Paper: K&Company.
  • Stamps: Friends (Gina K. Designs)
  • Ink: Walnut Stain Distress, Tea Dye Distress, Antique Linen Distress (Ranger)
  • Embellishments: Yellow Mulberry Flowers (Prima), Ice Blue Rhinestones (Kaisercraft), Yellow Brad (BoBunny), Diamond Stickles (Ranger)
  • Accessories: Sewing machine, Label 3 Nestabilities (Spellbinders), Foam tape, Sponges, Glue dots.
Hope you like it.
Now head over to Janice's blog and enjoy her wonderful creation.

Have fun hopping!!

Friday, October 22

CSS Alumni Blog Hop: Clean and Simple Challenge

Hello my friends and welcome to another CSS Alumni Blog Hop. If you have hopped from Deb's blog you are in the right place.
This time we were challenged to create a "Clean & Simple" card/project. I love layers and layers so this is a big challenge for me.

Here are the details about this challenge:
  • Clean And Simple design: lots of white or open space with one main focal point.
  • One image.
  • One sentiment.
  • One layer card - your card base plus only one more layer.
  • Embellishments - you can use any number of embellishments you want, but they all must be the same color.
So this is what I have created:
"Spirit of Christmas"

Directions:
  • Make card from Kraft Cardstock.
  • Cut a piece of Innocent Pink cardstock: 4 3/4" x 3.5"
  • Stamp image on Innocent Pink cardstock in White Craft Ink. Add White Embossing powder and heat emboss.
  • Stamp sentiment in Worn Lipstick Distress Ink.
  • Using a ruler and a Uni-ball White Pen, create a frame.
  • Sponge the image with Pink Ink. Add 3 Pink Rhinestones. Finally add ruffle ribbon.

Card recipe:
  • Cardstock: Kraft, Innocent Pink (Gina K. Designs) 
  • Stamps: Poinsettia image from "A year of flowers", snetiment from "A Very Merry Christmas" (Gina K. Designs)
  • Ink: White Craft (JoAnn's), Worn Lipstick Distress (Ranger).
  • Embellishments: Pink Rhinestones (Kaisercraft), Light Pink Satin Ribbon (Offray).
  • Accessories: White Uni-ball Signo Pen (Mitsubishi Pencil), White Embossing powder, Embossing heat gun (Marvi Uchida), Sponges, Adhesives.

Now, it is your turn to head over to Janice's blog, I am pretty sure you will be impress with her creations.

Hope you like mine!
Have a great day!!

PS: Don't forget about the "Card Drive for Logan and Bekah" You can find all the details and information HERE

Friday, October 8

CSS Alumni Blog Hop: Sketch Challenge!!

Welcome to another fun blog hop being hosted by members of StampTV Center Stage Alumni. If you've arrived from Deb's Blog then you're at the right place! To start at the beginning, please go to StampTV and hop from there.

The inspiration for this sketch was inspired by Deb's beautiful card she created for our last hop which you can find HERE. Thanks Deb for letting us use it for this hop!


And here is my card:
Congrats!!

I used Melanie's newest set: "Buds & Vases". I used a color combo I don't use very often, but I think it turned out pretty good.

Direction:
  • Make card from Ivory cardstock.
  • Mat together a piece of  In the navy cardstock and patterned paper. Add straight stitches and adhere to card.
  • Die cut a piece of In the Navy cardstock using Label 8 Nestabilities. Die cut a piece of Ivory cardstock using the same size Nestie and cut out the borders. Ink all edges.
  • Die cut Border with Nestabilities and stamp sentiment. Adhere to card.
  • Stamp image twice, color them and cut them out. Add one to the Level die-cut, using foam tape add the next one on top. Add it to card.
  • Add rhinestones.

Card Recipe:
  • Cardstock: White, Ivory, In the Navy. (Gina K. Designs)
  • Patterned Paper: Togetherness (Cosmo Cricket)
  • Stamps:"Buds & Vases". (Gina K. Designs)
  • Ink: Memento Tuxedo Black (Tsukineko)
  • Embellishments: Ice Blue Rhinestones (Kaisercraft).
  • Accessories: Label 8 nestabilities (Spellbinders), Border Nestabilities, Sewing machine, Sponges, Foam tape.

I hope you like my creation.
Now head over to Jen's blog to enjoy her beautiful creation!

Enjoy the hop!
Have a great night!!

Friday, September 10

CSS Alumni: Color Combo Challenge.

Hello ladies (and gentlemen). It's time for another fun CSS Alumni Blog Hop, featuring Gina K. Designs Stamps and if you coming from Deb's blog you are in the right place.
This time our Hop is a Color Combo Challenge. The colors given to us are:
  • Orange (Sweet Mango or Pumpkin Spice)
  • Red (Cranberry Tart, Rocket Red, or Red Hot)
  • Brown (Chocolate, Tan Leather, Kraft, Soft Sand
  • ONE Neutral Color from the following: White or Ivory
I created two cards for this hop and I hope you like them.

From Our Family to Yours.
Directions:
  • Make card from cardstock.
  • Emboss front of card.
  • Stamp image, color, die-cut and emboss. Mat it with another piece of cardstock. Adhere to card. Add glitter to flowers.
  • Stamp sentiment. Die-cut using Fancy Tags. Ink edges. Adhere to card with foam tape.
  • Add ribbon.

From our family to yours

From our family to yours

Card recipe:
  • Cardstock: Ivory, Rocket Red.
  • Stamps: Autumn Beauty.
  • Ink: Memento Tuxedo Black, Memento Rich Cocoa (Tsukineko)
  • Embellishments: Gold Rhinestones (Recollections), Orange Ribbon (Offray).
  • Accessories: Cuttlebug, Scrollwork folder, Fancy Tags (Spellbinders), Oval Nestabilities (Spellbinders), Prismacolor Pencils, Foam tape, Sponges.

Autumn Blessings.

Directions:
  • Make card from cardstock.
  • Cut a smaller piece of cardstock (1/4 inch small in both sides) and ink edges. Add a Red piece, add zig zag stitches.
  • Stamp image, color, die-cut, emboss and ink. Stamp and color a second image, cut out flower and leaves, add Diamond Glaze, set aside to dry.
  • Stamp sentiment. Adhere to card with foam tape.
  • Add ribbon and button. Add gold rhinestones in opposite corner.
  • Add extra flower and leaves.
Autumn Blessings

Autumn Blessings

Card recipe:

Hope you like them!
Now hope over to Jen's blog and enjoy her wonderful creations!!

Have fun hopping.

Friday, August 27

CSS Alumni Limited Supply Challenge

Hello and welcome to another fun Blog Hop with the CSS Alumni Team, featuring Gina K. Design Stamps. If you have come from Cheri's Blog you are in the right place, if not, you can start from the beginning over at StampTV.
This time our challenge is a "Limited Supply Challenge", using only these items:
  • One Neutral color for your card base: White, Ivory, Black, Brown or Kraft
  • Two different colors of card stock
  • One patterned paper
  • Three buttons
  • One color of ribbon
  • As little or as many images as you'd like
So, here are the cards I created:

Best Friend: Very feminine card :)

Directions:
  • Make card from card stock.
  • Die-cut scallop frame. Mat card stock and patterned paper, Add stitches. Adhere to card.
  • Stamp sentiment and die-cut and emboss. Ink inside edges. Mat it with another piece of card stock using foam tape.
  • Add button in left corner.
  • Adhere ribbon with button.

Best friends

Best friend

Card Recipe:

 Hooray!! Simple, fun and with lost of details.

Directions:
  • Make card from card stock.
  • Stamp Sentiment.
  • Create frame with Label 8 and Oval Nestabilities. Adhere to card with foam tape.
  • Punch/die-cut circles, using a very thin piece of card stock, adhere tape and add circles. Add patterned paper on top. Adhere to card.
  • Stamp rose in patterned paper twice and cut them out. Adhere to card.
  • Add ribbon and buttons.
Hooray

Hooray

Card recipe:
  • Card stock: Ivory, Kraft, Lemon Drop (All GKD)
  • Paper: Clothesline Collection (Little Yellow Bicycle)
  • Stamps: Versatile Verses, A Year of flowers (GKD)
  • Ink: Read red (SU), Espresso (Ranger)
  • Embellishments: Button jar Yellow Mix (GKD), White Satin Ribbon (Offray)
  • Accessories: Label 8 Nestabilities (Spellbinders), Oval Nestabilities (Spellbinders), Cricut machine, George and Basic Shapes Cartridge, Foam tape, Scor-tape, Mini glue dots.
Hope you like them!
Now, hop over to Jen's blog and check out her wonderful creation.

Have fun hopping.

Friday, August 13

CSS Alumni Sketch Challenge

Hello my friends! It is time for another fun CSS Alumni Blog Hop. This time is a Sketch Challenge. If you have come here from Cheri's blog, you are in the right place, if not come back to Stamp TV to start the hop.
I have to confess as soon as I saw the sketch I knew what I wanted to do, an "Envelope Card" hmm. what is that? It is a card and a envelope together, LOL. It is super easy to make.

Directions:
Inside of card:
  • Mat together 2 pieces of card stock and add stitches all around
  • Stamp image twice, color them. Cut out one and die cut the other one, adding some ink inside the borders.
  • Adhere the other image with Foam tape.
  • Add a scallop only in the top part.
  • Stamp sentiment.
  • Add image to card.
Envelope.
  • Cut a piece of card stock: 8.5" x 4.5"
  • Scor in half and fold. 
  • Using Circle Nestabilities, die cut a half circle. Emboss only front part.
  • Add a strip of card stock to the front and add stitches.
  • Add ribbon using Scor-tape and buttons.
Tips:
  •  If you want a flat folded ribbon add tiny drops of Fabric glue, press it and let it dry.
  • In order to have the perfect circle die-cut, put the inside piece through, make a little mark where you think the cut will match with the inside. (hope this makes sense)
Here is my "Baby Congratulations Card":


Card recipe:
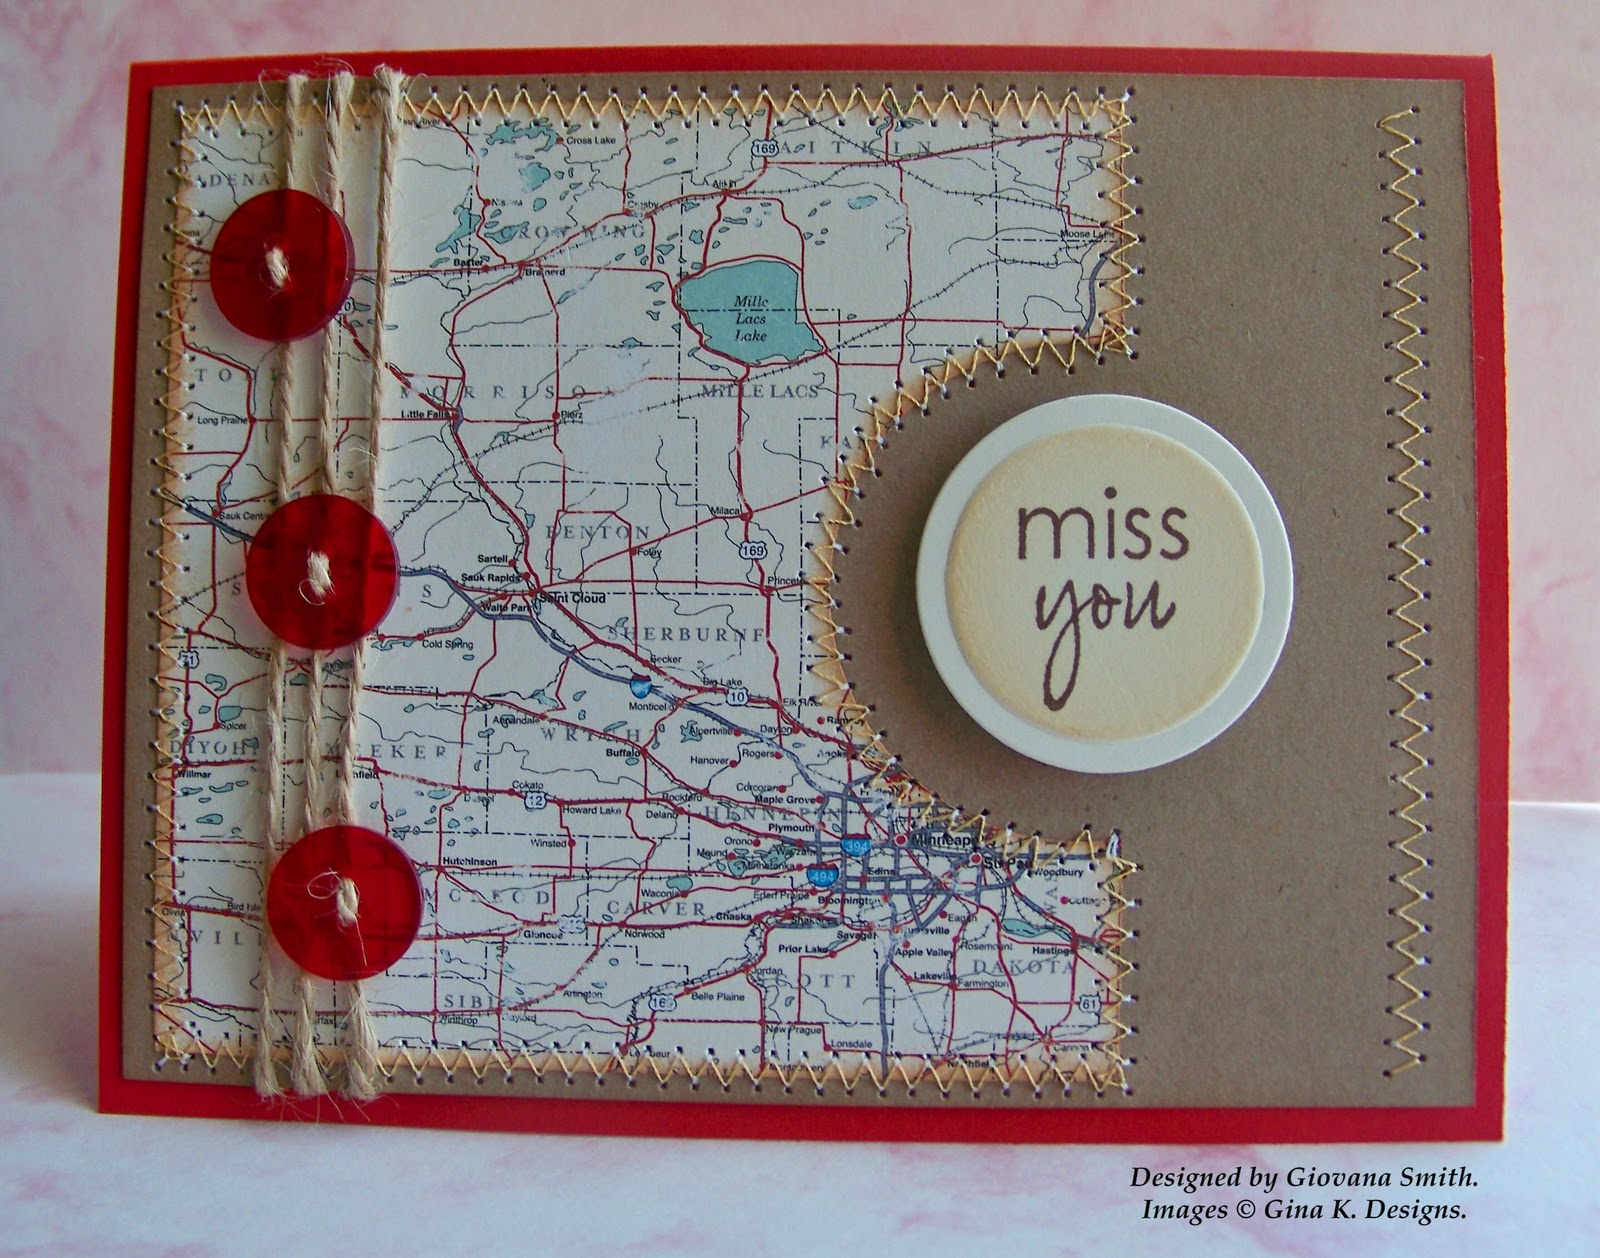
Miss you card: I made this card for my dad! I miss him so much, I haven't seen him in almost 6 years and I wish I could go and just talk and talk. He loves to talk, travel and eat good food (just like me), also he is very funny!!

Anyway, for this card I didn't turn the sketch around.

Directions:
  • Make card from card stock.
  • Cut piece of Patterned Paper. Die cut semi-circle using Circle Nestabilities. Ink edges.
  • Mat the piece of PP with card stock, add zig zag-stitches.
  • Add buttons with twine.
  •  Stamp sentiment, ink and emboss. Adhere to card with foam tape.

Card recipe:
Hope you like them!!

Now, hop over to Jen's blog to see her wonderful creation.

Have a great day!