Tuesday, May 31

Get Well Soon

Hello friends! Happy Tuesday to you. Today I have a special card requested by my husband for one of his co-workers. Last week he asked me for a Get well card at 9:30 pm, of course I said I can make one but he wanted one right away, sadly I was too tired and it was too late to craft (at least for me), so next day I made this card for the officer who will be out of duty for awhile. That's why the saying inside {wink, wink} again requested by my husband.

Since I didn't have any stamp with that saying I used my Concord & 9th stamps "Sophisticated Script Uppercase and Lowercase" and I love it! This card is pretty easy to make, I call it "Back to basics"
For the front I used my Wood Grain embossing folder on a piece of cream cardstock and then sponged the piece with Vintage Photo Distress Ink.


Submitting this project to:

Hope you like it!
Have a fantastic day!


Monday, May 30

Memorial Day, Never forget.


Hello! Hope you all are having a great day. Many are having family gatherings and celebrations together, love that, but never forget the fallen who fought for our freedom.

This video was shown at church yesterday and I think everybody needed a tissue, very emotional.


Have a great day!!


Friday, May 27

Freedom

Hello friends! Happy Friday to you! I have great news to you, Crafter's Companion has just released a couple of Patriotic sets and let me tell you, you are going to love them and need them!!

For this card I used the stars from the new Independence Day and 4th of July Sets, the Freedom and little stars from the background are from Patriotic Pride set.
I used Spectrum Noir Markers: TB2, TB3, TB4, DR1, DR3, DR4 to color the stars and Spectrum Noir Sparkle: Blue Topaz and Red Berry to create the red and blue background paper.
I added red and blue twine and added the panels to a Kraft color card base.


Submitting this project to:
Hope you like it.
Have a fantastic day!!

Wednesday, May 25

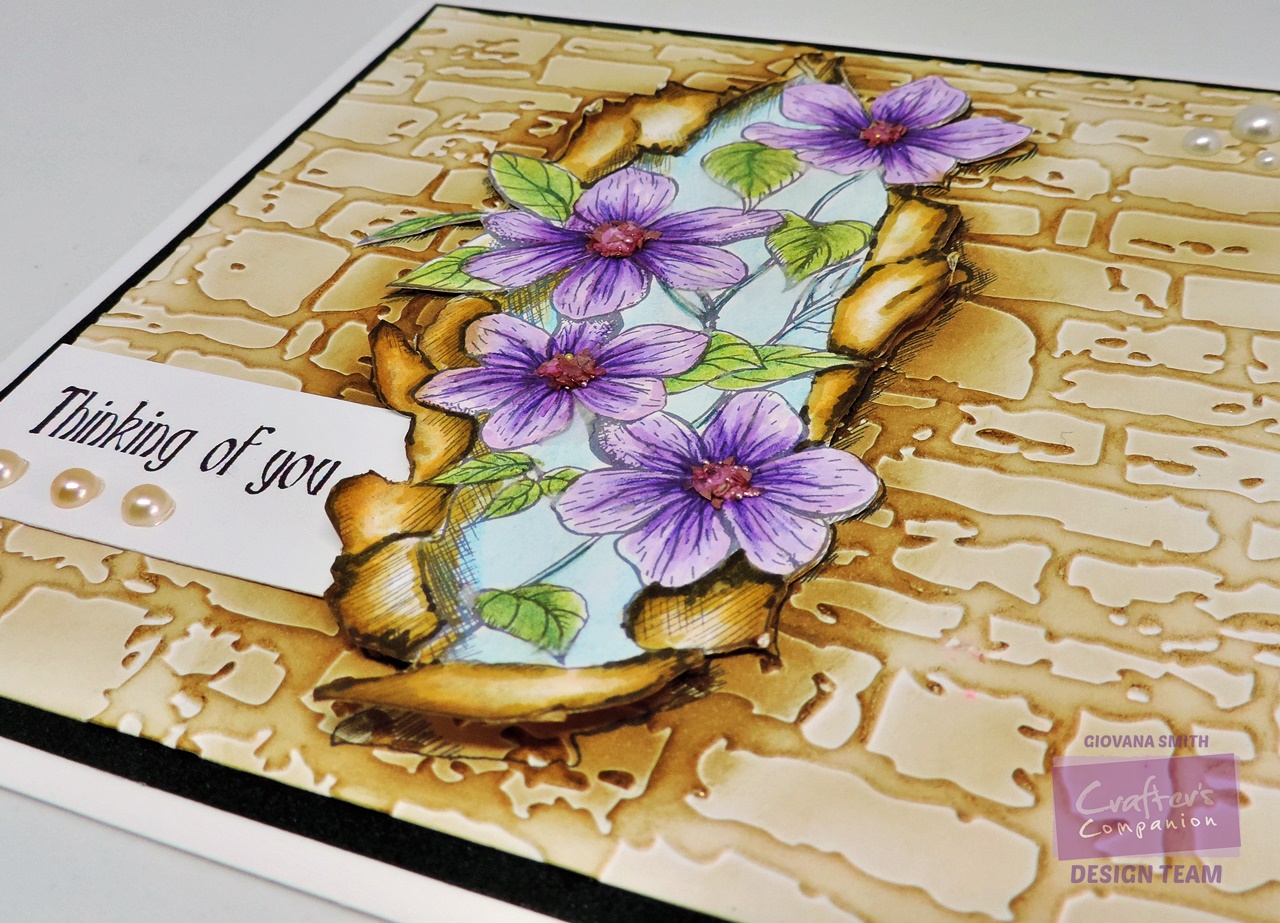
Thinking of you

Hello friends!! Sheena Douglas for Crafter's Companion has a new collection, part of the "A little bit sketchy" one, this collection has beautiful torn paper designs, the flower ones are my favorite!
You can find them HERE (The first 6 sets)


And I want to share with you the card I made with this collection, plus I am super happy it made it to the store banner {wink, wink}

Here are the details:
  • Stamp the image Clematis on a piece of Ultra Premium White Cardstock, color it with Spectrum Noir Markers, Sparkle and Pencils, these are the ones used:
  • Cut out colored image and set aside.
  • Stamp another image to get as a reference. Dry emboss it with Dry Stone Wall folder, apply brown tones of ink, here I used a couple of Distress Inks, then add a darker brown ink around the edges of the stamped image. Adhere cut out image.
  • Stamp sentiment from Sentimentals set. Add to card.
  • Cut a piece of Black Pearl Shimmering and adhere it behind the image, finally add panels to a 6" x 6" card base.
  • Add an extra embellishment, add pearls and micro beads on flowers.


Submitting this project to:
Hope you like it.
Have a fantastic day!!

Monday, May 23

Ken Oliver Crafts May Challenge: Flowers

Hello friends! Happy Monday to you all! Hope you all are starting a fantastic week. The Ken Oliver Creative Team has a new challenge for you, this month our theme is flowers, so this is your time to create anything with flowers and of course Ken Oliver Crafts products if you have them, you can find more details about the challenge HERE and also enjoy the projects made by the team.

This is the project I created for this month's challenge. I used the 6" x 6" Mixed Media Board as the base of my project, stamped the Poppy Mandala stamp direct on the board and added White Embossing powder and heat set it. After that I colored the flowers with Color Burst, I used: Alizarin Crimson, Fuchsia, Lime Green, for the background I used Turquoise. I also added Metallic Sky for the background and Metallic Mandarin on the flowers.
I also added embossing paste and stenciled the corners to give it and extra touch.


Products used:

Hope you like my project.
We hope you can join us and play along.

Have a fantastic day!


Thursday, May 19

Dream : Altered Journal Cover

Hello friends! Happy Thursday! Today I have a mixed media project I created for Crafter's Companion. I will start adding more pretty pages to my journal, practicing more, mixed media is a technique I really enjoy.

So, I invite you to hop over to the Crafter's Companion Blog and enjoy this tutorial.


Hope you like it!
Have a great day!

Tuesday, May 17

Poppy card using Color Burst!

Hello friends! I finally have time to sit down and write a post, I just want to share a card with picture tutorial I am sharing over at the Ken Oliver Crafts Blog, you can check it out HERE.

For this card I used the one of the new Cut n Color Stamps and Dies from Ken Oliver Crafts, this one is the poppy one, I used several Color Burst to color the image and the background.
I love poppies and this one of my favorites.


I am entering this card to:


Hope you like it!
Have a fantastic day/night!!


Monday, May 9

Pray

Hello my friends!! Happy Monday, hope you all are starting a great week and Happy Mother's Day to all the moms out there, hope yesterday you enjoyed a day full of love and great memories.

Today, I have a couple of cards for you, clean and simple style with a splash background created with Color Burst.

For these card I used the set  "Pray" from Latina Crafter, stamped the sentiments on vellum with Versamark Watermark Ink, then added Gold embossing powder and heat set it.
After that I die-cut the sentiment with circle and square dies.

To create the backgrounds, I used Tangerine and Chartreuse Color Burst for one BG and Yellow Ochre and Fuchsia for the other one.


I added Silver thread behind the vellum sentiments.

FinallyI added Fuchsia rhinestones and Ruby sequins to the cards.


My cards got inspired for this week sketch from CAS(E) this Sketch

Also submitting them to Word Art Wednesday: Anything goes.


Hope you like them!
Have a fantastic day!


Wednesday, May 4

Sara Davies is back at HSN!!

Hello friends!! Sara Davies is back in the US and she will be showcasing more goodies from Crafter's Companion and Spectrum Noir!


A new collection will be shown later today and I want to show you a card I made with this cute Starlet from Verity Rose Collection!! The image was colored with Spectrum Noir Markers:
Skin: FS2, FS3, FS6, TN2
Eyes: IG1, IG2
Outfit: TB1, TB2, IG1, EB1, GB5
Lips: CR8.
Accessories: 
Rose: CR8, DR5, DR7, CG2, DG2


The card base was made from Ultra Premium White cardstock, die-cut and embossed a couple of Scallop Border from Coastal Pearl Shimmering Cardstock, behind the image I colored the edges of a piece of white cardstock with Gold Spectrum Noir Sparkle.

Ultra White Premium Cardstock.
Coastal Pearl Shimmering Cardstock.
Sara Signature Collection Floral Delight 5"x7" Embossing Folder - Rambling Rose.
Sara Signature Collection Floral Delight Die - Scalloped Border.


Hope you like it!
Have  fantastic day!

Monday, May 2

Best mom in the world

Hello friends! I am back! I am so sorry I have been gone for more then a week, goodness I got really really sick, first I got a virus then an infection that hit me so hard that I couldn't do a thing, from the 2+ weeks I got sick I actually cooked 4 days only, Subway was our friend and the husband cooked few meals, leftovers are always a plus!

Anyway, I am feeling 90% better, so it is time to start creating again! Latina Crafter has a new sketch and/or twist challenge up, so hope you can participate too. You don't have to use Latina Crafter stamps/dies to participate ;)


And this is the card I created. This time I used both the sketch and the twist together (most of the time I use one or the other).
Here are the directions:
  • Start creating a card base from White cardstock. 5.5" square.
  • Cut a panel from yellow cardstock, 5.25" square and patterned paper, this paper coordinated perfectly with the colors from the challenge, stamp flowers and swirls from  La vida está llena de bendiciones set on paper in Versamark ink and white embossing powder. This is a Ken Oliver paper. Stitch together.
  • Stamp Celebrando a mamá on a piece of white cardstock in Versamark ink , add white embossing powder and heat set. Add distress inks to show more the heat embossed sentiment.
  • Add a scallop border to sentiment and add t panel and add stitches.
  • Adhere panel to card base, add a little strip of Coastal Pearl cardstock and embellish with pearls and sequins.


Entering this card to:
Hope you like it!
Have a fantastic day!


Friday, April 22

Together

Hello friends!! Happy Friday to you all! Today, the new Sara Davies Floral Delight Collection is available now!
This collection is very feminine and beautiful, the patterned papers are amazing and you can combine them without getting too much of the same kwim?

My card is super simple and aren't those flowers gorgeous?! Let me tell you, the flowers are from 6" x 6" patterned paper pack, they are so pretty I decided to go old school and take my scissors and cut around them.

Here a re the details:


Entering this project to:
Hope you like it!
Have a fantastic day!!


Thursday, April 21

Ken Oliver Creative Team April Challenge

Hello friends!! How you all are doing well. The Ken Oliver Creative Team was challenged this month to create a project based on the theme "Family" and also we were challenged to used 3 Color Burst, 1 Metallic, Stick It, stamp and/or dies.

So, I decided to do a baby picture frame! I made this for a friend who recently had a baby girl, she is more like family to me. I've been wanting to visit her, but I am recovering now from a horrible cold/cough bug so I will have to wait until I get 100% better to give it to her.

The project was done in about 90 minutes!!

Here are the details:
  • Start with a wooden frame, paint it with white acrylic paint and then add a couple of layers of gesso, here I used clear gesso to keep the deep white color from the acrylic paint.
  • While the frame dries, paint a piece of Water Color Media paper with Liquid Metal Rose and Saffron. Set aside to dry. Apply Stick It to both colors and die-cut the banner in rose and the baby in Saffron. (After it dried I decided to cover the Saffron color with Metallic Rose, that's why the color looks a little bit darker) I die-cut the baby 3x and the banner 2x. Peel the Stick it and adhere them together.
  • Mist 4 pieces of Water Color Media Paper in Fuchsia, Orchid, Yellow Ochre and Merlot and Pthalo Green and Terra Verte. Die-cut flowers and leaves.
  • Spray flowers and leaves to give them more textures and shape them.
  • Add pink buttons around the frame window.
  • Glue flowers together and add them to frame.
  • Add banner and baby die-cuts.
  • Embellish with pearls and twine.


Ken Oliver Products used:
Other products:
Now, it is your turn to play along!! Create a project based on the theme and use as many of the products listed for the challenge and post your creation on Facebook using the hashtag #kenoliveraprilchallenge or email your submissions to sharon@kenolivercrafts.com.

Hope you like my project!
Have a fantastic day!


Tic-Tac-Toe Guest Designing

Hello my friends!! Few weeks ago I got an exciting email asking if I would like to be a Guest Designer for the Tic-Tac-Toe Challenge #8 and of course I said yes!!

For my creation I used the 3 items from the top line, you can find more details about the current challenge here


For my card, I started stamping the Autumn leaves in Antique Linen Distress Ink on a piece of watercolor cardstock, then colored them using the wet on wet technique, with Kuretake watercolor paints, allow the colors to dry naturally and add more color if desired. The sentiment I think invites to create more, I added this sentiment because I am trying to do better with watercoloring techniques, inviting myself to keep creating. I added a layer of shimmering cardstock to the watercolor panel and added it to the square card base, finally added 3 clear enamel dots.


Hope you like it!
Have a fantastic day!!

Monday, April 18

Downton Abbey Collection Release Time!!

Hello friends!! Happy Monday to you all. Today is the day that many of you have been waiting for, yes finally the new Downton Abbey Collection is here, This collection is pure luxury, the papers are one of the best I have seen in long time and the stamps, dies and embellishments are just "Beautiful"

I have a couple of cards to share with you, both were made just in minutes and you can make them too!!
This card is a 6"x6" card, perfect to invite your friends for tea. The image was stamped on white cardstock  in versamark ink and added gold embossing powder, I fussy cut the image. The frame die was die-cut in white foam to give it a little bit of the antique puffy look.


These are the products used for this project:


=====================================================================

This second card is so elegant! Perfect for a loved one or a friend for their special day (birthday, wedding, graduation) super easy, just an embossed panel for the background, a stamped sentiment and a topper, just remove it from the sheet and add it to your card!! Voila, done!


These are the products used for this project:


Hope you like them!
Have a fantastic day!!