![]() |
| Photo credit: Lori Barnett |
Wednesday, January 11
Colorista Poppies
Hello friends! I am a little late posting, but I want to share with you this page I colored from the new Colorista Exquisite Florals, this pad has beautiful pages, you can use them not only to do a relaxing coloring time, but also for cards, scrapbook pages or frames, like I did.
Last night Jennifer Tryon presented a lot of new products and projects on HSN!
My frame made it to the big screen {wink, wink}
And here is a closer look of the frame
I colored the page with my Colorista Markers, then applied a light layer of Spectrum Noir Sparkle.
This Colorista Pad is still available on HSN, get it before is sold out!
You can check the other products that are still available HERE
Hope you like it.
Have a fantastic day!
Monday, January 9
Crafter's Companion on HSN!!
Hello friends! I am back into the creating wagon, I took a good break from creating to enjoy my family and the extra sweet goodies :)
Today, I want to invite you to join Jennifer Tryon from new Crafter's Companion, she will be on HSN presenting collections, new products, amazing stuff!
So, here it is the schedule,
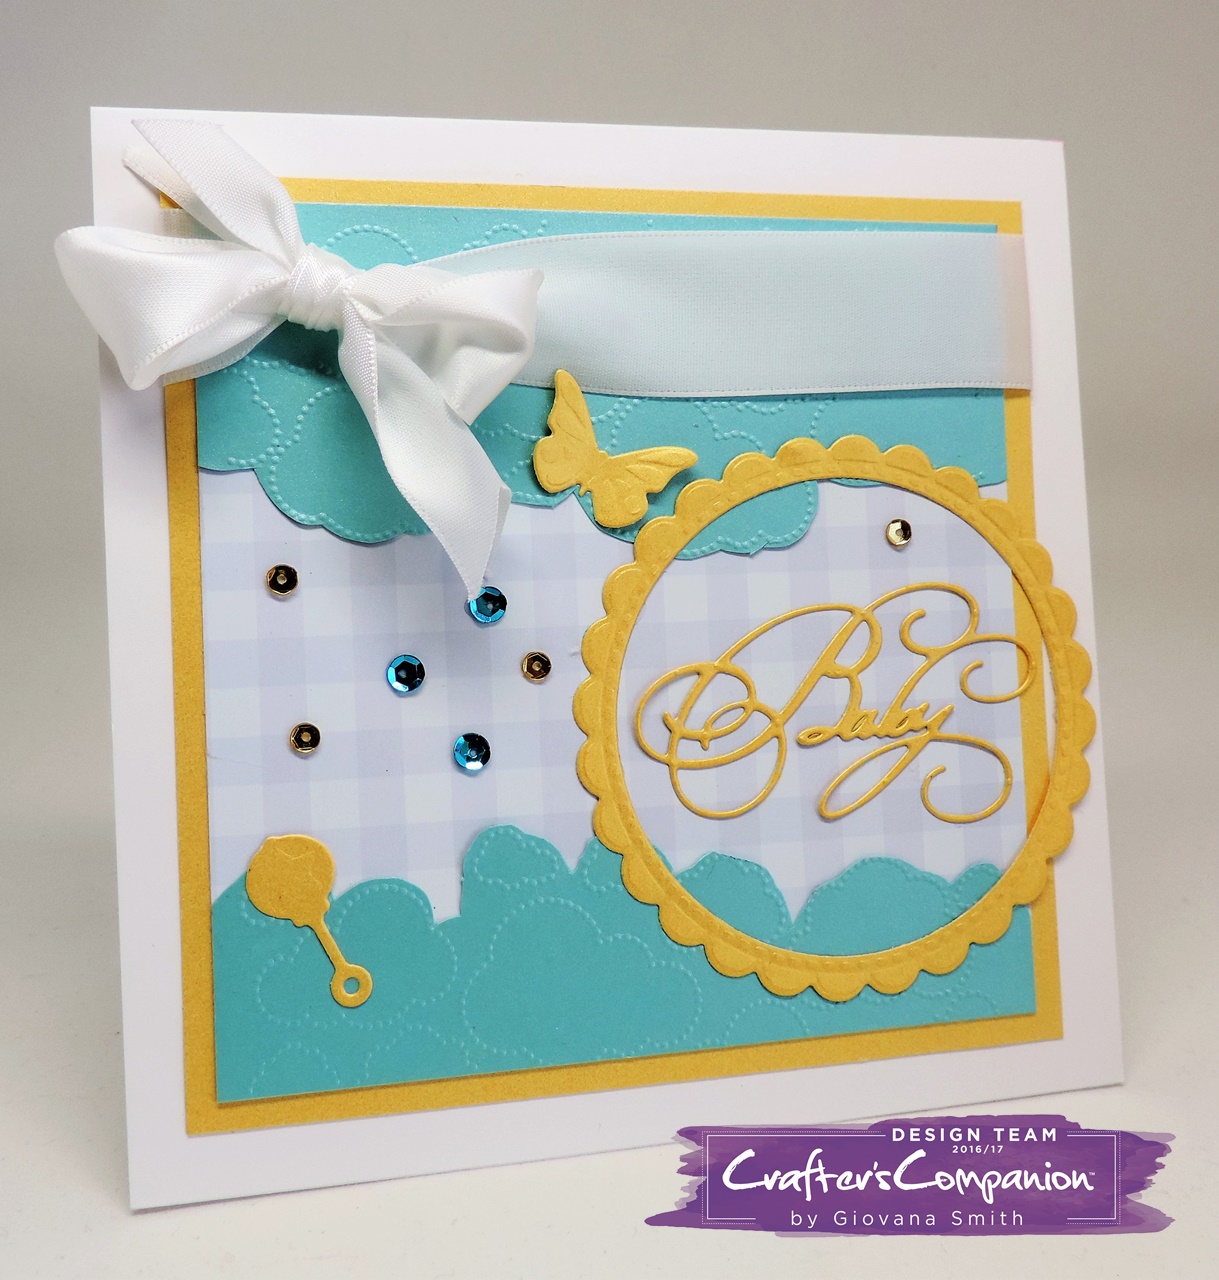
And I want to share projects I made using the "Little Angel" Collection! Baby stuff is my most favorite and when I saw this collection I feel in love, I will be sharing more projects this week.
Don't you love this cute elephant die!! All the dies in this collection are super sweet. You can die-cut one in watercolor paper and color it any color you want. The ribbon and papers are also from this collection.
And what about this super cute cloud embossing folder? I used scissors to shape the cloud and create two panels. More ideas coming :)
Entering these projects to Simon Says Wednesday Challenge: New Something.
Hope you like these 2 projects. Stay tuned for more ideas.
Have a fantastic day!!
Saturday, January 7
Seasons Giving Blog Hop Winner
Hello friends! I am a little late posting the winner from the Seasons Giving Blog Hop, but here it is, but first I want to thank you so much for all of your comments, my new followers here and on Instagram and blog readers, yay! you are amazing!
Now, the random winner is....
Vanias Reed
Vanias, send me your info at giovanachavez @ msn . com and I will send your prize this week.
Thanks again!
Saturday, December 31
Seasons Giving Blog Hop
Hello friends! Hope you all are having a great start of the year 2017! I have to say 2016 has been a great crafty year, I did what I love and put 100% in every single project, I always appreciate your comments, emails, likes on my FB page and the love you have always showed me.
As a thank you for your visits and comments and love throughout the year I have a giveaway, and I hope you like it!
Remember, every blog listed below has something amazing to giveaway to you, so don't forget to stop in every single one and leave some love.
I will keep this giveaway open until January 6th and I will announce the winner on January 7th, please leave your email address so you can be contacted if you are the lucky winner. Since shipping is quite expensive this giveaway is open to US residents only.
My giveaway includes stamps, dies, embellishments, cardstock, tape and I will add more, you won't be disappointed.
Also I would love if you can follow me on Instagram, my name is @giovana_handmade
Here, I picked few of my favorites projects of 2016!!
Blog Hop List
Giovana
Smith (You are here)
Heidi
Ramsey Blankenship
Thursday, December 15
What I love most about my coffee
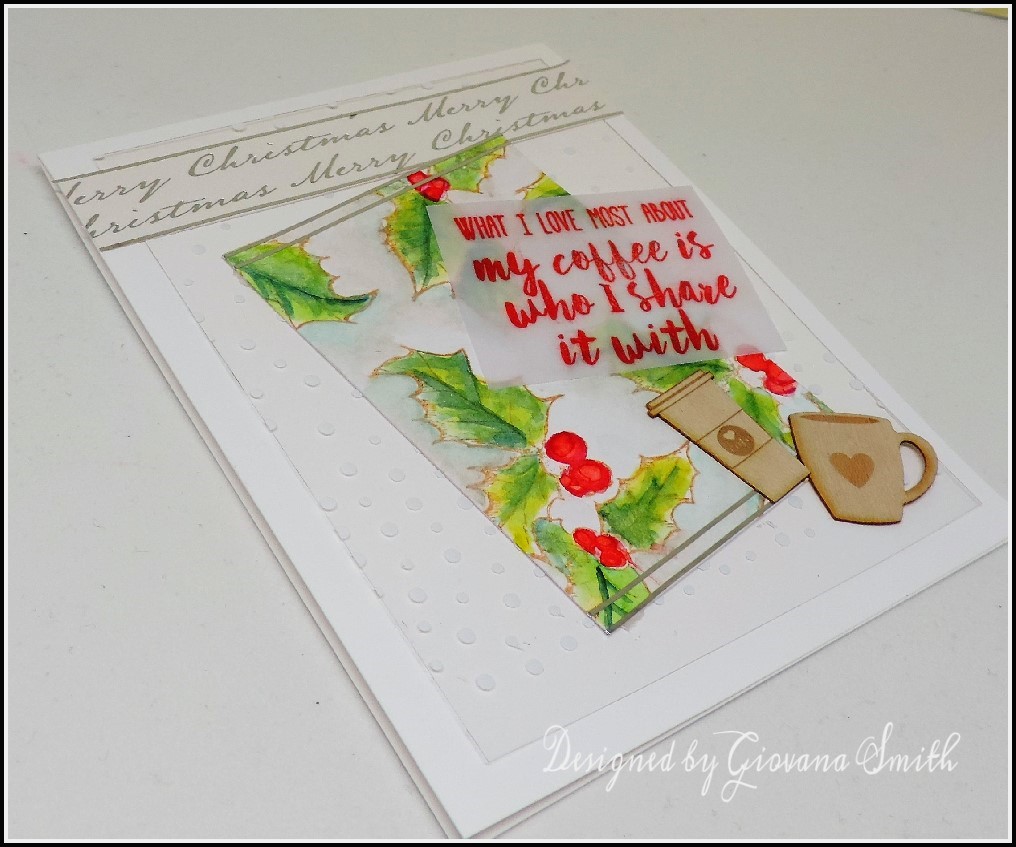
Hello friends!! How are you all doing? Hope the Christmas spirit is all around you and your family. I have a new project for you, showcasing products from 3 of my favorite companies!
So, let's get started
Submitting this project to Winter Coffee Lovers Blog Hop!
So, let's get started
- For this project I used a leftover colored piece that I used for this card, just a small piece, I didn't think it will work for anything, but it did {wink, wink}
- I added super thin 1/32" Silver Metallic Tape from Rainbow Tape.
- I stamped the coffee sentiment from Latina Crafter on a piece of vellum and in red Ink.
- To create the card base, I started with a piece of Ultra White Premium Cardstock, added a piece of snow acetate piece, then cut a piece of patterned paper and added to card base.
- Finally, added the other panels and coffee mugs wood veneers.
Submitting this project to Winter Coffee Lovers Blog Hop!
Products used:
Coffee Stamp (will be in store soon)
Have a fantastic and warm day!
Monday, December 5
Peace and Joy
Hello friends! Hope you all are starting a great week, I think my computer is finally working the way it should be, hopefully I will start crafting again without any problems.
So, for today I have an easy card using products from the Traditional Christmas Collection by Crafter's Companion.
Here are the details:
And this is the card, love how this turned out.
Entering this card to:
So, for today I have an easy card using products from the Traditional Christmas Collection by Crafter's Companion.
Here are the details:
- Start by die-cutting and embossing a piece of Ultra Premium White Cardstock using the Entwined Holly Die.
- Color the leaves and berries with Spectrum Noir Sparkle Markers: Holly Leaf and red Berry.
- Adhere a piece of Traditional Christmas Paper to a 6" x 6" card base.
- Adhere a piece of Gold Luxury Mirror Cardstock to top of the Patterned paper, then adhere the die-cut colored piece.
- Add a thin stripe of Candy Red Shimmering Cardstock
- Stamp sentiment in red ink, add a red bow to card.
And this is the card, love how this turned out.
Entering this card to:
Hope you like it!
Have a fantastic day!!
Friday, November 25
Just Truckin'
Hello friends!! Happy Friday!! Hope you all are having a great day after a fantastic Thanksgiving! Me, I am just resting, no shopping or craziness for this old lady, LOL. I don't like big crowds so I prefer to sit and watch TV and relax, so this card is just perfect for a super chill day, don't you think?
This stamp set is a brand new release from the new Sheena Groovin' 60's Just Truckin' Set, I stamped the image on a piece of heavy Vellum paper in Jet Black StazOn Ink, I used my MISTI to apply several layers of ink, then just set it aside to dry completely. The card base is from Watercolor paper, measures 5" x 7", I used the also brand new Groovin' 60's Crazy Perspective Stencil and with the help of my eBrush and my Spectrum Noir Markers, here I used CT2, CG3, LG3, BP5. When the image is completely dried sew it to card front, then stamp the flowers from the same set on vellum in Neon Pigment Inks and add them to card.
Hope you like this new collection, you can check out the other stamps and stencils HERE
Have a fantastic day!
This stamp set is a brand new release from the new Sheena Groovin' 60's Just Truckin' Set, I stamped the image on a piece of heavy Vellum paper in Jet Black StazOn Ink, I used my MISTI to apply several layers of ink, then just set it aside to dry completely. The card base is from Watercolor paper, measures 5" x 7", I used the also brand new Groovin' 60's Crazy Perspective Stencil and with the help of my eBrush and my Spectrum Noir Markers, here I used CT2, CG3, LG3, BP5. When the image is completely dried sew it to card front, then stamp the flowers from the same set on vellum in Neon Pigment Inks and add them to card.
Hope you like this new collection, you can check out the other stamps and stencils HERE
Have a fantastic day!
Tuesday, November 22
One page, three cards
Hello everyone!! Hope you all are having a great day! The Spectrum Noir Colorista Line is now available and I know you all are going to love it! The Coloring book or Color Paper Packs are amazing, the paper has an amazing quality and the markers and pencils blend beautifully!
I have for you 3 cards I made using just 1 page (still have 1/4 of the page I need to use), I spent 1 night coloring with the new Colorista Markers, after that I cut the page in quarters and I created these beautiful set.
Here few details about each card:
Best Wishes Card: I started with a Kraft Cardstock card base, cut a panel from Yellow Pearl Shimmering Cardstock and add a smaller panel of Vellum Paper. Then, die-cut the piece of paper using Louise Die-set, stamp sentiment on a piece of vellum, tie twine then adhere all the panels to card front. Finally, add sequins and a pearl.
Thank You card: Start with a Kraft Cardstock card base, cut a panel from Patterned Paper and adhere it to card front. Die-cut the colored piece with Circle dies, then create a circle frame from Yellow Pearl Shimmering Cardstock, adhere circle frame to die colored piece. Stamp Thank you on a piece of vellum, create a little banner and adhere them to card. Add circle panel to card with foam adhesive. Finally, add sequins.
Especially for you card: This was the easiest card of all 3, similar to the other 2, start with a Kraft cardstock for your card base. Cut a pnel from Yellow Pearl Shimmering cardstock, cut colored panel to fit the front card. Stamp sentiment on a piece of vellum and adhere it to card. Finally add sequins and red pearl.
Hope you like them!
Have a fantastic day!!
I have for you 3 cards I made using just 1 page (still have 1/4 of the page I need to use), I spent 1 night coloring with the new Colorista Markers, after that I cut the page in quarters and I created these beautiful set.
Here few details about each card:
Best Wishes Card: I started with a Kraft Cardstock card base, cut a panel from Yellow Pearl Shimmering Cardstock and add a smaller panel of Vellum Paper. Then, die-cut the piece of paper using Louise Die-set, stamp sentiment on a piece of vellum, tie twine then adhere all the panels to card front. Finally, add sequins and a pearl.
Thank You card: Start with a Kraft Cardstock card base, cut a panel from Patterned Paper and adhere it to card front. Die-cut the colored piece with Circle dies, then create a circle frame from Yellow Pearl Shimmering Cardstock, adhere circle frame to die colored piece. Stamp Thank you on a piece of vellum, create a little banner and adhere them to card. Add circle panel to card with foam adhesive. Finally, add sequins.
Especially for you card: This was the easiest card of all 3, similar to the other 2, start with a Kraft cardstock for your card base. Cut a pnel from Yellow Pearl Shimmering cardstock, cut colored panel to fit the front card. Stamp sentiment on a piece of vellum and adhere it to card. Finally add sequins and red pearl.
Hope you like them!
Have a fantastic day!!
Monday, November 21
New Colorista Line available + A week of Give Thanks!
Hi friends!! Happy Monday to you all! I have a super relaxed weekend, I attended a birthday party, I did laundry and watched movies on Netflix, yes, very relaxing weekend, I usually worked on projects, I did a bit of coloring, extra time you may think? Well, yes, my computer is still being repaired, I hope I can get it back this week, hopefully before Thanksgiving.
Anyway, I have great news for you!! Today the Spectrum Noir Colorista Line is available over at Crafter's Companion, markers, pencils, coloring books and new stamps!! I used this beautiful corner (available today) from Elements 2 Set.
Here are the details:
- Stamp corner image on Ultra Smooth Premium Cardstock in Black ink, color images with Colorista Markers: Here I used the following:
- Petals: Lemon, Canary, Cream, Gold, Nectarine.
- Greens Leaves: Daffodil, Sandstone, Pear Green.
- Blueish Leaves: Leaf Green, Pistachio, Pale Mint, Cyan
- Add Clear Spectrum Noir Sparkle over the petals.
- Stamp sentiment from Hello Beautiful on a piece of vellum in Watermark ink, add gold embossing powder and heat set. Attach sentiment to colored panel.
- Cut a panel from Coastal Pearl Shimmering Cardstock, adhere color panel on this.
- Created a card base from Yellow Pearl Shimmering cardstock. Add panels with foam tape.
And Crafter's Companion wants to say Thank you!! and it's offering FREE gifts with every order!
Hope you like it!
Have a fantastic day!!
Wednesday, November 16
Groovin' 60's!
Hello friends!! I won't bother you with my computer problems, instead I want to show a super cool Crafter's Companion collection from Sheena Douglass "Groovin' 60's"
All the stamp sets and stencils are amazing, super retro and super cool!!
OK, let me give you details about this project:
Hope you like it!
Have a fantastic day!!
All the stamp sets and stencils are amazing, super retro and super cool!!
OK, let me give you details about this project:
- Stamp the flowers on the front of your card base from "Bloomin' Sixties" Set in Memento Tuxedo Black ink, then color them with Spectrum Noir Markers, I used the following: PP1, PP21, PP3, CT3, CR6, GB1, OR1, OR2, OR3, LV1, LV2, BT3, BT4, DG1, DG2. Add a coat of Clear Spectrum Noir Sparkle and set aside to dry.
- Then, add "Circles of your mind" stencil on top and with an eBrush add color, here I used Spectrum Noir Markers: LG2, CR4, LY2.
- Stamp girl from "Hattie" Set on Watercolor Cardstock in StazOn Jet Black Ink, then color image with AquaBlend Pencils:
- Face: Straw, Apricot..
- Lips: Cherry
- Hair: Hickory, Currant.
- Hat: Chrome Orange, Carrot, Papaya, Spinach.
- Blouse: Aqua.
- Jacket: Rose
- Cut image to 3.75" x 4" , adhere it to a piece of patterned paper from Verity Rose Collection and add stitches.
- Add image to card base.
- Add clear rhinestone.
Hope you like it!
Have a fantastic day!!
Tuesday, November 15
O Christmas Tree
Hello friends! Today I want to share a Christmas card with you, this card was super fun to make and easy as well.
For this card I used Metallic Tapes from Rainbow Tapes, I love them, they are so pretty, shiny and give the WOW factor to your project.
So I used
1/4" Green and Red
1/8" Green and Red and
I took pictures from a different angle so you can see the real colors!
Here are the details about my card:
Card base is from Kraft Cardstock. A2 size, top folded.
Cream panel, size 3.75" x 5".
Added the metallic tapes to the middle area of the panel.
Stamp the trees in different colors, then stamp the star in Golden Delicata Ink (hard to see here)
Die-cut a snowflake and color it with Spectrum Noir Sparkle Pen.
Finally add clear rhinestones.
Stamps and dies by Concord & 9th
O Christmas Tree Stamp Set
Take a Bough Die
The stamps and dies are from Concord & 9th
Hope you like it.
Have a fantastic day!!
Tuesday, November 8
Merry Christmas
Hello friends! How are you doing today? Hope your day is a great, I am so sorry for being MIA, I've been having computer problems for awhile, but in the last 2 weeks I was not able to do much, after few trips to Best Buy, the computer is working better, BUT I am still having issues, hopefully they will be easy to fix.
Anyway, I want to share with you a Christmas card I made using my Spectrum Noir Sparkle and ColourBlend Pencils! Love them very much, this card was super easy and fast to make.
Here are the details:
Hope you like it!
Have a fantastic day!
Anyway, I want to share with you a Christmas card I made using my Spectrum Noir Sparkle and ColourBlend Pencils! Love them very much, this card was super easy and fast to make.
Here are the details:
- Make a card base from Yellow Pearl Shimmering Cardstock. A2 size. Top folded.
- Cut a piece of watercolor cardstock, 3.75" x 5", squeeze a drop of Red Berry and Holly Leaf Spectrum Noir Sparkle, then mist the colors with water until you get the desire movement (plus the shimmer action is beautiful)
- Stamp the berries and leaves from Christmas Visitors on watercolor cardstock in StazOn Black ink, then color them with Spectrum Noir ColourBlend, I used the following colors: Avocado, Fern Green,Forest Green, Flame Red, Raspberry, Viridion, Lake Blue.
- Stamp sentiment from Believe set in Brown ink.
- Adhere panel to card base, adhere a thin stripe of Candy Red Shimmering Cardstock
- Cut out the leaves and add them to card, finally add sequins.
Hope you like it!
Have a fantastic day!
Subscribe to:
Posts (Atom)