Saturday, October 6
Ellen Hutson Essentials Challenge
Hello friends!! Happy World Card Making Day!!
I made 7 cards today!! It has been a very long time since I made 7 cards in one day.
Anyway, I will be showing you the projects I made in the next few days.
Tonight, I want to show the card I made using the Ellen Hutson Essentials Challenge.
For my card I used the brand new set "Mondo Holly", well released few weeks ago, but I finally had the chance to ink it up.
I stamped the image on a piece of Watercolor Paper in Versamark Watermark Ink, then added White Embossing powder and heat set it.
Colored the image with watercolor pencils, then added some shimmer using Spectrum Sparkle Markers (Cosmos, Olive Jade and Moonlight) and Clear Wink of Stella.
Cut around the leaves I wanted to keep as a whole, then die-cut the piece using circle dies.
Created a card base from White Cardstock (5.5" square), created a panel with Green Shimmering cardstock and Patterned Paper (old one but good one), then added the image and sentiment that was stamped on a piece of white cardstock in Chocolate ink.
Added sequins and little drop of White Nuvo Crystal Drops.
Here you can see the shiny image.
Hope you like it!
Have a wonderful day/night.
World Card Making Day SALES!!!
Hello friends!
Happy World Card Making Day!
Today, it's a very special day for all of us card makers!!
I love celebrating this day, and no better day than making cards
and also sharing with you some fantastic SALES!!!
So, let's get started
Code: WCMD18
Get 18% off storewide
Gorgeous stencils for all occasions!!!
Code: makeacard
and get 15% off!!
Code: WCD20
$20 off storewide!
Codes:
Take10 : $10 off any order of $50 to $99
Code: WCMD18
Save 20% on your order
TODAY ONLY!!!
FREE dip-dyed cards and envelopes
with ANY purchase
No code needed
25% off
Code: WCMD18
Have fun!
Take advantage of these sales!
I will be back later sharing fun projects!!
Friday, October 5
Autumn Blessings
Hello friends!! Today I have an Autumn card for you!
I really love the new stamps by JanTink, her drawing is amazing and beautiful!
This card is actually pretty simple.
I stamped the beautiful Autumn Blessings stamp on a piece of watercolor paper in Black Ink.
Then colored the image with watercolor pencils and die-cut the piece.
After that, I sprayed a acrylic block with Harvest Sunset Shimmering Bliss and using a water brush I added shimmer to the leaves and tree.
Added the panel to a piece of white cardstock using foam tape and then adhered it to a Kraft card base.
You can get these products with a 10% discount using my code TJ10Giovana
Entering this card to Inspired by Challenge: Ready for Fall.
I got inspired by the season, Fall!! My favorite!
Hope you like my project.
Thursday, October 4
Impression Obsession Challenge: Make It Sparkle!!
Hello friends! Hope you all are having a great day!
It is time for a new Impression Obsession Challenge "Make It Sparkle"
To enter the challenge go to the Impression Obsession blog (all the details are there!). A random challenge card will be selected to showcase on the IO blog AND you can to enter to win a $25 gift certificate to IO just by playing! (IO stamps need to be used)
For my project I used Abstract Circles for the card base background, stamped direct on the Kraft card base front in Versamark Watermark Ink, then added Perfect Pearland rubbered it on the paper, cleaned up the excess.
Then, stamped the Acorn Row on a piece of White Cardstock in Chocolate Ink, then colored it with Copic Markers, also added Clear Wink of Stella on top of the acorns, set aside to dry.
Die- cut the Autumn Branch in Gold Cardstock, added them behind the image.
Also added few White Nuvo Crystal Drops.
You can see the Sparkle/Shimmer action here.
Wink of Stella on the acorns.
Now, visit the Impression Obsession Blog for more details!
Hope you like my project.
Have a wonderful day!
Monday, October 1
Technique Junkies October Release is here!!
Hello friends!! Technique Junkies October Release is here!!
Lots of beautiful Christmas images!
I can honestly say this is one of my favorite releases! Love to be in the Christmas spirit!
If you arriving here from Jan's blog, then you are in the right place, if not, please start the hop from the Technique Junkies blog.
All the October stamps are 15% off through October 8th!
No code needed, the discount will be applied at checkout.
Let me show you the projects I have created for you.
For these 2 projects I used Season's Greetings Set of 6
Both cards are very similar design, simple yet elegant.
Warm Wishes for a Happy new Year
For this card I used the mistletoe image and stamped it on a Kraft card front in Beige Ink (very soft ink color).
Stamped the mistletoe image on a piece of watercolor paper in Versamark Ink, then added white embossing powder and heat set it. Colored the image with watercolor pencils, then added extra color using Nuvo Glitter Markers.
Die-cut the panel and added an extra red panel behind. Added them with foam adhesive.
Stamped the sentiment on a piece of black cardstock in Versamark, added White embossing powder and heat set it.
Finally, added few dots of Rhubarb Crumble and Simply White Nuvo Crystal Drops.
Season's Greetings
For this card I did the same with the card front as previous card.
Stamped the image on a piece of watercolor paper in Versamark Ink and added Gold embossing powder, then heat set it.
Then, die-cut the panel using 2 different stitched rectangle dies. Adhered the bigger outer frame direct to card base, then added the center rectangle with foam tape to create more dimension.
Stamped the sentiment on a piece of vellum in Versamark Ink and White embossing powder, then die-cut it and adhered it to card.
Embellished it with Rhubarb Crumble Nuvo Crystal Drops.
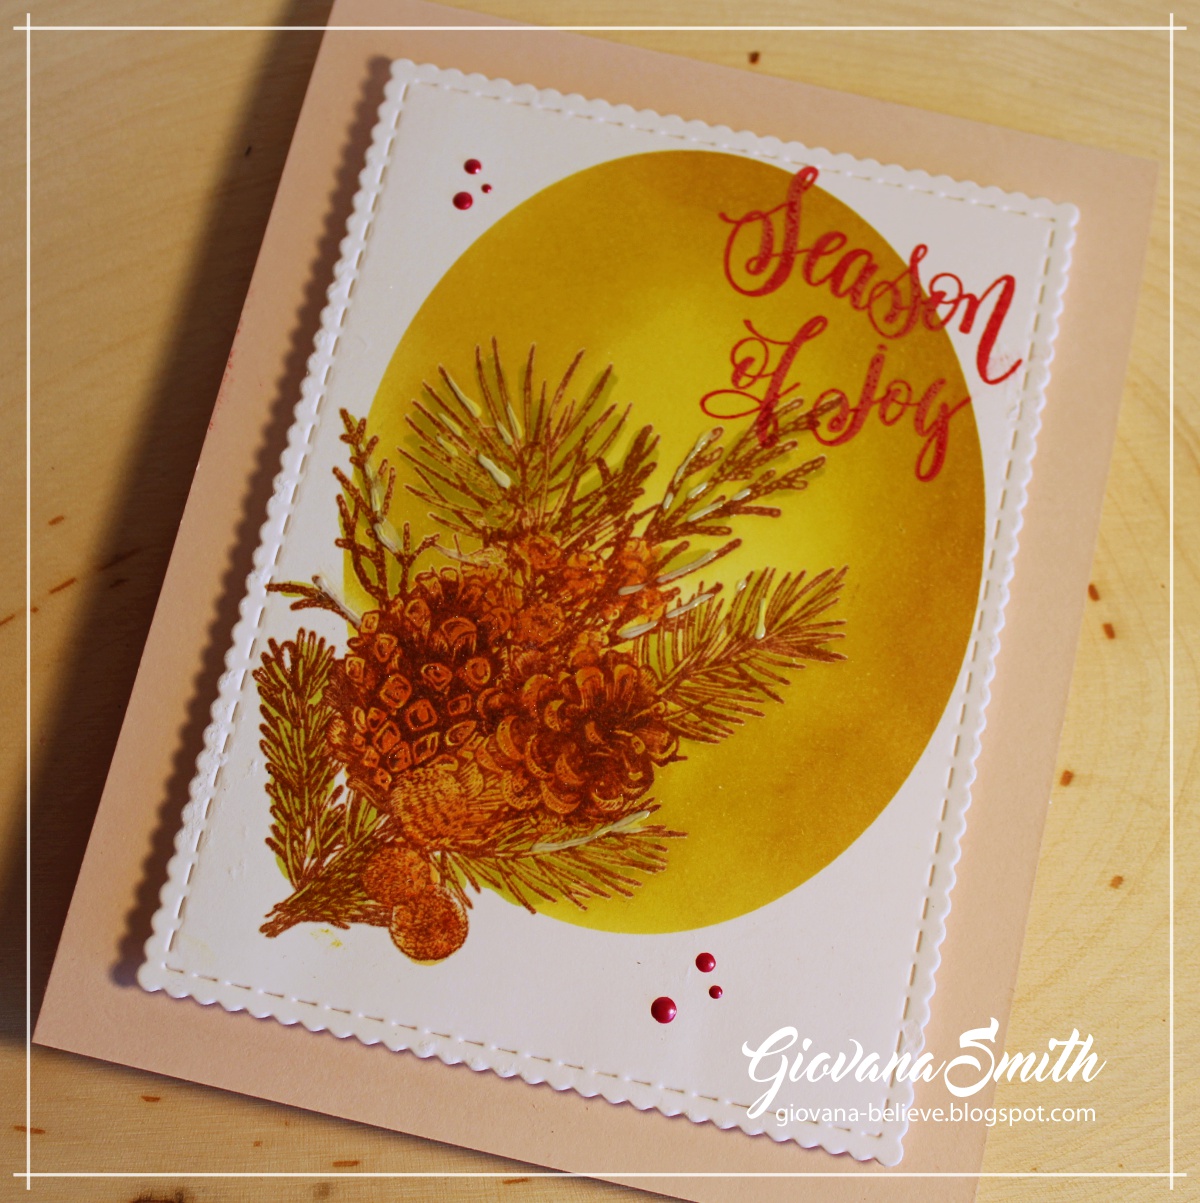
Season of Joy
For this card I used Pine Spray and Season of Joy.
Started stamping the Pine Spray on a piece of white cardstock in brown ink, then re-stamped it using Versamark and added Clear Embossing Powder, then heat set it.
Colored the image with markers, then created an oval mask piece, used the negative part and sponged the area with Yellow, green and brown inks.
Stamped the sentiment in Red Ink.
Die-cut the panel and adhered it to a pink card base with foam adhesive.
Added few dots of Rhubarb Crumble Nuvo Crystal Drops.
Merry Christmas cards.
For this cards I used the Christmas Whimsy Background for the tags!
I stamped the new Christmas Whimsy Background on a piece of pink and light green cardstock in Cherry and Teal Ink, used my MISTI to get a perfect impression. After stamping the images, I stamped Textured Newsprint on top in Beige Ink to add a little extra textured.
Die-cut them using tag dies, then die-cut bigger panels to add behind.
For the card bases, I stamped the Textured Newsprint in Beige Ink.
Adhered the tags with foam adhesive, then embellished them with snowflakes, buttons and twine.
Finally stamped Merry Christmas in Chocolate ink on White cardstock and adhere them to tags.
Now, time to hop over to Ceal's Blog.
Hope you like my projects!
Have fun hopping!
Impression Obsession Winner!!
Hello hello!!
Thanks so much to all of you who left a comment on my Impression Obsession Fall/Winter New dies Collection.
I entered all the names into random.org and the winner is...
Becca Yahrling
Becca please email me so I can send you your gift certificate code!!
(my email is on the side bar, just click the envelope logo)
Thanks so much again!
Have a wonderful day!
Thursday, September 27
Impression Obsession DT Thursday!
Hello friends! It's my turn to share Impression Obsession DT Thursday!! I am in the mood for Christmas cards, so far I think I have created one in every style, so today I have a super cute Christmas card!
Impression Obsession Products used
I started stamping the super cute "Penguin Pair" image on a piece of white cardstock in Black Ink, then colored it with Copic Markers, I sponged the background using Banana and Blue Ink, then added foam adhesive behind the image.
Then, I created a frame using rectangle dies and adhered it on top of image.
Added the panel to a 5" x 5" white card base, hen added the die-cut "Merry Christmas" sentiment and the mistletoe branch.
Finally, embellished it with sequins and Ruby Liquid Pearl.
Entering this project to:
Hope you like it!
Have a wonderful day!
Tuesday, September 25
Impression Obsession Fall/Winter Die Celebration Day 2: Christmas cards
Hello friends!! Today I have more inspiration for you using the new Fall/Winter dies from Impression Obsession!
Today, I have a couple of Christmas cards!! I couldn't resist, these snowflake dies are gorgeous and you are gonna be creating cards/tags/pages in no time!
So, let me tell you about these projects.
Season's Greetings
For this project I used 2 new dies
This card was super easy to make.
Started creating a background with Alcohol Inks: Watermelon and Pink Sherbet on yupo paper and Alcohol mix, when the inks were drying and started to get a little sticky, I added gold flakes and rub them in there gently, hard to see in the picture, but it gives a beautiful holiday touch.
Then, I die-cut the Snowflake 5 (3 times) using Pearl White Shimmering Cardstock, then glued them together.
Then, die-cut the Season Greeting in Red Metallic cardstock.
Adhere a gold cardstock panel to a White card Base (A2), then, added thick foam behind the yupo panel and adhered it to card.
Adhered the snowflake and sentiment, added few pearls.
Merry Christmas
Dies used in this project:
This card was just very similar to the previous one.
Created a background using Alcohol Inks: Pool and Purple Twilight on a piece of Yupo Paper and Alcohol mix.
Die-cut the Snowflake Block on white cardstock (3 times) and in Gold Metallic Cardstock (once), then glued them together.
The sentiment is from Christmas Stitched Words.
This card is 5.5" x 6"
Now, visit the Impression Obsession Blog to find out more details about these dies.
Come back tomorrow for more inspiration using these new dies! And on Saturday September 29th I will pick a name to win a $10 Gift Certificate to Impression Obsession!!
Thanks so much for stopping by!
Hope you like my projects!
Monday, September 24
Impression Obsession Fall/Winter Die Celebration: Joy and Boo!
Hello friends!! How are you doing today?! I hope you are having a great Monday!! Today I want to show a couple of projects I created with the brand new Fall/Winter dies from Impression Obsession. Have you seen them yet? They are fantastic, gorgeous designs!!
The cards I created are fun and easy! Just wanted to let the dies shine!!
So let's get started.
Joy
For this project I used 3 new dies
First, I created a background using Ultramarine Blue Color Burst, added a little bit of powder on a piece of watercolor paper, then misted water and set it aside to dry. After that, I die-cut the panel.
I die-cut the kids from Snowball Fight in Black Pearl Shimmering cardstock, I did t 3 times and then glued them together; then die-cut the Snowflake 5 in White Pearl Shimmering cardstock.
I adhered the background panel on a White Card base (A2 size), then adhered the snowflake and kids. Finally I added the JOY sentiment die-cut from Christmas Stitched Words Set.
Boo!
This card was a lot of fun to make! I had several ideas, but I think I like how this one turned out.
For this project I used
Started die-cutting the Monsters in lime, orange, purple and blue cardstock (didn't use any blue in this project)
Then created a frame using square dies, added foam adhesive, then positioned the lime and orange monster. I used a leftover piece of alcohol inks (Espresso and Purple Twilight) used in yupo paper, adhered behind the frame
Added an extra purple monster under the frame and the BOO sentiment from Halloween Stitched Words.
Finally, I added 3 purple sequins.
Now, visit the Impression Obsession Blog to find out more details about these dies.
Come back tomorrow for more inspiration using these new dies! And on Saturday September 29th I will pick a name to win a $10 Gift Certificate to Impression Obsession!!
Thanks so much for stopping by!
Hope you like my projects!
Friday, September 21
Trick or Treat
Hello friends!!Today I have a Halloween card for you!
Halloween is just around the corner and if you like to create fun cards and decorations, I think this card is just a fun one for you to recreate.
For this project I used Boo Convention background stamp.
I stamped the background on a piece of White cardstock in Black ink, then sprayed it with Dragon Blood Shimmering Bliss, after it dried I die-cut the image using circle dies, then added the circles to a piece of black cardstock and used a rectangle stitched die and die-cut the piece again.
Added the rectangle piece to a black scalloped piece.
Adhered the panel to a A2 white card base.
Stamped the sentiment Trick or Treat on a piece of white cardstock in black ink, then added a bit of color using a gray and red markers.
Added yellow twine behind the sentiment, finally added clear sequins.
You can get these images and the wonderful Shimmering bliss with a 10% discount using my code
TJ10Giovana
Hope you like this project.
Subscribe to:
Posts (Atom)


