Showing posts with label Color Burst. Show all posts

Friday, February 22

Flowery Thank You.

Hello friends!
Hope you all are having a fantastic day! Friday is here and I can't be more excited about it, lol, nothing special happening, just extra hours of sleep, yeah, I need that.

Today I have a super easy card using one of my favorite products "Color Burst by Ken Oliver Crafts"
For this project I used:
Sentiment from Blooms Fill-In (Concord & 9th)

Details:
Position the stencil on a piece of watercolor paper, tap little bits of Color Burst in different places (a little bit is more than enough), then mist it with water and voila!
I let my stencil sit for a little bit to avoid damaging the design (yeah, sometimes I am not patient, lol)


Die-cut the panel after it gets dried.
Adhere it to a A2 Pink card base.
Stamp sentiment and add to card.
Add little bit of Violet Galaxy Nuvo Drops.


Entering this card to:

Hope you like it.
Have a fantastic day!

Thursday, March 1

Technique Junkies March Release


Hello friends!! Welcome to another fun March release from Technique Junkies. This month we have, as always, super fun sets. I worked with 4 stamps this time.
If you arrived here from the Technique Junkies Blog you are in the right place, if not check HERE to start the right hop order.

So, let me show you the projects I have for you today.

Happy Easter
For this sweet card I used the "Little Bunny" stamp, isn't it cute??!! First, I created a background with Color Burst (Alizarin Crimson, Ultramarine Blue and Lemon Yellow), set aside to dry, then die-cut the piece and stamped the cute bunny on top in Ganache StazOn Ink.
Die-cut or emboss a background, adhered it a white card base, then adhered the oval image with foam tape. Then, stamp the sentiment "Happy Easter" in St. Valentine StazOn ink on a piece of vellum. I die-cut grass and eggs (from leftover yupo paper) and adhered them to card.


 You are
This card was just a lot of fun to make, pretty simple. I used the new "Perfect Atoms" stamp. Stamped image on a piece of watercolor paper in Jet Black StazOn ink. Then used Color Burst to create the background. Hard to see but I added Pink Sparkle marker to the birds and green sparkle marker to the leaves. After that, I trimmed the piece and added to a white card base. Finally, I added metallic gold tape.
 Dream on
This is a super cute 4.25" square card. Here I used "Free Spirit" set of 4. First I played with alcohol ink and yupo paper (it's so addicting!) After my yupo paper was dried, I stamped the image in Blue StazOn ink, then die-cut the image with scallop square dies. Die-cut a bigger panel from blue cardstock to  add behind the image panel.
For the card front I stamped the feathers all around in versamark ink, then added clear embossing powder and heat (Confession time, I didn't clean up my stamp very well and got few spot of light blue around, I actually like it this way)
Then, added the panel to card base and tied ribbon around.

Now, I invite you to visit Ceal's blog!
Don't forget the new release has an instant 15% off until March 8th!! (no coupon needed) and you can use my 10% discount code TJ10Giovana  to get all the Color Burst, they are so much to play with and the vibrant colors are amazing!!

Hope you enjoy the new release.
Have a wonderful day!

Monday, February 19

He has Risen

Hello friends!Sharing today a set of Easter cards! Now that Valentine's is over, you can start all out Easter/Spring projects!!
I love tulips, they are so pretty and elegant looking, after so many years I planted a big row of tulips on my yard and once they bloomed I was a happy camper.

Anyway, let me show the cards I made, they are so easy to mass produce in case you send out Easter cards.
These are the Tutti Designs I used:

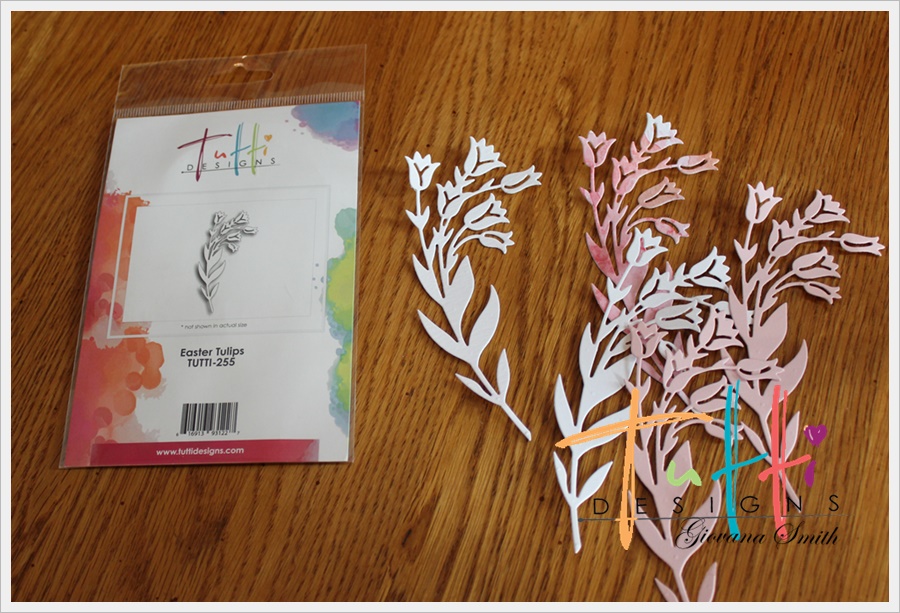
TUTTI-255 Easter TulipsTUTTI-413 Dotted Nesting OvalsTUTTI-419 Scalloped Stitched Nesting Circles

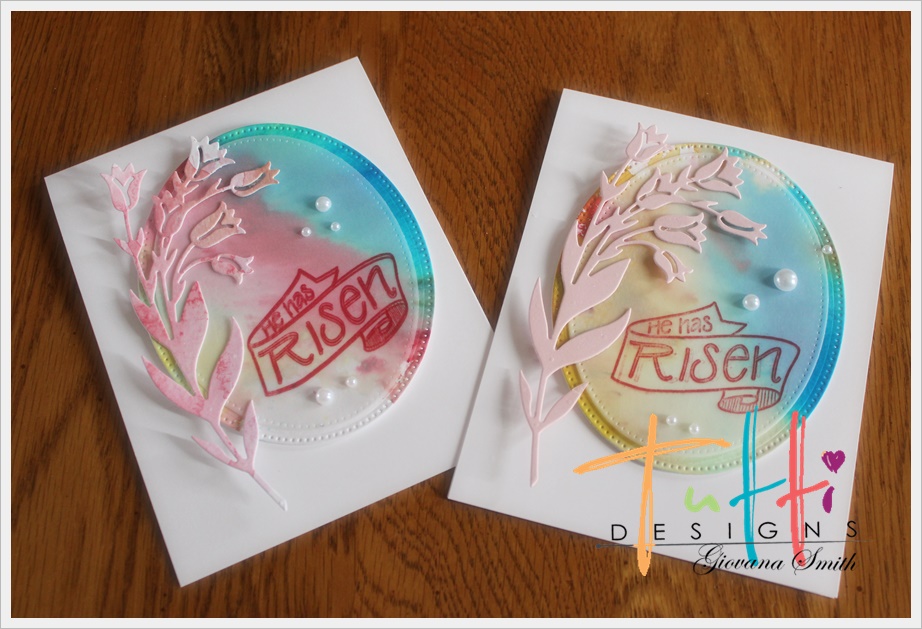
I started with a sheet of watercolor paper and added Color Burst Powders, set aside the paper to let it dry, then die-cut the piece using the Dotted nesting Ovals and Scalloped Stitched Nesting Circles Dies. I also die-cut the pieces in vellum paper.

 Die-cut the Easter Tulips in white, pink and a leftover watercolor painted piece.
 After that, I just adhered the pieces together, stamped the He has Risen sentiment on the piece of vellum. Finally I added pearls and the cards were done!


Here are the cards all together.

Entering this set to Simon Says Wednesday Challenge: Add a Die.

Hope you like my projects!
Have a fantastic day!

For your convenience, here are all the Tutti Designs quick links you will need:


Happy Crafting!


Thursday, September 7

Thanks!


Hello friends!! Hope you are having a fantastic day! Here in the PNW we are dealing with very unhealthy to hazardous air quality :( Hard to go outside, everything looks foggy and the smells is horrible. Praying for rain.

Anyway, I have a very "Fall-y" card for you today, by the way, have you commented on the My Sweet Petunia and Right At Home  blog hop? You still have time to comment and your name will be added, you can be a lucky a winner!! Enter HERE.

For my card I used "Fall Leaves" set, stamped them in Watercolor paper, Versamark ink and White embossing powder, then heat set, cut them out and them added Color Burst Powders! (Sepia, Yellow Ochre, Terra Verte, Tangerine).
The background was created on a Kraft 5"x 7" card, added Copper Liquid Metals , then mist the paper and voila!!
The sentiment is from "Script Greetings" set,  stamped the "thank" from thank you (I cut the clear stamp), then masked the stamp "blessed" and used one of the "s" to add it to the word, I used Jet Black Ink

Finally, I added twine and sequins, ad my card was done!


Hope you like it!
Have a fantastic day!


Thursday, July 6

If you stumble, make it part of the dance.


Hello friends!! Hope you all are having a great day! Today I want to share a card I made with one of my favorite stamps just released few days ago from Technique Junkies!!! This image is called "Part of the Dance" is so pretty and has a lot of possibilities. Here I want to share with you how I did it.

  • After the background has dried completely, stamp the image in Stazon Jet Black, since this is a silhouette stamp, some times it requires several stamping, so the MISTI is super handy, just keep inking your image until you are happy with the result.

  •  Finally, I added a piece of Purple Mirror Cardstock behind the image and added stitches. Also added few sequins and the card was done! 

Remember, you can get this image and/or any of the new released images with a 15% off until July 8th!! Plus you can add any other stamps and get a 10% off using my super code {wink, wink} TJ10Giovana (get a MISTI, you will be happy) 


Hope you like it and give this technique a try!
Have a fantastic day!!


Thursday, June 22

God bless America


Hello friends, how have you been? I've been busy, sick family members and tired!! Life is giving me too many lemons, so I am keeping making lemonade {wink, wink}
Anyway, today I am bringing you a very American card. When I saw these stamps from Technique Junkies, I knew I needed them for my 4th of July cards, this is one of a set I am making. Super easy and mail friendly.

Here are the details:
  •  After your blue watercolor piece has dried, cut a small piece of vellum and stitch it to the panel.
  •  Fussy cut the banners and add blue twine to connect them together. Stamp the "God bless America Pennant" sentiment on a piece of red cardstock, add thin gold adhesive tape and add it to card with foam adhesive. Add the panel to a A2 cad base.

Here is the card standing up. Very simple and elegant.

Hope you like it and give it a try. Remember you can buy these stamps using my code TJ10Giovana for a 10% off of you purchase!!

Have a fantastic day!!

Thursday, February 11

Hello Baby


Hello friends!! Thursday is here!! I have a baby card for you today. I have a friend who just had a baby boy and I am planning to send her this card.

I used the sketch  #39 from Sugar Pea Designs, but you can check out the new sketch as well, this is a monthly challenge, I want to play the new sketch too, they help with my mojo ;)


This cute image is from "Bundle of Joy" set, I stamped part of the sentiment  and used the Baby die from "Baby Diaper Pin" die-cut set.
The image was stamped on a piece of watercolor paper in JetBlack StazOn ink and colored Spectrum Aqua Markers. I die-cut the "Baby" piece from a leftover panel of Ultramarine Color Burst. I used Green Envy Shimmering cardstock to cut the green thin lines. The cloud is also a leftover piece. Added stitches and added to a A2 card base.

Hope you like it!!
Have a fantastic day!

Friday, November 6

Great news to share!!

Hello friends!!! I have super news to share with you! If you are on Facebook you have probably seen it, but if your are not, well I made it to the Ken Oliver Crafts Creative Team! I love playing with Color Burst! I can't wait to share with you more projects, ideas and tutorials!
 And here is the picture of the whole team!

 
And last night I made a quick card, but sadly it was too dark to take pictures, so since the announcement is up, I am sharing my first project as a part of the Creative Team. 
This card is super simple, just created the background with Alizarin Crimson, Pthalo Green and Lemon Yellow Color Burst, then I stamped the circle and leaves in dark red ink (they look a lot darker), stamped the little dots in gold and added clear rhinestones. Die-cut the Give Thanks and added to the panel, finally added a jute bow.
All stamps are from Concord & 9th.


I am submitting this project to:
Hope you like and join me in this new adventure!
Have a fantastic day!
~Gio~

Thursday, October 22

Maya Road and Ken Oliver Blog Hop!!


Hello friends!! Today I am super excited to be joining the Maya Road and Ken Oliver Crafts Designer Challenge Blog Swap!!
For all the details, please check Ken's Blog

I got fun goodies from Maya Road and Ken Oliver Crafts and I just couldn't make 1 projects, so I made 2 and then I thought I will make one more, LOL. I made a canvas too, but that one will take more time to finish ;)

So let's get started with my projects:


Merry Christmas card

  • Start with a card base from White Cardstock. A2 size, then cut a panel from Kraft cardstock 3.75" x 5".
  • Cut a panel from Watercolor paper 4.5" x 4.75". Here is the fun part, I drew the poinsettia!! I think it turned out really pretty {wink, wink}. Color the flower with Alizarin Crimson, Pthalo Green and Lemon Yellow Color Burst. Be sure you have a mat for easy cleaning, I used the The Best Ever Craft Mat.
  • After the flower is flower is dried, create the washed background with Lemon Yellow and Ultramarine Blue Color Burst.
  • Apply as much needed Stick It behind a piece of Gold cardstock. Die-cut the "Merry Christmas" x3, peel the Stick It and mount them together.
  • Mount Kraft and watercolor piece and add stitches. 
  • Add die-cut to panel, add sequin and rhinestones.
=========================


Just for YOU friend
  • Start with a card base from Red Cardstock.
  • Cut a piece of watercolor paper, create washed background using Lemon Yellow and Alizarin Crimson Color Burst.
  • Cut a piece of yellow lace, long enough to add it behind a wooden token, to create a "flower look"
  • Adhere a piece Stick it on a piece of Coastal Pearl Shimmering cardstock, big enough to die-cut "friend" x3, then peel the pieces and mount them together.
  • Add a stripe of Kraft cardstock to left side and add stitches.
  • Finally, add die-cut and wooden token to panel.
===========================


Hello

  • Start with a card base from White Cardstock. A2 size.
  • Cut a panel from Watercolor Paper 3.5" x 4.75", create a washed watercolor background with Alizarin Crimson Color Burst. Set aside to dry, then add a Kraft panel behind and add stitches.
  • Die-cut stitched tag and mini label from Gold Cardstock. Add mini label behind of Corrugated Kraft tag and stitched tag on top of kraft tag. 
  • Adhere a piece Stick it on a piece of Coastal Pearl Shimmering cardstock, big enough to die-cut "hello" x3, then peel the pieces and mount them together.
  • Add silver thread to tag and add the "hello" die-cut.
  • Take a butterfly wooden token, ink all edges and adhere it to tag.
  • Add tag to card base.
**Products in red are from Maya Road**

Don't forget to visit Ken and Maya Road's blogs!!

Giveaway!!

Yes, I have a giveaway for you!! What about some Stick it (This adhesive is fantastic!! ) and a Tool it All (9 tools in 1, I have 1 and it is amazing) and fun goodies from Maya Road? Just leave a comment here on this post and I will draw a winner. You have until October 25th at midnight (ET)  and I will announced the winner on the 26th!!


Hope you like my projects!
Have a fantastic day!

Tuesday, September 29

Thank You


Hello friends!! How are you doing today/tonight? Hopefully you are having/had a fabulous day. I started this post earlier today (around noon), but couldn't finish it because the little ones woke up at the same time and my busy schedule started again.

Anyway, I want to share with you about a new stamp company, it is called Concord & 9th and it has super cute stamps!! I recently purchased 3 sets and today had the chance to play with one of them while the little ones were napping, this one is called Painted Thank You and it is super cute and fun stamp.

I used the embossing resist technique for this card, the colorful background was created with my Color Burst Powders, that is something you need to get for sure, they are so much to play with ;)

Here are the details:
  • Make a card base from white cardstock. A2 size.
  • Cut a piece of watercolor paper, size 4.75" x 3.5". 
  • Stamp image in Versamark Watermark ink, add white embossing powder and heat set! Then, mist your watercolor paper with water and sprinkle your Color Burst Powder, here I used Alizarin Crimson, Lemon Yellow and Ultramarine Blue. (I got mine on Blitsy)
  • Stamp the little flower in a circle tag, add lace tape and silver thread.
  • Adhere panel to card base.


Hope you like it!!
Have a fantastic day/night!