Monday, August 31

Coffee and pretty things


Hello friends! How are you today? I hop you are starting a fantastic week! Today I have a card using one of the new Coffee stamps from Latina Crafter. This card is super simple, I followed the sketch from CAS(E) this Sketch.


Here are the directions:

Submitting this card to:


Hope you like it!
Have a fantastic day!

Sunday, August 30

I Believe


Hello friends! Happy Sunday for you all. Today I have a super cool card, I am very proud of this card because I think it turned a lot prettier than I expected and it's super easy to do! This die is on of the new collection just released by Crafter's Companion, part of the new Classique Christmas Only Words 

Here are the details:


What do you think? Do you like it?

Submitting this card to:
Hope you like it!
Have a fantastic day!

Friday, August 28

Skipping Stones Challenge: Christmas!!


Hello and welcome, we could not be more excited to share our first challenge with you! We cannot wait to see what you share and how we can learn and grow from YOU! The challenge will be the last Friday of every month and will run for a week. We will be challenging you to sketches, colors, inspiration, and themes; whatever strikes our fancy! One random person will win a Skipping Stones Design stamp set of their choice and each of the design team gals will be sharing their favorite card for the week. Skipping Stones Design Stamps are not required, but highly encouraged...we want to be inspired by you too!

Please tell all your friends about our challenge and invite them to play along. Challenge will end on Friday, September 4 at 5:00PM EST.

If you are on social media sites use #skippingstonesdesign and #stampandshare and if you upload to Splitcoaststampers use the keywords ssd and skippingstonesdesign. We would love to visit and share some love with you!

And this card was posted before, but I will be back with a new Christmas card! 
For this card I used  Christmas Labels and Joy, these are 2 sets  just released !

Don't forget to add your projects HERE!

Have a great day!!

Wednesday, August 26

Prestige Christmas Only Words "Love" Sneak Peek

Hello friends!! Hope you all are having a fantastic Wednesday! I have a super cool sneak peek of the new Crafter's Companion Prestige Christmas Only Words, this one is "Love" and I really love it.

Here are the details:


Submitting this project to:

Hope you like it!
Have a fantastic day!

Sunday, August 23

Holly Silver bells!


Hello friends! I never post anything on Sunday, but today after a long day cleaning the house plus other house chores I decided to make a quick card with another border die from Crafter's Companion! Plus I saw the the sketch from Freshly Made Sketches and I really wanted to play along!


Ok, this card took me "only 15 minutes", I was so happy!! I die-cut the Holly Bells on a piece of Silver Starlight Shimmering Cardstock, then cut the piece to a 5.5" square piece. I stamped the sentiment from Silver Bells on a piece of Pearl White Shimmering Cardstock, then add a strip of Candy Red Shimmering Cardstock on top of the sentiment and behind the die-cut panel. Tied around silver organza ribbon and added the die-cut panel to a Scored White Bright 6" card. Finally added pearls and little drops of Liquid Pearl in red and white to the bells.


Now, before I go I want to share with you a fantastic deal going on over at Crafter's Companion, ends tomorrow!!!!


Hope you like it!
Have a fantastic day!

Friday, August 21

Joy to the World with a Bethlehem Die border

Hello friends!! Crafter's Companion has a brand a new release, the new Edge'ables Christmas Collection , they are beautiful! And also a very special deal! I will tell you about it in a bit.

Let me show how I made this card:
  • Die-cut and emboss the Bethlehem border on a piece of Gold Cardstock.
  • Add a piece of Candy red Shimmering Cardstock and a couple of thin strips of Forest Green Shimmering Cardstock to the gold panel. 
  • Stamp sentiment in Versamark Watermark Ink, then add white embossing powder and heat set.
  • Add panel to a 5.5" square piece of Black Pearl Shimmering Cardstock, then tie around white ribbon, create a bow with Ultimate Tool.
  • Add panel to a White Scored piece.
  • Finally, add pearls.


Now, before I go I want to share with you a fantastic deal going on over at Crafter's Companion!!


Products used:

Candy Red Shimmering Cardstock.

Hope you like it!
Have a fantastic day!!

Thursday, August 20

Kid's Summer Vacation Challenge

Hello friends! I am having a special post today, this time is my daughter playing a challenge {wink, wink}, you know, she is crafty and she loves everything DIY!! I think she will be a designer in the future and have a bright crazy house, LOL.

Anyway, I was checking the Simon Says Stamps Challenge and I say the Kid's Summer Vacation Challenge, so I mentioned it to her and she told me she will think of something "fun to make", she also told me she is not a cardmaker (hmm, I don't agree, but) so her project would be different (ok kid)

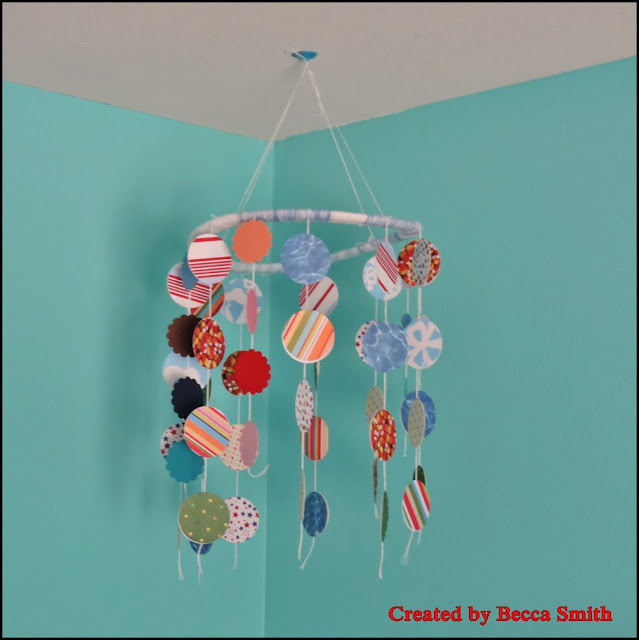
So, this is what she created!!


She wrapped a plastic ring with yarn (leftover from a scarf project), then cut a lot of circles from patterned paper and scallops from cardstock, cut embroidery and glue the circles to it, then attached them to the ring, added more more string and hung it to her bedroom!!

How old is she now? She is 11!! going 24 {wink, wink}

OK, later this mama will post something different.

Have a great day!
Leave her a comment if you have a minute.

Tuesday, August 18

Happy Birthday Crafter's Companion!!

Hello friends!! Crafter's Companion is celebrating another birthday and today the Crafter's Companion Design Team are joining the fun with a birthday blog hop and prizes too!!

For this special occasion, I used this cute Bebunni image from Peek-A-Boo set, here are the details:
  • Stamp Bebunni image on a piece of watercolor paper in Memento London Fog ink, color image with Spectrum Aqua Markers and Spectrum Nor Pencil #117 (for bunny)
    • Bunny: Tan, Charcoal, Peach, Black.
    • Box: Sea Green
    • Balloon: Peach, Begonia
    • Shadows: Slate, Black
  • Add a small piece of Pink pearl Shimmering Cardstock.
  • Emboss a piece of Pink Pearl Shimmering Cardstock with Starry Eyed Embossing Folder, add bits of Versamark Watermark ink in random place and gold embossing powder, heat set.
  • Adhere embossed piece to card base (6" square card), add image with foam adhesive, stamp sentiment in St. Valentine StazOn Ink, create a banner and add a button.
  • Finally, die-cut a cupcake and add it to card.
  • Add bits of glitter and Crystal Lacquer to balloon and cupcake.


+++++++++++++++++++++++++++++++++++++++++++++++++++++++++

What's a party without prizes? We've got EIGHT chances for you to win the Bebunni Birthday stamp of your choice!
Just enter this form for your chance to win  Bebunni stamp of YOUR choice, enter HERE. Of course you can  leave a comment as well, that will make me happy ;) 


Now, we have more giveaways!! Just click this link to enter the MEGA Giveaway!! You don't want to miss this one, it is HUGE!!
Some conditions applied.


List of participants in this blog hop:


Plus, Crafter's Companion have put together some fantastic money-saving offers, plus a FREE gift with every order* over $35, as well as FREE shipping* & double Loyalty Points on all orders too! PLUS every retail order placed with us during Birthday Week will receive a mystery coupon in their package, worth between 20% and 50% off your first order with us in September to spend on Holiday crafting goodies! Check it out HERE


Hope you like my project!
Have a fantastic day!

Products used for this project:


Monday, August 17

Born to shine!!

Hello friends! Happy Monday to you all. I have been a bit MIA lately, life sometimes gets busy. I have spent a lot of time lately doing yard/garden work! Every muscle hurts, LOL, but things are looking better and clean and that makes me happy, just tried to take advantage of the not too hot days, sadly we have fires around us and the air quality is BAD!

Anyways, back to crafts, today I want to share with you a card I made for Latina Crafter, the saying says "Born to shine", the stamp and stencil are from the July Kit
The rays were sponged using Mustard seed and Wild Honey Distress Inks, the image and background was colored with Spectrum Aqua markers, I added some pierced areas around the panels of the 2 layers of watercolor papers, tied around twine and added the labels on a yellow card base.


Submitting this project to:

Hope you like it!
Have a great Monday!!

Thursday, August 13

Victorian Love

Hello friends! I am back (well, kind of), today I have a watercolored card over at the Skipping Stones blog, all the details are whole pictures are over there.

Here is a little peek, I look forward to reading your comments.


Hope you enjoy it.
Have a fantastic day!

Monday, August 10

Silver Bells

Hello friends! Happy Monday to you all! Today I have another Christmas card using a brand new set just released by Crafter's Companion, this come from the new A Little Bit Festive Collection from Sheena Douglas.
This image is quite large and would be perfect for a cover image for your A2 size cards, for scrapbook pages as well.
This time I created a 6"x 6" card with a slide down sentiment!

Here are the details:
  • Stamp image on a piece of Ultra Premium White cardstock in black ink, color image with Spectrum Noir Markers:
    • Bells: IG2, IG3, IG4, IG5, BG2.
    • Ribbon: CR3, CR4, CR8, DR2, DR5.
    • Branch and leaves: LG2, LG3, DG2, DG4, GB1, GB11, TN4.
  • Stamp sentiment on a piece of vellum and set aside to dry. After is dried, cut it as a banner and mount it to a piece of Candy Red Shimmering Cardstock.
  • Cut image panel to 5.5" square, mat it to to a Silver Starlight, add the sentiment banner and add stitches.
  • Add piece to a Candy Red Shimmering Cardstock and adhere it to card base.
  • Cover colored ribbon with Crystal Lacquer. Add enamels to decorate the card.


Submitting this project to:
Hope you like it.
Have a fantastic day!!

Products used for this project:


Friday, August 7

Nordic Christmas Release!!


Hello friends! Happy Friday to you all! Crafter's Companion has released a new collection "Nordic Christmas" and I am pretty sure you are going to love it!! The images are super sweet, plus not only that, embossing folders, CD-ROM with tons of papers and more!

So, this is the card I have for you today! Love this cute snowman from Cool Christmas set. Isn't he fun?

Here are the details:
  • Create a card base from Kraft cardstock. 5" x 5".
  • Stamp snowman in Ultra Premium White Cardstock and color it with Spectrum Noir Markers: these are the ones I used:
    • Snowman: BT1, IB1, FS1, OR1, OR2
    • Scarf: DR1, DR2, DR4
    • Hat: IG3, IG4, IG5, IB2, DG2, DG3.
    • Cane: GG5
  • Cut out image and set aside.
  • Create a window panel using High Gloss White Cardstock (5" square) and Oval dies.Adhere snowman behind. Print background from CD-ROM and adhere it behind window panel. Cut a panel from Coastal Pearl Shimmering cardstock and adhere it behind.
  • Die-cut Scenic Pines in High Gloss and Coastal Pearl cardstock, adhere them together leaving a top edge border as a shadow, adhere them to card with foam adhesive.
  • Stamp sentiment, die-cut and emboss it with a ticket die from Just the Ticket.
  • Add button and twine, pearls.


Submitting this project to:
Hope you like it!
Have a fantastic day!


Products used for this project: