Wednesday, April 30

Top Dog Dies Baby Cards

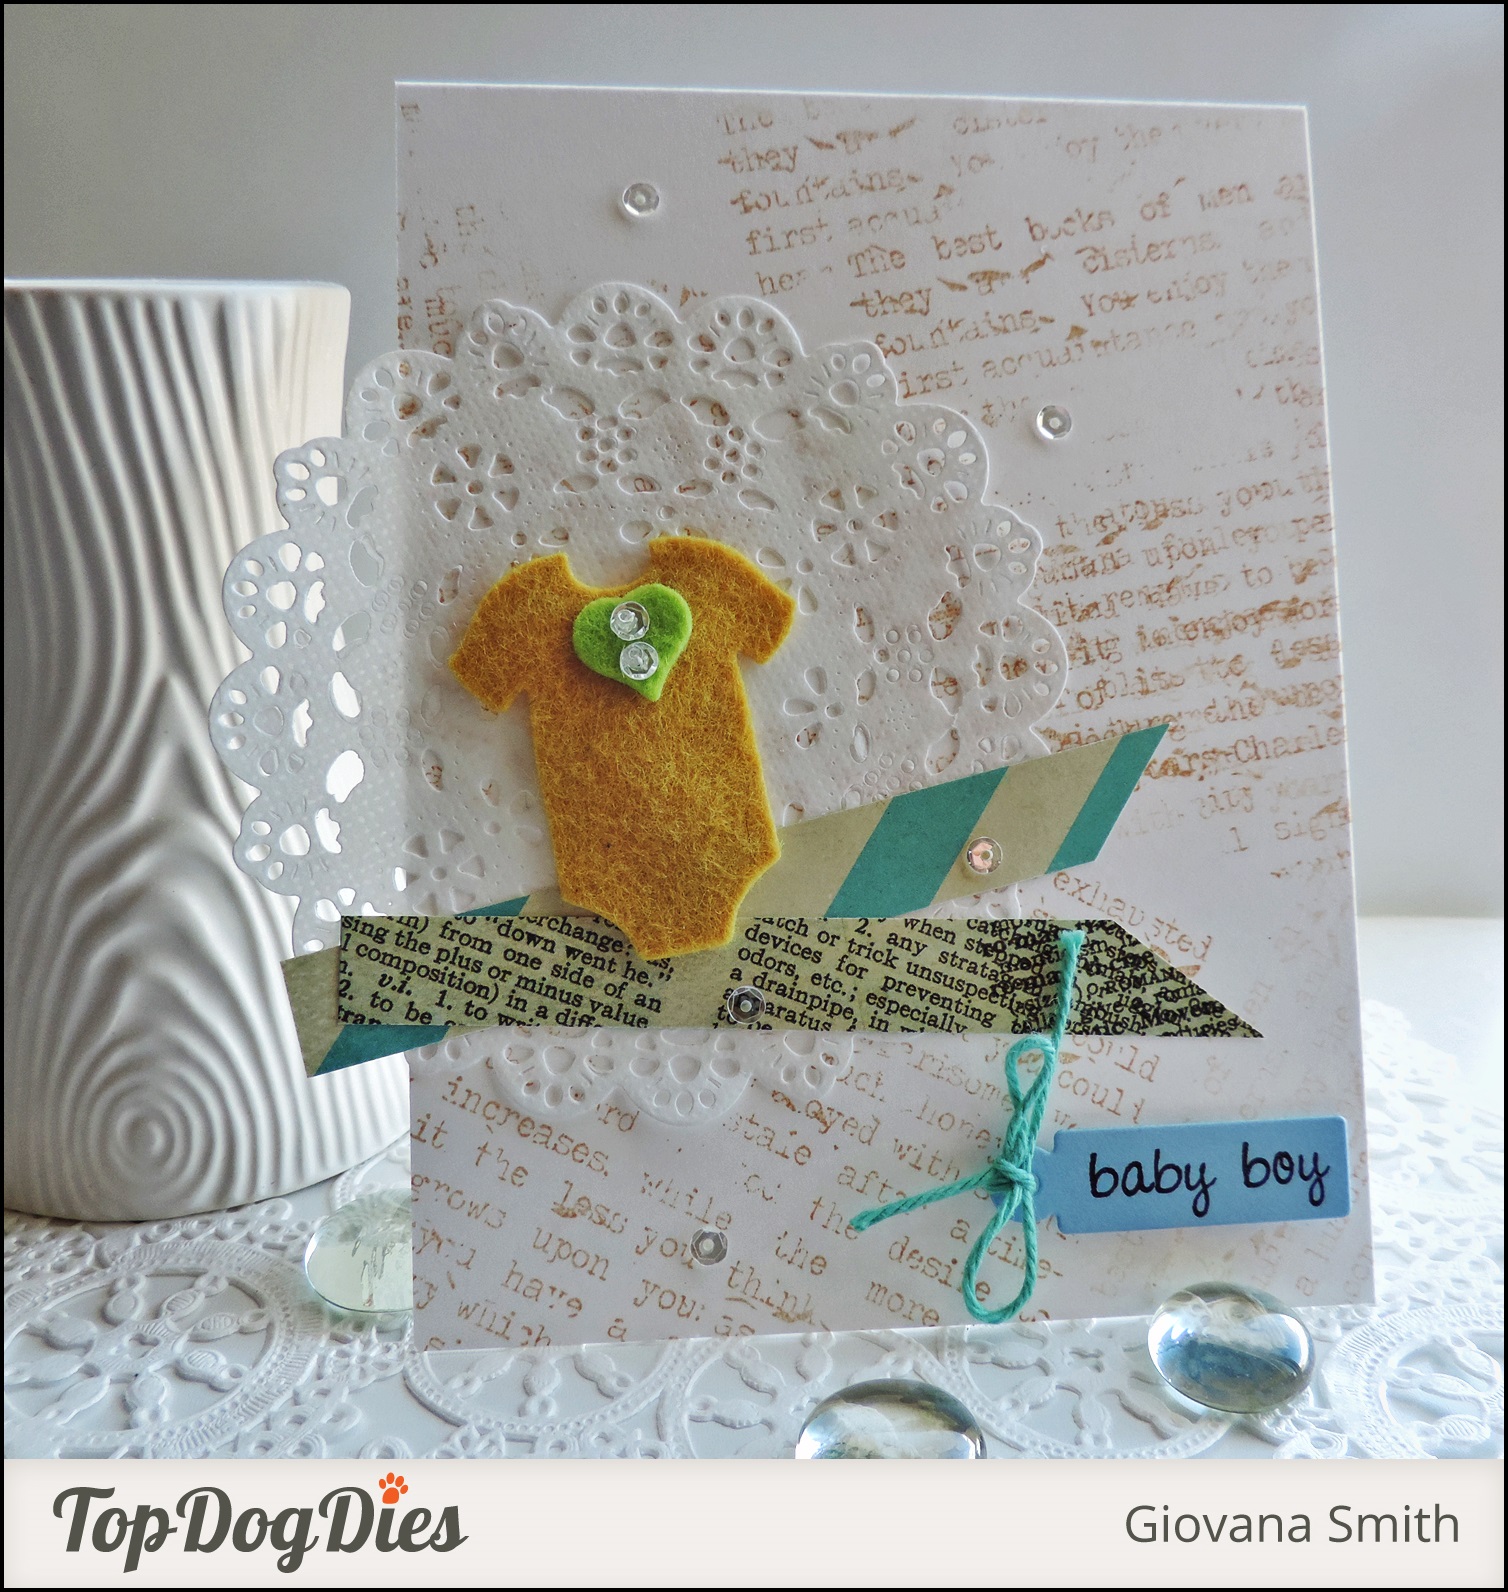
Hello friends! Hope you all are having a great Wednesday! Today, I have a couple of baby card for you using dies from Top Dog Dies, some of you may know, but I love making baby projects, they are always so cute! :D

Anyway, here are the details. Both are pretty cute and simple cards, easy to make when you just need a quick and cute card. Both cards have sequins from Pretty Pink posh. the sequins were sewn onto the felt baby onesie, I also added tiny little beads.

Baby Boy Card: Super easy and cute card


Welcome Sweet Little One:


These are the dies I used for these cards:


Submitting these projects to:


Hope you like them.
Have a fantastic day!!
Tuesday, April 29

Heartfelt Creations Alumni Team April Blog Hop

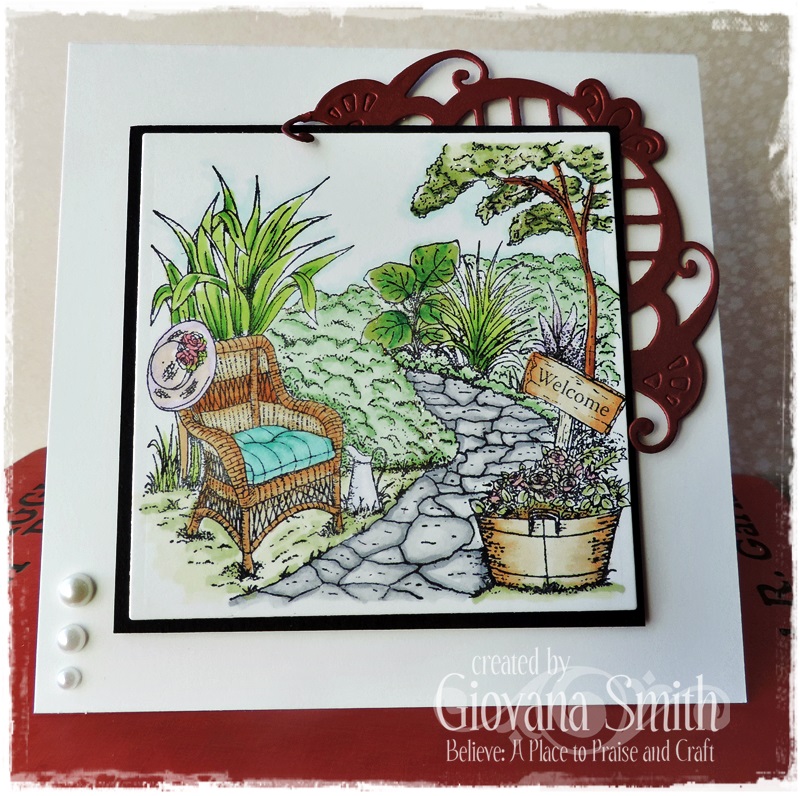
Hello friends!! Welcome to this month's Heartfelt Creations Alumni Blog Hop.  This time I have a simple card, I focused more on the image, I spent some time coloring it. I do enjoy coloring, since I have been sick, the only thing I've been doing is coloring!! Well, I took a lot of naps too :)

Here are the details of this project:
  • Make card base from White Cardstock. 5" square card.
  • Stamp image from Spring Season Set on White cardstock in Memento Tuxedo Black Ink. Color image with markers. I used Spectrum Noir.
    • Flower Pot: TN1, TN2, TN3, PP4, DG1, DG2
    • Grass: DG1, DG2
    • Chair: TN1, TN2, TN3, TN5
    • Pillow: BT3, BT4
    • Big leaves: DG1, DG2, JG1. JG2
    • Hat: FS2, LV1, CR6, CG3
    • Welcome Sign: TN1, TN2, TN3
  • Die-cut image with Square Dies.
  • Mat image with a piece of Black cardstock. Add dimensionals.
  • Die-cut a Decorative Lattice Swirl from Red Metallic cardstock, add it behind image.
  • Add image to card base.
  • Add pearls.


You have until Friday, May 2nd at midnight (EST time) to leave a comment for your chance to win a  $25 gift certificate to shop at Heartfelt Creations

Here is the list of participants:
Have fun hopping!

Monday, April 28

With Love

Hello friends! Hope you are having a great Monday. Today I have a card showcasing another great stamp from the new "A Taste of India" Collection from Crafter's Companion.

This card is super simple. Here are the details:

  • Make card base from Ivory Cardstock. 5.5" square. Score each side about 0.25" from the side.
  • Stamp image from Henna Mango set on Ivory Cardstock in Black Ink.
  • Color image with:
  • Stamp sentiment on Ivory Cardstock in Black ink. This is from Only Words - From the Heart set.
  • Add stitches to image.
  • Cut sentiment as a banner and add it to card.
  • Add panels with dimensionals.


Submitting this card to:

Hope you like it!!
Have a fantastic day.

Friday, April 25

Top Dog Dies and Pretty Pink Posh Blog Hop


Hello friends! I am here with my second post and another blog hop, yay!! This time it's Pretty Pink Posh and Top Dog Dies!
Tomorrow is the Sequin Shaker Blog Hop, and before the big day, many companies and teams have been sharing "Sequin Shaker" projects!! I think this blog hop is going to be super fun!

You can find all the details about the hop HERE

Now, let me show you the "Sequin Shaker Shape Card" I made :) since Mother's Day is just around the corner, I decided to use the heart shape (this card also fits Anniversary, Valentines, Just Because, etc), here are the details.


This is the list of participants!!
To celebrate Pretty Pink Posh has a special saving coupon!! 


Tomorrow's Blog Hop has fantastic sponsors, Top Dog Dies is one of them!!


Hope you like my project!
Have a fantastic day.

Friday Feature: Happy Home

Hello sweet friends and welcome to the second Sweet 'n Sassy Stamps New Release Friday Feature!
The Design Divas have more fabulous samples for you to see today as we feature another new April release stamp set available at the Sweet 'n Sassy StoreHappy Home


Now it's time for our April Release Blog Hop feature and Challenge!

Today's feature is:
Happy Home
                                             
http://www.sweetnsassystamps.com/new/

http://www.sweetnsassystamps.com/happy-home-clear-stamp-set/


  • Stamp set measures approximately 4" x 4"
  • The large houses measure approximately 1 1/8" x 1 3/8"
  • Designed by Diane Zechman
  • Stamp set priced at $11

This is the project I created for today's Feature Blog Hop/Challenge, I used the sketch from Sketch Saturday.


  • Make card base from White Cardstock. A2 size.
  • Mat Brown cardstock and Patterned Paper, add stitches.
  • Add a little polka dot piece, add stitches.
  • Add a brown piece and add zig-zag stitches.
  • Stamp house and tree on a piece of Watercolor paper in Jet Black Archival Ink, color image with Inktense pencils. Then add Twinkling H2O paints. After piece dry, stamp sentiment in Jet Black Archival Ink.
  • Die-cut fence and little cloud from White cardstock. 
  • Add pearls. 


Our challenge to you this week is to use a house or a home on your card or project!

The first cards in the hop were created for your inspiration by the design team.  As you hop along, leave a little love behind, then create your own Home card and use the linky tool to add it to the gallery!

Just a few guidelines to remember as you play:
            
- You don't have to use a Sweet 'n Sassy image to enter (although we sure love when you do!)
 - You'll have until Thursday, May 1st at midnight EST to enter
- We'll draw 1 winner from this week's challenge to receive a $10 credit to Sweet 'n Sassy Stamps!
- Please use code SNSFFC9 when uploading to Splitcoaststampers or other galleries 
Share a link to your creation below.

Thanks for joining us today!  

Tuesday, April 22

Come back soon

Hello friends!! Hope you all are having a great day. I am recovering from a cold that really hit me, 2 days feeling sick, but now I am feeling much better, having the "funny voice", but with more energy.

Today, I have a cute card using Latina Crafter products. Did you know Latina Crafter has a monthly sketch challenge? Yes, and at the end of the month one winner is chosen getting a really nice prize pack!!

This is the April sketch:

And this is my interpretation of the sketch. Here are the details:

  • Make card base from Ivory Cardstock, A2 size.
  • Cut a piece of Patterned Paper (3.75" x 5"), adhere it to card front.
  • Stamp owl from the Aqui Estoy set, color image with markers, I used Spectrum Noir.
  • Die-cut Polaroid from chipboard, adhere image behind and add it to card.
  • Die-cut speech bubbles from Patterned Paper, adhere them to card.
  • Add twine to paper flower.
  • Add wood veneers to speech bubble and polaroid.
  • Add black rhinestones.
  • Add Soft flower to polaroid and little dots of Crystal Lacquer to the little hearts.
The sentiment says: Come back soon.

Submitting this project to:


Hope you like it!
Have a great day!

Monday, April 21

Top Dog Dies and Scrapbook Circle Blog Hop


Hello friends! Welcome to Top Dog Dies and Scrapbook Circle Blog Hop!

Here is a little more about Scrapbook Circle:  At Scrapbook Circle we are passionate about preserving our family memories. We love sharing daily inspiration and connecting with others who also love to create. We have been creating monthly scrapbook kits for over seven years. Each of our kits includes a custom printable and we have now expanded our shop to included coordinating digital files. We create exclusive items for each monthly kit. We strive to provide you with fresh products every month that inspire you to create. 

Isn't this fun?! I am not a scrapbooker,, but the products can be used for cards, albums, pages, the sky is the limit!!

I got the *Bucket List kit, love the variety of papers and accessories. I created a couple of cards with them and my dies from Top Dog Dies.

For U Card: Love the combination of papers and dies, I used the Cardabilities Sketch.


Here are the details:
  • Make a card base from White cardstock. 5.5" square card.
  • Cut a piece of Turquoise cardstock, add a piece of *Patterned Paper, add stitches. I applied a light coat of gesso to the patterned paper to soften the color a little bit.
  • Die-cut a couple of Top Dog Dies Wildflower Die from *Patterned Paper.
  • Die-cut a butterfly from Top Dog Dies Butterfly Finishers Dies Set from *Patterned Paper.
  • Die-cut the tag from Top Dog Dies Alexa Frames Dies from *Patterned Paper.
  • Add all the die-cut elements to card panel with dimensionals.
  • Add *Sticker letters to tag.
  • Add sequins and twine.


For my second card, I used the Viva la Verve Sketch and Inspiration combo, I created a love card with non-classic colors and I love it! It looks super elegant and the papers are the perfect.


Here are the details:

  • Make a card base from White cardstock. 5" square.
  • Cut a piece of *Patterned Paper 4.25" square and adhere it to card base.
  • Die-cut a Top Dog Die Wildflower die from White Cardstock, cut it in half.
  • Die-cut the photo, heart and love from Top Dog Dies Camera Finishers die set.
  • Add die-cut pieces to card front.
  • Add pearls.
  • Cover heart with 3D Crystal Lacquer, then add clear glitter. Set aside to let it dry.


Special Scrapbook Circle Promotion : Use code scrapbook20 to receive 20% off your order today though May 31, 2014

PRIZES!!!
  • Scrapbook Circle is giving away one Scrapbook Circle Bucket List kit.
  • Top Dog Dies is giving away 2 prizes of $50 in Top Dog Dies wafer-thin dies.


Blog Hop List 


Have fun hopping!
Thanks for stopping by.

Saturday, April 19

Clean and Simple Tutorial with Top Dog Dies


Hello friends! Today I have a very CAS tutorial for you using some of my favorite Top Dog Dies. It includes few die-cuts and you will have a super cute card for Mother's Day!


Let's start die-cutting a piece of white cardstock using Top Dog Dies Flower Mosaic A2 Mat Die.


Die-cut a couple of butterflies using the 2 small butterflies from Top Dog Dies Butterfly Finishers Die Set, one in Pink cardstock and one in Patterned Paper. Die-cut also the twirls


Then, glue them together and lift up the wings to give it a 3D look.


Add them to the background piece. Add a piece of light blue cardstock.


Die-cut a mini tag from Top Dog Dies Mini Tags Die Set. Stamp a sentiment and add them to card with dimensionals. Add a piece of pink twine. Add paper flowers to butterflies.


And this is how your card will look like. I really like how it turned out! The pink and brown really pops from the light blue background.


Hope you like it!
Have a fantastic day!!

Friday, April 18

Friday Feature: Thankful Blooms set and dies + Mother Die

Hello friends!! Today the Sweet 'n Sassy DT is featuring Thankful BloomsThankful Blooms Die SetThankful Innies Mother Die.


  • Stamp set measures approximately 4" x 6"
  • The largest bloom measures approximately 2" x 2 1/4"
  • Designed by Korin Sutherland
  • Stamp set priced at $15
  • Die set priced at $15.25
  • Stamp set measures approximately 6" x 4"
  • The Tender care sentiment measures approximately 2 1/2" x 1 1/2"
  • Designed by Korin Sutherland
  • Stamp set priced at $15
  • Die measures approximately 3 3/4" x 1"
  • Designed by Korin Sutherland
  • Die priced at $7.25
For my card I combined Thankful BloomsThankful Blooms Die Set Mother Die. I thought it would be fun if I should you some of the process in pictures.
  • Create a card base, in this case I created a label shape card in Strawberry Blush cardstock. I stamped the blooms in Red Ink. Added a piece of vellum on top. NOTE: This vellum is pretty thick, for this kind of project it's better if you buy thin vellum.


  • Adhere your vellum piece.

  • Die-cut "Mother" x3 in White Cardstock, then glue them together.

  • Stamp and die-cut blooms and leaves, add them to card with dimensionals. Stamp sentiment in Coffee Archival ink. Add "Mother" die-cut to card. 

  • I added zig-zag sttiches to side of the card and then faux sitiches to all edges with a White pen. Add pearls to flower centers.


And this is the card!!


Our challenge to you this week is to create a Mother's Day card!
The first 12 cards in the hop were created for your inspiration by the design team.  As you hop along, leave a little love behind, then create your own Mother's Day card and use the linky tool to add it to the gallery!

Just a few guidelines to remember as you play:
            
  • You don't have to use a Sweet 'n Sassy image to enter (although we sure love when you do!)
  • You'll have until Thursday, April 24th at midnight EST to enter
  • We'll draw 1 winner from this week's challenge to receive a $10 credit to Sweet 'n Sassy Stamps!
  • Please use code SNSFFC8 when uploading to Splitcoaststampers or other galleries 

Share a link to your creation below.

Thanks for joining us today!  Be sure to check back again on Friday, April 25th to see if you won and to check out the next Friday Feature & Challenge!

==========