Thursday, August 28

Our lives are like quilts

Hello friends! Sharing this super cool card today. I really love the sentiment in this set from Crafter's Companion. Few years ago, I decided I wanted to make a quilt, I always love to sew and I thought it would be fun to make one for my daughter, I bought all the fabrics I liked, and the thread, and extra materials. After few cuts and a lot of ironing, I started sewing, all the piece were uneven, I cried (now I am laughing), I tried it again and the same thing happened. I decided to try something else and that's how I found paper crafting!! I still have all the little pieces of quilt in a big box, my daughter found it the other day and asked me what my plans are for all that fabric, LOL. I bet she has a plan already.

Anyway, I will share with you how I made this card! Super easy


Submitting this project to:
Hope you like it!
Have a great day!

Wednesday, August 27

Glittery Ombre Tutorial

Hello friends! Today, I am sharing a super easy tutorial!! You have probably seen something similar, but this time you are not going to waste a bit of your products! Promise {wink, wink}

For this project I created an ombre background using Embossing Paste and Glitter! Super easy and you can make this in any color you like/want.

Let get started!

  • Secure your mat to a piece of cardstock (here I used white) with removable tape or washi tape.

  •  Combine White Embossing Paste and 2 drops of Faded Jeans Distress Ink, mix well.


  • Apply it to left part of your piece, then add "more embossing paste" to soft the blue and apply to the middle part (I applied it diagonally) 


  •  Mix 1 more time the remaining past with more embossing paste to apply to your right bottom corner (your softest color)

  •  Add clear glitter to piece, use your heat gun to set it.


*Sentiment from Lots to Say (Reverse Confetti)
*Flowers from Painted Flower (Altenew)

Submitting this project to:


Hope you like it!
Have a great day!

Tuesday, August 26

Heartfelt Creations Alumni Blog Hop

Hello friends! Welcome to another Heartfelt Creations Alumni Blog Hop! This month I am glad I am joining the fun.
I made this card for a very special person who has been feeling under the weather, hopefully she will feel better and like this card.

For this card I used Sun Kissed Fleur set and Sun Kissed Fleur dies. I stamped the flowers on Sun Kissed Paper Collection in Versamark Ink, then added white embossing powder and heat set, sprayed them with Chocolate mist. Die-cut the leaves from Classic Leaf Die set also from the same patterned paper, sprayed them with Green Mist.
The card base is 5" x 5", the paper panel is from Posy Patch Paper Collection as well as the sentiment. I matted it with Light Blue Cardstock and added a couple of thin piece to the top and side, then added stitches. Finally, I added brown hemp twine and clear sequins. 


Here is the list of participants:

Don't forget to leave a comment in all the participant blogs for your chance to win a $25 Gift Certificate to Heartfelt Creations! You have until August 29th midnight (Eastern Time) to leave a comment.

Hope you like my project! 
Have fun hopping!

Monday, August 25

Imagination can take you anywhere

Hello friends! Hope you all are having a great day! My daughter starts school today and she is super excited to see her friends, meet new friends and be in a new school! No more elementary school kid in this house.
Ok, it has been a while since I share a new Z Becky Brown handbag. This design is super easy. Here I used my beautiful White Night Bag
Here are the details:

  • Start with a set of Ziva Solar White Inserts, create a cloud background around all panel (top/middle area).
  • Stamp image from Happiness is... in Memento Tuxedo Black Ink, color image with markers, here I used Spectrum Noir.
  • Stamp sentiment from same set in StazOn Claret ink.
  • Die cut grass and sun from Patterned Paper. Adhere them to panels and VOILA!


Hope you like it!
Have a great day!!

Friday, August 22

Christmas Wreath Tutorial

Hello friends! Today, I want to show you a very elegant and simple tutorial using a brand new die from Crafter's Companion  "Christmas Wreath" I think this die can be used to create frames, decorations, paints! just to mention a few.

So let's get started:

  •  Die-cut and emboss using the 3 colors of cardstock, here I used a half sheet of Candy Red, since I just needed the bow (Please save all the little and cute stars!)


This is the final card. I added few of the little stars around the wreath and card.Also 3 little pearls

Here you can see all the layers.

This week Crafter's Companion is celebrating its 7th Birtday!! Wonderful giveaways and amazing SALES!! Check out the website for details (free shipping, gifts and coupons!!)

Hope you like it!
Have a fantastic day!

Thursday, August 21

Sweet little Baby

Hello friends!! Happy Friday to you all! Today, I have a couple of super cute cards. Who doesn't love babies? or baby cards? {wink, wink}, well, I do! I think baby cards are always so cute and adorable, and today I have a couple of card, same design, just different color "For her, For him".

For these cards I used Top Dog Dies Baby on Board Die Set, the details for both cards are the same, just different colors.

Here are the details:
  • Make card base from cardstock. Score each side at 1/8"
  • Cut a panel from White cardstock (3.5" x 4.75"). Score each side at 1/4".
  • Using the hearts die create a border. 
  • Stamp sentiment in Coffee Archival Ink.
  • Die-cut onesie. Die-cut bow from Top Dog Dies Photo Props Die Set, glue bow to onesie and adhere it to card panel with foam adhesive.
  • Tie on ribbon and add card panel to card base.


Submitting these projects to:
Hope you like them.
Have a fantastic day!

Let's Party

Hello friends! Hope you are having a fantastic day! I created this card few weeks ago, but I just have the perfect time to post it. I love to have birthday cards ready to go on my stash, especially cute ones for my daughter's friends. She got invited to a sleepover birthday celebration and I think this card is perfect!!
For this card I used Humphrey Birthday Conga set by Crafter's Companion.

Here are the details:

  • Create a card base from Textured pink cardstock. A2 size.
  • Cut a panel from Ultra Smooth Premium White Cardstock (3.75" x 5"). Add a panel from Patterned Paper( 3.25" x 4"). Die-cut 3 small scallop circles, cut them in half and adhere them to card panel, then add zig-zag stitches.
  • Stamp image on Ultra Smooth Premium White Cardstock in Memento Tuxedo Black. Color image with Spectrum Noir Markers. Here is the list of markers used:
    • Elephants skin: IG1, IG2
    • Elephant 1: Dress: CR2, CR7, Shoes: CR7, LY3
    • Elephant 2: Dress: TB1, TB2, TB3, Shoes: TB3, LY3
    • Elephant 3: Coat: CR11, DR1, DR3, Pants: LG4, CG4, Shoes: IG5
    • Balloons: CT1, CT2, CT3, CR2, CR3, CR4
  • Die-cut image with Circle Dies. Adhere it to card panel with circle foam adhesive.
  • Add pink lace and pearls to card panel, then add it to card base with circle foam adhesive.


Submitting this card to:
Hope you like it.
Have a great day!

Wednesday, August 20

Mr & Mrs

Hello friends! Happy Wednesday to you all. Today I have a couple of super cute, clean and simple cards using dies from Top Dog Dies!

For this card I started creating the grass background with Spectrum Noir Blendable Pencils. I die-cut the poodles in black and pink cardstock, then a bow in red and the banner in white cardstock, I used this brand new die Top Dog Dies Dog Days #2 set. I stamped the sentiment on the white banner in Jet Black Cardstock, I colored the bone with TN9 Spectrum Noir marker. I matted the banner with a red banner, this one is from Top Dog Dies Banners #1 set.
I added the pieces to front card, then added the bow to the black poodle and pearls around the pink poodle.


This second card was a lot easier to make. I started creating the background, I used the Top Dog Die Heart Border Die (save the little hearts from the die, they work perfect as little floating hearts) as a stencil, I placed it on the right side of my card and used gelatos, I wanted an uneven border, like the one you see here. Then I die-cut the Scooties in Red and Black cardstock from Top Dog Dies Dog Days #2 set and a bow in white cardstock. Created a little floor are with Spectrum Noir Blendable pencils, then added the doggies. The sentiment was stamped in Jet Black Archival, color the bone with Spectrum Noir marker and added to card front with foam adhesive. Finally, I added the few little hearts from the Heart Border Die


I am submitting these cards to:
These are the dies used in my projects:
Top Dog Dies Dog Days #2 
Top Dog Dies Banners #1 set.

Top Dog Die Heart Border Die 
Other products used:

Monday, August 18

Party Paws Christmas Release is today!!

Hello friends! Today is the day! Crafter's Companion is releasing 8 adorable sets from the Party Paws Christmas Collection!! Yes, they are adorable and perfect for all of your cute Christmas projects.

I have 2 projects for you using  these brand new images, I used Noel and Snow Much Fun sets, both images colored with Spectrum Noir Markers, here are the details:

Noel: Isn't this the cutest ?! I had a lot of fun coloring it.


====================================

Let it Snow: I think these "Tres Amigos" are so adorable together. This image is part of the Snow Much Fun Set!
Here are the details of this card:


Now, more great news!! Crafter's Companion USA is celebrating it 7th Birthday!! Great deal and amazing discounts! prizes everyday, don't miss the announcement on Facebook!! 

Hope you like my projects!
Have a fantastic day!

Gracias Maestra (Thank you teacher)

Hello friends! Hope you all are having a great Monday! I had a very busy weekend, a lot of yard/garden work done, but it was so needed and I was able to do a lot, I am so thankful my back is feeling better, although yesterday I had to take it easy and rest. Oh well, it is all good today!

Today, I have a "Teacher Thank You" card. This was created for the monthly challenge over at Latina Crafter "sketch + twist" (which is a school theme)


and this is my card and the details:

  • Make a card base from White cardstock. A2 size.
  • Cut a panel from pink cardstock 3" x 5". Adhere it to card base.
  • Cut a panel from white cardstock 3.5"x 2". Use the Chevron Stencil, mix Embossing Paste and 1 or 2 drops of pink re-inker, mix it and apply to panel. Set aside to dry, then tie ribbon and make a bow.
  • Die-cut a bubble speech Dies Nubes Habladoras, stamp sentiment Super PapĆ” (Gracias) Feliz DĆ­a and adhere it to card with foam tape.
  • Take a couple of apple wood veneers (Wood veneers Escolares (Kit de Julio), color them with markers and then covered them with Crystal Lacquer. Be sure it is completely dry before adhere it to card.
  • Add pearls.


Submitting this project to:


Hope you like it!
Have a fantastic day!

Saturday, August 16

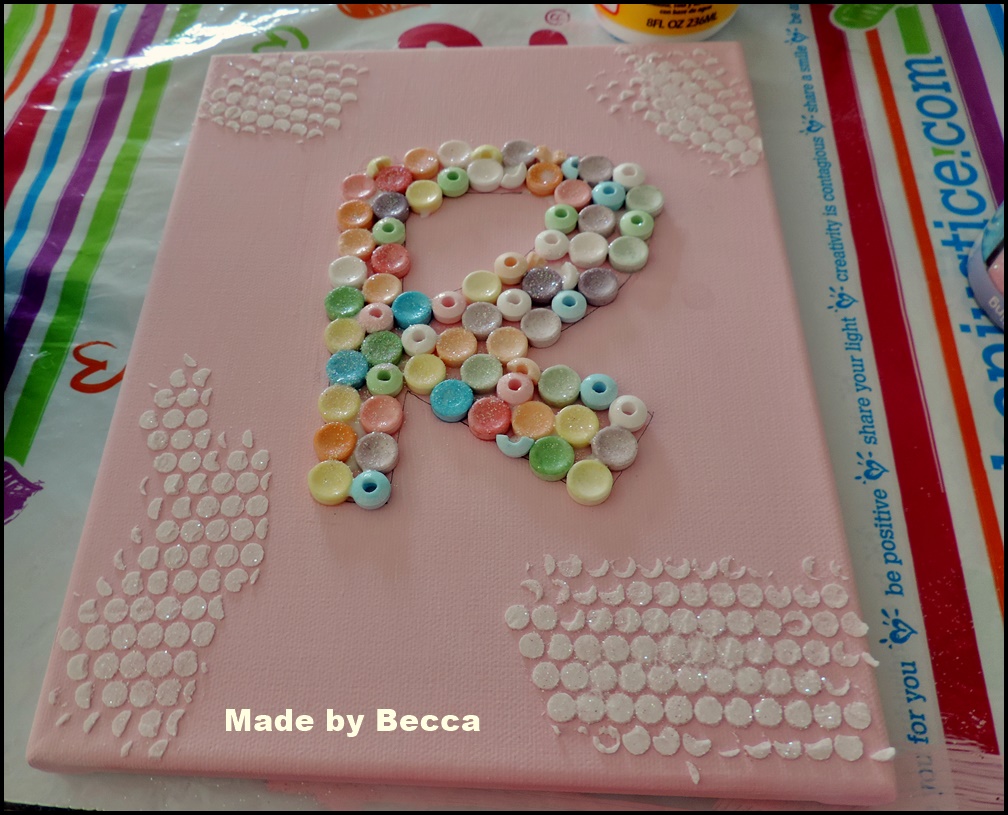
Candy Monogram Canvas

Hello! This is a very special post because I am sharing a canvas made entirely by my daughter! She is ten, quite crafty and loves to get my stuff to create, she was in the mood to make a canvas, she got all the materials needed and started creating!
I took the pictures only, but she did ALL THE WORK!!  She used smarties candy because she doesn't like them {wink, wink}

Without further ado lets see the beautiful picture tutorial:

Paint canvas with acrylic paint (here she used pink). Create a initial template and trace it onto your canvas.

Glue candy in the traced area.

After you finished the whole letter, add some embossing paste and glitter!!

And this is her final canvas!! She was sweet enough to make one for me too!!


She is super excited to submit this to Simon Says Stamps: Summer Vacation Challenge!!

Hope you like it! Leave her a comment and I will be sure she reads it.

Have a great day!

Friday, August 15

Sweet 'n Sassy August Release!

Hello, Sweet 'n Sassy  friends!  Welcome to the August 2014 Release!  Dies seem to be the trend in card making right now and Sweet 'n Sassy Stamps has some fabulous new dies to release this month that coordinate with several of our summer stamp sets already available in the store!  The bonus is that even though these stamps and dies were designed to be summer sets, they can be used all year long!

As always Sweet 'n Sassy Stamps has some wonderful prizes and another  Release Day Challenge for you!


~One random commenter from one of the DT blogs will be selected to win a $10 Gift Code to be used at the Sweet 'n Sassy Stamps Store.  You have until Thursday, August 21st at midnight EST to leave your comments.  The winner will be posted on the Sweet 'n Sassy Stamps Blog on Friday, August 22nd!

 Now, for the Release!
First up…Beauty By the Sea Dies 
which coordinate with the Beauty By the Sea stamp set:

  • Die set includes 6 dies
  • Designed by Korin Sutherland
  • Die set price is $15.25
For this card I created a "Congrats" card, my idea was to create to wedding card and ended up being a congrats card (but it can be used as a wedding card too, I think) The background was stamped in Versmark ink, then added Bridal embossing powder and heat set. The shells were stamped on textured cardstock in versamark ink and white embossing powder, then I colored them with Spectrum Noir markers and die-cut them. I added jute twine to create a wreath, then added the shells (I used hot glue), cheese cloth and pearls. The sentiment was stamped in a banner and added to card with foam adhesive. 


==================================
which coordinate with the Happy Ocean Friends stamp set:
  • Die set includes 7 dies
  • Designed by Korin Sutherland
  • Die set price is $16.75

For this card, my idea was to create a simple CAS card, but I ended up making a simple "Shaker card". Sorry for the bad lighting, I will try to post a new picture later. First I stamped, colored the images and die-cut them. Then I die-cut a circle piece of Vellum and stamped the bubbles and sentiment in Versamark ink, added white embossing powder a heat set. Then I created a frame, adhered the vellum piece and foam tape around the whole frame, added clear and blue sequins to the middle of my card base, adhered the frame to card base. Then, added the fishes to top of the vellum piece with foam tape, added few tiny little hearts and covered them with Crystal Lacquer.


================================
And FinallyFlourish Seashells
which coordinate with the Flourish Seashells stamp set:


  • Die set includes 5 dies
  • Designed by Korin Sutherland
  • Die set price is $11.75
Finally, for this card, first I spray the background with chocolate spray mist. I stamped the pieces on white cardstock and vellum paper, then die-cut them. Sponged the vellum pieces and glue them to the cardstock, hard to see here, but it gives a lot of dimension. Then, I created a panel with patterned paper, added stitches, then added the pieces, tied twine and the sentiment.


========================


Can't decide what to get…here's the whole bundle:

Before I let you go, don't forget about our release day challenge and chance to win a $20 store gift code!

Our challenge is "Add a Die Cut"  Add at least 1 die cut to your card or project.  Use the Linky Tool below to add your card to the challenge gallery.  To be eligible for the prize, we ask that you create a new card (no back linking, please) and enter your card in No More than 3 Challenges.  

Just a few guidelines to remember as you play:
            

  • You don't have to use a Sweet 'n Sassy Stamps image to enter (although we sure love when you do!)
  • You'll have until Thursday, August 21st at midnight EST to enter
  • We'll draw 1 winner from this week's challenge to receive a $20 credit to the Sweet 'n Sassy Stamps Store!  
  • If there are 25 participants, (not including the DT), we'll draw 2 winners!
  • Please use code SNSAUG2014RC when uploading to Splitcoaststampers or other galleries 

To enter simply share a link to your creation below.

Thanks for joining us today!  Be sure to join us again on Friday, August 22nd to see if you've won and to check out the next Friday Feature & Challenge!