**This is a paper crafting collection for Crafter's Companion, not TV series, sorry for the confusion**
Sunday, December 31
Seasons Giving Blog Hop 2017
*** Giveaway is now closed****
Hello friends!! Another year just went by, now we are getting ready to start a brand new one and hope a much better one.
From my side, my crafting year has been great, up and downs as always, by I met new crafty people, made new friends and got into amazing Design Teams!
On the personal side, I was able to go to Peru and see my family after almost 13 years!! We, as a family, spent an entire month having a blast! I ate a bit too much and got sick, lol, but after a day of rest and chicken soup I was up and running again!!
My wish for next year is to craft more and stress less!! Send more cards and meet more friends!
Thanks so much for visiting my blog, leave comments, pin my cards and share them with other. I invite you to follow my Crafty Facebook page, Instagram (I share crafts and nature pictures) and hopefully I will brave myself and start making videos and posting them on YouTube
Let me share with you what Instagram chose as my favorite 9 of 2017 and I agree too!
Now, as an appreciation for your visits, let me show you what I have for you as a Thank you!!
Prize includes:
Downton Abbey DVD Collection (Brand new)
**This is a paper crafting collection for Crafter's Companion, not TV series, sorry for the confusion**
**This is a paper crafting collection for Crafter's Companion, not TV series, sorry for the confusion**
Downton Abbey Stamp Set. (Brand new)
Downton Abbey Paper Pack (few pages used, almost brand new)
Spectrum Noir Colorista 2 pack set (Brand new)
Varity Rose Coloring Pad (I took one page, like brand new)
** The Downton Abbey Collection is retired and not available in stores anymore, it is a beautiful elegant collection***
All you have to do to win this prize is leave a comment here, anything goes {wink, wink}
Giveaway will be open until Saturday, Jan. 6th (midnight PST) and winner will be posted on Monday, January 8th.
Here is the list of participants!
Happy New Year and the best for you in the 2018!!
Blessings to all.
Saturday, December 30
End of the year sales!!!
Hello friends! Hope you all are having an amazing day! I am working behind the scenes to bring you new projects for the 2018!!
But while I work on them, I want to share with you some great sales!
The MISTI and the entire store on SALE!! 20% OFF everything!! Get the MISTI, papers, magnets, cleaners, bags, lol, you know you need them all!!
Sale ends Dec. 31st.
Altenew is offering 50% OFF on selected items!!
I have some Altenew stamps I need to ink up! Beautiful floral stamps!
Sale ends Dec. 31st.
Techniques Junkies has marked down 100 overstocked items!! No code needed, stamps are already discounted for you. Check them out HERE. Plus, You can use my TJ10Giovana and get an extra 10% off, YAY!!!
I was browsing the stamps I found this amazing Gingham, Deco roses, Dotty Flowers, Paisley and so much more!!
Tutti Designs is offering 20% OFF entire store. Add code : NEWYEAR at checkout!
Sale ends Dec. 31st
Blitsy has tons of deals!! 30% to 70% OFF!!

Lots of products on sale!!
Sale ends Jan. 1st.

Have fun shopping!!
Tuesday, December 26
Take the Step.
Hello friends! How are you doing today? Hope your holiday celebrations were amazing!! Now, we can start relaxing a bit. I am getting ready to close the craft room door for a few days and enjoy movies and relax while I can.
Today, I have a non-holiday card. Probably by now you are done with your cards and want something different, well, you are in the right place :)
For today's project I used this beautiful stamp "Take the Step", distress inks and my MISTI! Super easy project, love how it turned out, I think I will frame it.
You can use my TJ10Giovana code to get a 10% off .
Hope you like it.
Have a great day!
Today, I have a non-holiday card. Probably by now you are done with your cards and want something different, well, you are in the right place :)
For today's project I used this beautiful stamp "Take the Step", distress inks and my MISTI! Super easy project, love how it turned out, I think I will frame it.
- Start stamping the top part of the image in black ink.
- Clean up your stamps, then stamp the whole image in Versamark Watermark ink , then add clear embossing powder.
- Use Distress Inks to add more dimension to the project. I used Tumbled Glass, Broken China, Mustard Seed and Wild Honey Distress Inks.
Die-cut the image and adhere to a couple of coordinated cardstock panels. Card size is 6" square.
You can use my TJ10Giovana code to get a 10% off .
Hope you like it.
Have a great day!
Monday, December 25
Merry Christmas!!
 |
| Card created using dies from Tutti Designs |
Hello friends!! Wishing you all a Very Merry Christmas!
Blessings to all.
Hugs and the best for you.
Saturday, December 23
Poinsettia Corner Cards
Hello friends! T I want to share with you a couple of cards, both similar, easy and very elegant! For this project I used Poinsettia Corner from Tutti Designs, this die is very delicate and elegant.
So, let's get started:
So, let's get started:
- Die-cut the beautiful Poinsettia Corner in Metallic and Glitter Red Cardstock.
- Cut a card base 11" x 5.5" and scored at 5.5" (here I used White and Gold cardstock for card bases) and cut card fronts 5" square in Gold and Clear Vellum.
- Stamp sentiment on vellum, score 1/8" on each side. Then, adhere the poinsettia, I used my MISTI and as you can see on the picture I used the 1/4"corner to align the die and get the perfect position.
- Finally, adhere the panels to card bases and add red sequins.
Hope you like my project!
Have a fantastic day!
For your convenience, here are all the Tutti Designs quick links you will need:
Happy Crafting!
Friday, December 22
Last minute Christmas cards
Hello friends! Today, sharing your last minute Christmas cards and tags too! I hope all your shopping is done and all your card were mailed, right? Yeah, me either, hehehehe and just in case you are in need of a quick idea to make 3 cards + 2 tags with 1 background stamp, today is your lucky day!!
Yes!! I used this super cute from Concord & 9th "Christmas Cheer Turnabout" , so let's get started!
Here are the cards!! Love how they turned out! I added gold snowflakes and bough to embellish the cards, both from "Take a Bough Die"
And here you have the 2 little tags, I kept them super simple, just added snowflakes and bough to the corner, I used a brad I found on my stash (do you still use brads?)
I hope you like these projects! It took me 40 minutes to create this set, not too bad, right?
Entering this set to Where Creativity Meets C9 : Anything goes
Have a fantastic day!!
Hugs!
Yes!! I used this super cute from Concord & 9th "Christmas Cheer Turnabout" , so let's get started!
- Starting with stamping the Christmas Cheer Turnabout, using your MISTI, on a piece of cream cardstock in Versamark Watermark ink. (click on the picture for a bigger one)
- After stamping the 4 sides, add gold embossing powder and heat set.
- Using stitched dies or any rectangle and a square die, die-cut the background piece. At first, I just wanted the 3 big pieces, but then I have a "great moment" and decided to die-cut the little pieces as well for little tags {win, win}
- Adhere the stamped panel on a piece of red metallic cardstock. Here I use Scallop Rectangle dies.
- Stamp sentiment on bottom part of cards in green and red ink.
Here are the cards!! Love how they turned out! I added gold snowflakes and bough to embellish the cards, both from "Take a Bough Die"
And here you have the 2 little tags, I kept them super simple, just added snowflakes and bough to the corner, I used a brad I found on my stash (do you still use brads?)
I hope you like these projects! It took me 40 minutes to create this set, not too bad, right?
Entering this set to Where Creativity Meets C9 : Anything goes
Have a fantastic day!!
Hugs!
Thursday, December 21
Impression Obsession Challenge : Anything goes.
Hello friends!! I have great news to share, I am joining the Impression Obsession Design Team!! YAY, so excited!
So, let's share with you the brand new challenge: Anything goes!!
To enter the challenge go to the Impression Obsession blog (all the details are there!). A random challenge card will be selected to showcase on the IO blog AND you can to enter to win a $25 gift certificate to IO just by playing!
So, in case you still need ideas for Christmas cards, I want to share this set , super easy! I stamped all the images on white cardstock, black ink and then colored them with markers. Die-cut the image and adhered them to a copper metallic cardstock piece. Stamped the sentiment in red ink and voila!!
For this project I used Tidings of Joy set, to align the panel I used MSP Creative Corners fits perfectly.
Hop list:
Hope you can join us!
Have fun stamping!
Monday, December 11
2017 Winter Coffee Lovers Blog Hop!!
My card is very simple and cute {wink, wink}, here are few details I would love to share with you.
- First, stamp the coffee background image, this one is Cups 'n Mugs from Technique Junkies on a piece of white cardstock in red ink. I used my MISTI to restamp the image to get a perfect coverage. After that, leaving your stamp on your MISTI, stamp the image with Versamark Watermark ink and add clear embossing powder.
- After that, sponge your piece with Peeled Paint Distress Ink.
- Stamp the sentiment on the bottom in red ink. I used one of the sentiments from Gift of Christmas set (I covered part of sentiment with washi tape so I could stamp "Merry Christmas" only)
- Die-cut the background piece with Rectangle Stitched dies and a Rectangle Scalloped Stitched in Green Metallic cardstock to add behind the image.
- Embellish card with die-cut boughs.
- Add little white dots with a white pen on the kraft cardstock base.
Hope you like my project!
Have a fantastic day!
Thursday, December 7
Merry Christmas card set.
Hello friends! Sharing today my first post as a Design team member for Tutti Designs! YAY, super excited to be part of this amazing group!
So let's get started, for today I have a set of Christmas card, super simple and easy to mass produce , but with the WOW factor {wink, wink}
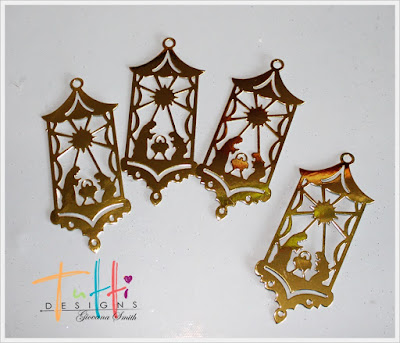
for this project I used Nesting Stitched Rectangles and Nativity Ornament.


I started selecting Gold and Copper Metallic and Glitter Cardstock.
Die-cut the ornament as well as the metallic and glitter cardstock.
Mount a layer of rectangle stitched metallic cardstock with a piece of glitter cardstock. Then, add Nativity Ornament with foam tape.
Close up
Here is a picture of the Cards
Now, I have a bonus project for you, I made a super cute ornament using just the Nativity Ornament die-cut piece.
For this project I die-cut the Nativity Ornament 4 times, then I glue them together, added ribbon and ready to be hung up on my Christmas tree.
Hope you like my projects!
Have a fantastic day!
For your convenience, here are all the Tutti Designs quick links you will need:
Happy Crafting!
Subscribe to:
Comments (Atom)


