Pages

Tuesday, June 30

Crafter's Companion HSN Blog Hop!!

Hello friends! Today, the Crafter's Companion UK and US family are together, having a super fun blog hop showcasing the products that are going to be on HSN tomorrow!! Sara Davies is back again and this time we want to show you all the fun products and what you can create with them!
I invite you to check the Crafter's Companion US Facebook Page to see Sara's HSN schedule!

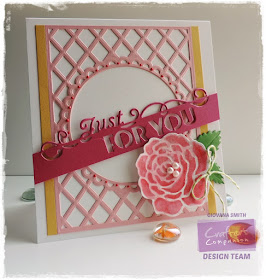
This is the card I created for you, showcasing a couple of dies that will be at the show!

Here are the detatils:
  • Start with a White card base 5.5" x 6".
  • Die-cut a Lattice Ornate Create a Card front in Pink Pearl Shimmering Cardstock. I die-cut the center piece with circle dies.
  • Adhere Lattice piece on white card base. Cut a 0.25" strips of Yellow Pearl Shimmering Cardstock and adhere it to card.
  • Die-cut an Edgeable's Just for You in Candy Red Shimmering Cardstock. Adehre it to card with foam adhesive.
  • Die-cut a Cabbage Rose in watercolor paper and color it with Spectrum Aqua Markers. Die-cut leaves from Green Envy Shimmering cardstock.
  • Add rose and leaves to card with foam adhesive. Add pearls and twine.


What about a giveaway?!! Yes!! I am giving away the Ornate Lattice Create a Card Die!! This giveaway is open to the US and UK (included Austria, Belgium, Denmark, France, Germany, Luxembourg, Netherlands, Republic of Ireland, Switzerland, Cyprus, Czech Republic, Finland, Gibralta, Greece, Italy, Malta, Norway, Portugal, Spain, Sweden)


Plus, all of my teammates are giving away stamps or dies...make sure you hop along to everyone’s blog, and leave comments to win their fabulous prizes! And be sure not to miss the huge prize packs on the Crafter’s Companion US blog and over on Sara Davies’ blog!

Here is the list of the blog participating in this hop:
You have until Wednesday, July 1st at midnight (EST time) to leave a comment!! Good luck and enjoy the hop!

Have fun hopping!!

Products used for this project:

Monday, June 29

America the Beautiful

Hello friends! Happy Monday to you all! Since Independence Day is just around the corner I want to show you a card I made this weekend, just for fun! Love the "Patriotic Pride" set from Crafter's Companion. I think this set is perfect for 4th of July, troops or any patriotic festivity.

For this card I stamped the flag and sentiment in blue and red, just keeping it simple to showcase the national colors. I added red and blue cardstock behind the sentiment as well as stitches. The final touches were red and blue rhinestones.
Super easy!


Entering this card to:
Hope you like it!
Have a fantastic day!!

Friday, June 26

Dreams come...

Hello friends! Happy Friday to you all! Today, I have a super cute card using one of the brand new, just released "Scruffy Little Kitten" stamps, this cute guy is "Charlie", I colored him with Spectrum Noir Pencils. here are the details:

  • Start with a 6" x 6" Scored Bright White Card.
  • Cut a couple of pieces of patterned paper and adhere them to card base.
  • Stamp image on a piece of Ultra Smooth Premium White cardstock, color it with Spectrum Noir Blendable Pencils:
    • Skin: 009, 89, 90, 96, 100.
    • T-Shirt: 065.
    • Pants: 065, 068, 069, 075, 061 (Blending)
    • Hair: 011, 014, 016, 084, 087, 091, 093.
    • Boots: 087, 088.
    • Watercan: 112, 113, 115, 116.
    • Butterflies: 041, 042, 043; 014, 030, 034, 036
  • Adhere image to card base, draw a border with a fine black pen.
  • Die-cut clouds in white and coastal pearl shimmering cardstock, adhere them to card.
  • Stamp sentiment, die-cut and emboss it with rectangle dies, add it to card with foam tape.
  • Die-cut Daisy Border Die, color it as desired, adhere it to card.
  • Die-cut a Country fence and cut out the grass par and adhere it to card.


Entering this card to:

Hope you like it!
Have a fantastic day!!

Monday, June 22

Scruffy Little Kitten "Dollie"

Hello friends! Happy Monday to you all. Today I have a sneak peek of a new collection "Scruffy Little Kitten" by Crafter's Companion. The images are super cute, fun to color and great for little and no too little people too ;)
If you are on Facebook, you should take a peek of the samples posted there.

This super cute girl is "Dollie", I colored her with Spectrum Noir Pencils, this is the list of pencils I used:

  • Hair: 087, 088, 090, 098, 099.
  • Skin: 002, 004, 009, 034, 089, 096, 100.
  • Curlers: 029, 031, 034, 036.
  • Bubbles: 001, 061, 065, 112.
  • Bathtub: 001, 016, 112, 114, 115.
  • Butterfly: 084
  • Heart: 023, 026, 033, 034
Added stitches and distressed the edges of the panels, this is a 6" x 6" card.


I think this image is super cute, what do you think?

Thanks so much for stopping by!
Have a fantastic day!!

New winner Summer Coffee Lovers Blog Hop!!!

Hello ladies!! The winner from the Blog Hop never contacted me and sadly it was not way to contact her, so I am picking a new winner and it is...


Taunya, please send me an email so I can give you your GC code!!

Congrats!!

Friday, June 19

Welcome to the family

Hello friends! Today I have a super cute and sweet baby card! I used this new Die'sire Classiques Only Words "Welcome to the family" die. You can check out all the collection HERE.

Here are the details:
  • Create a card base from Kraft cardstock, 5" square.
  • Cut a panel from Coastal Pearl Shimmering cardstock, 4.5" square.
  • Cut a panel from Ultra White Premium Cardstock, 4.5" square.
  • Emboss white panel with Clouds embossing folder, then sponge it with Tumbled Glass Distress Ink. 
  • Add panels to card base.
  • Die-cut a circle from Yellow Pearl Shimmering cardstock, then dry emboss it with clouds folder and match it with white piece. Adhere it to card with foam adhesive.
  • Die-cut stars using Bebunni Floral Stars Die in Yellow Pearl Shimmering cardstock. Adhere them to card.
  • Die-cut a white cloud using Head in the clouds die and adhere it behind circle.
  • Die-cut "Welcome to the family" in Coastal Pearl Shimmering cardstock and adhere it to circle.
  • Embellish piece with sequins and dots.


Entering this card to:
Hope you like it.
Have a fantastic day!!

Products used for this project:


Wednesday, June 17

Bloom where you are planted

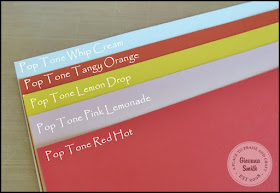
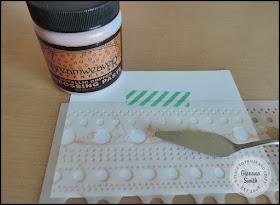
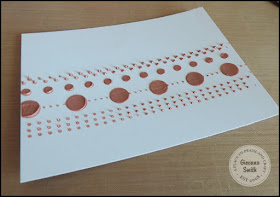
Hello friends! Hope you all are having a fantastic day! Sharing today a tutorial I created for CutCardStock. It's a very simple card showcasing the Pop Tones Cardstock from CutCardStock.

So, let's get started:


  • Just like this, set aside to dry while we work on the flowers.


  • After the embossing paste has dried, add a bit color using yellow mist.

  • Stamp sentiment in red ink. add leaves a flowers to right bottom corner. I mixed the centers of the flowers to make them pop a bit more.


Submitting this card to:
Hope you like it.
Have a fantastic day!!

Monday, June 15

Friendship is...

Hello friends! Hope you are starting a great week!! Yesterday, I crafted for awhile, I colored a lot of images for new releases, promise to share them with you as soon as I can, one of the images I colored just for fun was this beautiful butterfly from Crafter's Companion, I have to say I have another idea in mind for this project, but sometimes your ideas don't turn the way you want them, but I like how this turn out.

For my card I got inspired by the sketch from CAS(E) this sketch and few other challenges involved ;


Here are the details:
  • Make card base from Kraft cardstock. A2 size.
  • Stamp sentiment on bottom part of card base in St. Valentine StazOn ink.
  • Stamp butterfly on a piece of watercolor paper in Versamark Watermark Ink, then add white embossing powder and heat set.
  • Color butterfly with Spectrum Aqua markers starting with Peach, Blossom, Begonia and Scarlet.
  • Color background squares with Magenta markers.
  • Add piece to card base with foam adhesive.
  • Finally, add sequins.


Also entering this card to:

Hope you like it.
Have a fantastic day!


Products used for this project: