Pages

Saturday, February 26

Wee Memories Scrappy Saturday #45: United we Stamp

Hello my friends and welcome to another Scrappy Saturday Challenge, this week challenge is sponsored by Unity Stamps and the theme is Free for all!!


This week we are supporting "Operation Write Home", so if you have extra cards and would like to donate them to OWH, please do. You can read all the Guidelines HERE (very important information) and also, if you don't know where to send them, you can find the nearest person clicking HERE.

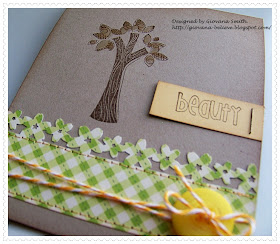
Here is my card:
BEAUTY

Directions:
  • Make card base from Kraft Cardstock.
  • Cut a piece of Patterned Paper, punch top border. Adhere to card and add stitches.
  • Tie Lemon Drop Baker twine around and add a button, make a bow.
  • Stamp image in Vintage Photo Distress Ink. Add Crystal Lacquer to leaves.
  • Stamp sentiment on Yellow Cardstock. Ink all edges. Adhere to card with a Black Staple.

Card recipe:
  • Cardstock: Kraft (SU), Sweet Corn (GKD).
  • Paper: Material Girl (Cosmo Cricket)
  • Stamps: Beauty Tree (Unity Stamps)
  • Ink: Vintage Photo Distress (Ranger)
  • Embellishments: Lemon Drop Twine (The twinery), Yellow button (GKD).
  • Accessories: Sewing machine, Flower Border Punch (Martha Stewart), Black Staple (Making Memories), Sponges.
The deadline for this challenge is next Friday, March 4th at 11:59 PST. The winners will be announced on Sundays on the Wee Memories Blog.


Hope you like it!
Thanks for stopping by!!
Have a great day!

Wednesday, February 23

Rejoice!

Hello my friends! Hope you are having a great day. Today I have a couple of fun projects feauturing Heartfelt Creations Stamps, this set is one of the newests one released a couple of weeks ago, perfect for your Easter cards. You can visit the Heartfelt Creations Blog for more awesome creations!

Here is the Card-Candle set I created.

Directions:

DECORATIVE CANDLE
  • Stamp image and sentiment from HCPC 3366 Wrought Iron Cross PreCut Set onto White Tissue Paper in Vintage Photo Distress Ink.
  • Color the cros with Copic Markers: E31, E33, R22
  • Cut out the tissue paper, adhere to candle, cover the paper with wax paper and heat it up until image is completely blended in the candle.
  • Add rhinestone on flower and tie jute twine around candle.

 CARD:
  • Make card from White Cardstock. A2 size.
  • Stamp cross and sentiment from HCPC 3366 Wrought Iron Cross PreCut Set on White Cardstock. Color image with Copic Markers: E11, E31, E33, R22. Mat this piece with a Cream piece of Cardstock. Add straight stitches.
  • Die-cut Oval frame using HCD 710 Decorative Oval Window Die in Cream Carsdtock, emboss  and stencil it with Antique Linen Distress Ink. Add it to card with foam tape.
  • Add Pink rhinestones.
  • Cover cross with Crystal Lacquer
 

Recipe:
  1. Cardstock: White, Cream (Colorbok)
  2. Paper: Tissue paper, Wax paper (for candle)
  3. Stamps: HCPC 3366 Wrought Iron Cross PreCut Set (Heartfelt Creations)
  4. Ink: Vinatge Photo Distress, Antique Linen (Ranger), Copic Markers.
  5. Embellishments: Jute twine, Pink Rhinestones (Kaisercraft).
  6. Accessories: HCD 710 Decorative Oval Window Die (Heartfelt Creations), Crystal Lacquer, Grand Calibur (Spellbinders), Foam tape, Sponges, Sewing machine.
Hope you like my projects!
Thanks for stopping by.
Have a great day!

Monday, February 21

Have a happy day!

Hello my friends! Hope you all had a great weekend and a fabulous Monday! Mine started with a sick child who was complaining a lot about her throat, she was fever-ish and not in a good mood. I checked her tonsils and they were huge (hers are usually big, but this time they were huge), time to go to the doctor, my husband told me maybe she has a strep throat and I said I hope not. Well at the doctor's office she explained her symptoms and yes! she not only has the strep throat but also tonsillitis, poor girl, now she is taking antibiotics and pain -fever relief. Hope she can sleep better tonight.

Anyway, I have a "Clean & Simple" card for you today. For this card I used "Little Critters" set from Gina K. Designs. This set was just released last Thursday :)

Directions:
  • Make card base from White cardstock. A2 size.
  • Cut a piece of white cardstock (4" x 5.25"), dry emboss 3/4 part with Textile folder.
  • Stamp sentiment  in Vintage Photo Distress Ink. Add 3 pearls.
  • Tie ribbon around and adhere to card.
  • Stamp image on White Cardstock in Memento Tuxedo Black. Color it with Copic Markers. Die-cut, emboss and stencil piece using Rectangle Nestabilities.
  • Adhere to card with Foam tape. Add Copper Stickles to tulips.


Card Recipe:
  • Cardstock: White (Gina K. Designs)
  • Stamps: Little Critters (Gina K. Designs)
  • Ink: Memento Tuxedo Black (Tsukineko), Vintage Photo Distress (Ranger)
  • Embellishments: White Organza Ribbon (Gina K. Designs), Pearls (Gina K. Designs) Hodgepodge Hardware (SU), Copper Stickles (Ranger)
  • Accessories: Cuttlebug, Textile embossing folder, Copic Markers, Rectangle Nestabilities (Spellbinders), Foam tape, Scor-tape.
I am submitting this card to:
  1. Less is More: Spring theme
  2. Moxi Fab Blog: Stamping With Markers.
Hope you like my card!
Thanks for stopping by.

Saturday, February 19

Wee Memories Scrappy Saturday # 44: Source of Inspiration

Hello my friends! Welcome to another Scrappy Saturday Challenge. This week our challenge is to find a Source of Inspiration and create a Project with it, for example PaperCrafts Magazine, Stamping Catalog, etc.


This week our challenge is sponsored by Oh My Crafts! and one lucky winner will win $15.00 Gift Certificate !!


For my card I got inspired by the Sketch on pag.68 from Go to Sketches.

Thanks so much

Directions:
  • Make card from cardstock.
  • Mat Pink Cardstock and Patterned Paper. Ink edges of PP.
  • Punch a border. Adhere to card and add stitches.
  • Stamp circles onto border. Tie Twine around and create a bow.
  • Stamp sentiment onto Patterned Paper.
  • Stamp flowers and leaves on White cardstock, cut them out and adhere them to card wtih Glue dots.

Card Recipe:
  • Cardstock: White (Colorbok), Pink (DCWV)
  • Stamps: Mimosa (SEI)
  • Ink: Walnut Stain, Worn Lipstick, Peeled Paint (Ranger)
  • Embellishments: Pink Rhinestone (Kaisercraft), Twine (The Twinery).
  • Accessories: Flower Border Punch (Martha Stewart), Sewing machine, Sponges, Glue dots.
The deadline for this challenge is next Friday, Feb 25th at 11:59 PST. The winners will be announced on Sundays on the Wee Memories Blog.

Thursday, February 17

Happy Easter & I believe in You

Hello my friends! Hope you are having a great day. I have a couple of cards for you today using Heartfelt Creations Stamps! .

Happy Easter.


Directions:
  • Make card base from White Cardstock. 4.75" x 5.5"
  • Cut a piece of White Cardstock: 4 1/8" x 5 1/8". Ink all edges with Vintage Photo Distress Ink.
  • Cut a piece of White Cardstock: 3.5" x 4 5/8".  Stamp Lilies from  HCPC 3370 Easter Lilies PreCut Set in Memento Tuxedo Black. Color them with Copic Markers: E11, E21, YG95. Ink all edges and adhere to previous cut piece of White Cardstock. Add zig-zag stitches.
  • Stamp the Big Lilie, color it with Copics and cut it out. Adhere to card with foam tape. Cover it with Crystal Lacquer.
  • Stamp image from HCPC 336 Wrought Iron Cross PreCut Set in Espresso Ink. Die-cut this piece with the smallest die from Label 8 Nestabilities. Adhere to card with Foam tape.
  • Add a couple of pearls on the left top.

Card Recipe:
  • Cardstock: White.
  • Stamps: HCPC 3370 Easter Lilies PreCut Set, HCPC 336 Wrought Iron Cross PreCut Set.
  • Ink: Memento Tuxedo Black (Tsukineko), Vintage Photo Distress (Ranger), Espresso Adirondack (Ranger)
  • Embellishments: Pearls, Copper Stickles (Ranger)
  • Accessories: Label 8 Nestabilities (Spellbinders), Sewing machine, Sponges, Foam tape, Crystal Lacquer, Copic Markers.

I Believe in You:

Directions:
  • Using the Biggest die from Label 8 Nestabilities, fold a White Piece of Cardstock (11" x 4.25") and make a card.  Ink all edges with Vintage Photo Distress Ink.
  • Using the second biggest, die-cut a piece of White Cardstock. Stamp images from HCPC 3304 Posy Patch Swirls PreCut Set in Tea Dye Distress Ink. Ink all edges.
  • Using HD 701 Posy Patch Die-cuts, die-cut flowers in White Crepe Paper. Ink all edges and mount them and put them together with a brad.
  • Adhere Cream lace and ruffle ribbon.
  • Tie Jute Twine twine and make a knot.
  • Add flowers .
  • Stamp sentiment on Kraft Carsdtock in VersaMark Ink. Add White embossing powder and heat it up. Die-cut piece with Label 3 Nestabilities. Using the same die, trace it onto Blue cardstock and cut it out. Mount them together and adhere to card with Foam tape.

Card Recipe:
  • Cardstock: White, Ocean Mist, Kraft
  • Paper: Crepe Paper.
  • Stamps: HCPC 3304 Posy Patch Swirls PreCut Set.
  • Ink: Tea Dye Distress, Vintage Photo Distress (Ranger), Versamark (Tsukineko)
  • Embellishments: Dot Ribbon (American Craft). Lace Ribbon (Offray), Brads, Jute twine.
  • Accessories: Label 8 Nestabilities, Label 3 Nestabilities (Spellbinders), HD 701 Posy Patch Die-cuts (Heartfelt Creations), Sponges, Foam tape, Scor-tape, Grand Calibur.
You can visit the Heartfelt Creation Blog for more inspiration and awesome eye candy! and also HC has a Design Team Call!! If you love HC stamps and would love to be part of the new DT, this is your chance

Hope you like my cards!
Thanks for stopping by.

Gina K. Previews Day 4: Framed Greetings and Release Party tonight!!

Hello my friends, welcome to Day 4 and last day of Gina K. Previews! Today it's the turn to show you the New Free with Three: Framed Greetings. This coordinates with Label 16 Dies. I don't own those dies "yet", so I just cut it out and play around :)

Thanks so very much.

Directions:
  • Make card from White cardstock. Size 4.25" x 5.5"
  • Stamp Label image and sentiment. Color it with Copic markers and cut it out or die-cut it.
  • Cut a piece of doilies paper and sponge the borders. Add it to card.
  • Tie ribbon around with some yellow twine, add a yellow button and make a little bow.
  • Cut out a little side of the frame image, adhere it to card with foam tape.
  • Add some Crystal lacquer to flowers and Copper Stickles.
  • Add a couple of pearls to the top right.

Card recipe:
  • Cardstock: White (GKD)
  • Paper: Doilies paper.
  • Stamps: Framed Greetings (Gina K. Designs)
  • Ink: Memento Tuxedo Black, Red.
  • Embellishments: Yellow Satin Ribbon, Yellow twine, Yellow button, Pearls, Copper Stickles (Ranger)
  • Accessories: Scor-tape, Foam tape, Crystal Lacquer, Sponges

* All items in bold can be found at Gina K. Designs Store

Hope you like my creation!, now for more inspiration using these 2 sets, be sure to check out what the rest of the design team has come up with:
 (Taken from Gina's blog) Would you like to win one of these fun sets?Here's what to do- Visit each of the blogs listed above and leave a comment, (including Gina's blog.) The more blogs you comment on, the more chances you have of winning!
Tomorrow, Gina will announce 4 randomly chosen winners who will each win one this new set!

Don't forget, tonight is the Release Party! Come join us at StampTV 7:00-10:00 pm (Central Time)!! See ya there :)

Wednesday, February 16

Gina K. Previews Day 3: Live Life Loud and Christ is Risen

Welcome to Day 3 of Gina K. Previews!! Today we have 2 amazing sets for you and I am pretty sure you are going to love them. Different styles, but wonderful images :)

Live Life Loud. This set is wonderful for teenagers and non-teenagers too! It has fun images and wonderful sentiments and has been illustrated by the wonderful Tami Mayberry.

Party Like a ROCK STAR!!

Directions:
  • Make card from Ivory Cardstock. Card size: 4.25" x 5.5"
  • Cut a piece of Kraft cardstock, distress and ink all edges.
  • Mat a piece of Wine with everything Cardstock and Patterned Paper. Distress all edges of CS. Adhere to card.
  • Cut a piece of Wine with everything and Ivory Cardstock. Distress edges of Wine CS. On Ivory Cardstock stamp Circles image in Antique Linen Distress and Note Music image in Cranberry Ink. Mat with Wine piece and adhere to card.
  • Add Jute Ribbon around.
  • Stamp sentiment on Ivory Cardstock in Cranberry Ink.
  • Stamp guitar on Ivory Cardstock and cut it out. Add Crystal Lacquer. Add it to card.
  • Add brads.

Card recipe:
  • Cardstock: Ivory, Wine with everything, Kraft (Gina K. Designs)
  • Paper: DCWV
  • Stamps: Live Life Loud (Gina K. Designs)
  • Ink: Antique Linen Distress (Ranger), Cranberry.
  • Embellishments: Jute Ribbon, Brads.
  • Accessories: Circle Nestabilities, Distresser, Foam tape, Scor-tape.

Christ is Risen: This set is beautiful, the images and sentiments are just perfect for all your Easter cards, and has been illustrated by the talented Nina Brackett.

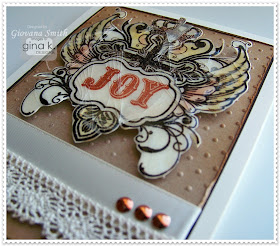
JOY.

Directions:
  • Make card base from Ivory Cardstock. Card size : 4.25" x 5.5"
  • Mat a piece of Chocolate Brown and Kraft Cardstock. Ink and distress edges of Kraft piece. Dry emboss 3/4 of Kraft piece with Swiss Dots folder. Add ribbon and Lace around. Add 3 Gold Nailheads.
  • Stamp image and sentiment on Ivory cardstock in Walnut Stain Distress Ink. Stamp sentiment in Ginger Ink.
  • Color the image with Chalk Inks (I used Q-tips to add different shades of Green Poppy and Yellow Ink)
  • Add UTEE and heat it up at least 3 times. Then create the Cracked Glass.
  • Add to card base with Foam tape.

Card recipe:
  • Cardstock: Ivory, Chocolate Brown, Kraft (Gina K. Designs)
  • Stamps: Christ is Risen (Gina K. Designs)
  • Ink: Walnut Stain Distress (Ranger), Assorted Chalk Inks.
  • Embellishments: Ivory Satin Ribbon, Lace Ribbon, Gold Nailheads.
  • Accessories: Swiss Dots Embossing folder, Cuttlebug, UTEE, Scor-tape, Foam tape
* All items in bold can be found at Gina K. Designs Store.

Hope you like my creations! Now hop over to the check out the creations from the DT.

(Taken from Gina's blog) Would you like to win one of these fun sets?Here's what to do- Visit each of the blogs listed above and leave a comment, (including Gina's blog.) The more blogs you comment on, the more chances you have of winning!
Tomorrow, Gina will annouce 4 randomly chosen winners who will each win one of these fabulous new stamp sets!

Thanks so much for stopping by!

Tuesday, February 15

Gina K. Previews Day 2: Little Critters and Chocolate Bunnies

Welcome to Gina K. Previews Day 2!! Today we have 2 beautiful sets for you.

Little Critters: This pretty sets has been ilustrated by the talented Theresa Momber and has cute images.

Here for you.
Directions:
  • Make card from cardstock. Card size 4.25" x 5.5"
  • Mat a piece of Red Hot Cardstock with Polka Dot Patterned paper. Ink edges of PP.
  • Add a piece of Red Hot Cardstock and add stitches.
  • Adhere a piece of Red patterned Paper and add stitches.
  • Tie White Organdy Ribbon around. Make a bow and add to card.
  • Stamp image on White Cardstock in memento Tuxedo Black. Color it with Copic Markers. Die-cut emboss and stencil image with Circle Nestabilities. Adhere to card with Foam tape.
  • Stamp sentiment on White Cardtsock in Memento Rich Cocoa Ink. Cut it out and create and banner. Adhere  to card with Foam tape.
  • Add Crystal Lacquer to mushroom image and set to dry.
  • Add a couple of Gold Nailheads to the right bottom.

Card Recipe:
  • Cardstock: White, Red Hot (Gina K. Designs)
  • Paper: Colorbok, Cosmo Cricket.
  • Stamps: Little Crickets (Gina K. Designs)
  • Ink: Memento Tuxedo Black, Memento Rich Cocoa (Tsukineko)
  • Embellishments: White Organdy Ribbon (GKD), Nailhead adhesive (GKD).
  • Accessories: Circle Nestabilities (Spellbinders), Sewing machine, Sponges, Foam tape, Copic Markers, Crystal Lacquer, Scor-tape.

Chocolate Bunnies: This set great for Easter time, the bunnies are pure cuteness :) This set has been ilustrated by Asela Hopkins.

Hoppy Easter

Directions:
  • Make card from White Cardstock. Card size: 4.25" x 5.5"
  • Mat Green Grass Cardstock with Patterned Paper. Ink edges on PP. Add stitches.
  • Cut a piece of Patterned Pater, punch border, ink edges and add to card. Add zig-zag stitches.
  • Tie Yellow Satin Ribbon around and make a bow.
  • Die-cut and emboss a piece of Lemon Drop Cardstock and patterned Paper with Circle Nestabilities. Adhere to card.
  • Add a couple of Paper Roses.
  • Stamp bunnies on White Cardstock in Memento Tuxedo Black. Color them with Copic Markers. Cut them out and add Crystal Lacquer, set aside to dry.
  • Stamp sentiment on Patterned Paper in Vintage Photo Distress Ink.
  • Add some Clear Rhinestones on right top corner.
  • After bunnies are dried, add some foam tape and adhere to card.

Card recipe:
  • Cardstock: White, Grass Green, Lemon Drop (Gina K. Designs)
  • Paper: Colobok, Cosmo Cricket.
  • Stamps: Chocolate Bunnies (Gina K. Designs)
  • Ink: Memento Tuxedo Black (Tsukineko), Vintage Photo Distress (Ranger)
  • Embellishments: Yellow Satin Ribbon, Paper flowers, Clear Rhinestones (GKD).
  • Accessories: Circle Nestabilities (Spellbinders), Border Punch, Sewing machine, Foam tape, Sponges, Glue dots, Crystal Lacquer, Copic Markers.
* All items in bold can be found at Gina K. Designs Store.

Hope you like my cards, now for more inspiration head over to the rest of the DT members and enjoy their creations :)

Thanks so much for stopping by!

(Taken from Gina's blog) Would you like to win one of these fun sets?Here's what to do- Visit each of the blogs listed above and leave a comment, (including Gina's blog.) The more blogs you comment on, the more chances you have of winning!
Tomorrow, Gina will annouce 4 randomly chosen winners who will each win one of these fabulous new stamp sets!

Monday, February 14

Gina K. Previews Day 1: Spring Basket and Basket Blessings

Hello my friends and welcome to Day 1 of Gina K. previews!! So excited to show you 2 awesome sets designed by Melanie Muenchinger : "Spring Basket & Basket Blessings"

Spring Basket: This set has beautiful images, super fun to color too :)

Tulip Basket Card:

Directions:
  • Make card base from White Cardstock. Card size: 5" x 5"
  • Dry-emboss a piece of Red Hot Cardstock with Swiss Dots folder. Ink all edges and adhere to card.
  • Stamp image onto White Cardstock in Memento Tuxedo Black. Stamp an extra image and color them with Copic Markers.
  • Die-cut and emboss image with Circle Nestabilities. Cut out tulips from second image. Add lace to basket and add tulip with foam tape. Cover tulips with Crystal Lacquer.
  • For the border frame, die-cut the big die from Fleur de Lis dies and the coordinate corner (8 times) in Patterned Paper. Add the big square behind your image, then add the little corners.
  • Add Pearls in each corner.
Inside of card

Card recipe:
  • Cardstcok: White, Red Hot (GKD)
  • Paper: Jovial (BasicGrey)
  • Stamps: Spring Basket (GKD)
  • Ink: Memento Tuxedo Black (Tsukineko), Walnut Stain Distress (Ranger), Pink.
  • Embellishments: Lace, Pearls.
  • Accessories: Fleur de Lis Dies, Circle Nestabilities, Oval Nestabilities (Spellbinders), Grand Calibur,  Swiss Dots embossing folder, Cuttlebug, Copic Markers, Foam tape.

Welcome Little One.

Directions:
  • Make card base from White cardstock. Card size: 4.25" x 5.5"
  • Cut a piece of Lemon Drop Cardstock and dry emboss  3/4 of it with Spots & Dots folder. Ink all edges. Mat this piece with Ocean Mist cardstock. Emboss a small piece of Ocean Mist and punch 1 border. Add it to previous piece, add ribbon and stitches all around.
  • Stamp sentiment in Walnut Stain Distress Ink.
  • Stamp image twice on White Cardstock in Memento Tuxedo Black. Color images with Copic markers. Cut out second image and add it to main image with foam tape. Cover it wit Crystal Lacquer.
  • Add button.

Card Recipe:
  • Cardstock: White, Ocean Mist, Lemon Drop (GKD)
  • Stamps: Basket Blessings (GKD)
  • Ink: Memento Tuxedo Black (Tsukineko), Walnut Stain Distress (Ranger).
  • Embellishments: Turquoise Mix Button Jar (GKD), Jute twine, Dandelion Grosgrain Ribbon (GKD)
  • Accessories: Spots & Dots embossing folder (Provo-craft), Cuttlebug, Flower Border Punch,  Sewing machine, Crystal Lacquer, Scor-tape, Foam tape.
* All items in bold can be found at Gina K. Designs Store.

Hope you like my creations!, now for more inspiration using these 2 sets, be sure to check out what the rest of the design team has come up with:
Don' forget to leave a comment in all the DT blogs, Tomorrow, Gina will annouce 4 randomly chosen winners who will each win one of these fabulous new stamp sets!Also, don't forget the Big Release Party is this Thursday Feb 17 at 7-10 pm (Central Time) over at Stamp TV!

Saturday, February 12

Wee Memories Scrappy Saturday Challenge #43: Live, Laugh, Love

Hello my friends and welcome to another fun Wee Memories Scrappy Saturday. This week our challenge theme is "Live, Laugh, Love". 
So you can create anything life related, funny or love themed for this week's challenge.


This week our sponsor is "Penny Black" who is giving 2 lucky winners some Clear and Wood Stamps!!


I created a Love card.

Directions:
  • Make card from White Cardstock.
  • Cut a piece of Pink Cardstock (3" x 5.5"), punch out sides and ink all edges.
  • Cut a piece of Patterned Paper and adhere to Pink CS. Cut thin pieces of Green Patterned Paper and adhere to each side. Add zig-zag stitches.
  • Stamp Sentiment in Vintage Photo Distress Ink.
  • Stamp image on White cardstock in Memento Tuxedo Black. Color it with Copic Markers. Die-cut this piece with Label 8 Nestabilities.
  • Add Pink Satin Ribbon.

Card recipe:
  • Cardstock: White, Innocent Pink (GKD)
  • Patterned Paper: Material Girl (Cosmo Cricket), Clothesline (Little Yellow Bicycle).
  • Stamps: Where your heart is (Gina K. Designs)
  • Ink: Memento Tuxedo Black (Tsukineko), Vintage Photo Distress (Ranger).
  • Embellishments: Pink Satin Ribbon (Offray)
  • Accessories: Border Punch (Recollections), Label 8 Nestabilities (Spellbinders), Sewing machine, Copic Markers, Scor-tape, Foam tape, Sponges.

The deadline for this challenge is 11.59pm PST on Friday, 18 February 2011. For more details, some fabulous design team inspiration and to link up your projects, click here.

Hope you like it!
Have a great day!
Wednesday, February 9

It's Heartfelt Creations Release Time!! New Life Collection

Hello my friends! I am so excited to show you some of the projects I made with the some of the stamps from the New Life Collection, released today!!
You can find all information about all the new sets released at the Heartfelt Creations Blog and also the new Oval Window Die, this die is to die for :)

Happy Easter Card

Directions:
  • Make card base from White cardstock. Emboss front of card with Swiss Dots embossing folder. Ink all edges with Vintage Photo Distress Ink.
  • Stamp Lilies from  HCPC 3370 Easter Lilies PreCut Set, color them with Copic Markers : E21, YG95, 0.
  • Stamp sentiment from HCPC 3366 Wrought Iron Cross PreCut Set in Vintage Photo Distress Ink.
  • Die-cut image using Oval Nestabilities, emboss and stencil as well.
  • Die-cut frame using HCD 710 Decorative Oval Window Die in Gold Cardstock.
  • Attach image on frame. Add Crystal Lacquer to Lilies and set to dry.
  • Add Cream Ribbon to card. Adhere frame with foam tape

Card recipe:
  • Cardstock: White, Good as Gold (GKD)
  • Stamps: HCPC 3370 Easter Lilies PreCut Set, HCPC 3366 Wrought Iron Cross PreCut Set (Heartfelt Creations)
  • Ink: Memento Tuxedo Black (Tsukienko), Vinatge Photo Distress (Ranger)
  • Embellishments: Cream Satin Ribbon (LSS), Copper Stickles (Ranger).
  • Accessories: Oval Window Die (Heartfelt Creations), Oval Nestabilities (Spellbinders), Swiss Dots Embossing folder (Provo Craft), Cuttlebug, Grand Calibur (Spellbinders), Scor-tape, Copic markers, Sponges, Foam tape.

Vintage Cross Card:

Directions:
  • Make a card Base from Ivory Cardstock. A2 size.
  • Mat a piece of Kraft CS and Ivory.  First, dry embossed the Ivory CS with Swiss Dots folder, Ink all edges and add stitches. Adhere to card.
  • Stamp Cross onto Ivory Cardstock in Walnut Stain Distress Ink. Color it with Copic Markers: E11, E31, E33, E35, Y13, Y17, YG95.
  • Tie ribbon around bottom card.
  • Cut out image and adhere to card with foam tape.
  • Add Crystal Lacquer to center flower and leaves. Set to dry

 Card Recipe:
  • Cardstock: Ivory, Kraft
  • Stamps: HCPC 3365 Decorative Vintage Cross PreCut Set. (Heartfelt Creations)
  • Ink: Walnut Stain Distress (Ranger)
  • Embellishments: Cream  Satin Ribbon (LSS).
  • Accessories: Swiss Dots Embossing folder, Cuttlebug, Sewing machine, Crystal Lacquer, Copic Markers, Foam tape, Sponges.
Hope you like my cards.
Have a great day!!

Tuesday, February 8

Gina K. Virtual Birthday Party!


Hello my friends!! Today is a very especial day, we are celebrating Gina's Birthday!! The Design Team has prepared an awesome blog, each blog features some part of the birthday experience.  Hop around to see the amazingly creative projects the team created to honor Gina on her special day!
Now,  if you have come from Emily's blog, you are in the right place, if not I will invite you to go to Cammie's blog and start from the beginning.

Gina's Blog Hop Details:
When: TODAY!
Where: on the design team's blogs 
Why: To wish Gina K a Happy Birthday.  After you are finished hopping along, don't forget to head on over to  Gina's Blog and wish her a Happy Birthday.  TWO lucky commenters will receive a party favor---a FREE stamp set!

I am in charge of the Party Hats!! and this is the card I created for Gina.


Now, hop over to Lee's blog!

Remember, if you head on over to Gina's Blog and leave her some birthday love, we will draw forTWO lucky people to receive a FREE stamp set!"

Have fun hopping!

Saturday, February 5

Wee Memories Scrappy Saturday Blog Hop

Hello my friends! I am so excited because today it is my first official post as a DT member for Wee Memories Scrappy Saturday!! and also my first Blog Hop, woo-hoo!!
If you got here from our GD Sarah's blog, you are in the right place, if you happen to be visiting my blog, please stop by Jenny's blog to start from the beginning and enjoy all the creations from our awesome DT!


Our challenge this week is sponsored by Michelle's Scraps who is giving to one lucky winner a $15.00 Gift Certificate. So what do you need to do? Use all your scraps and create a card/project.


So, this is the card I created for this challenge, I used different pieces of scraps of PP, Pink CS and White Ribbon. Even the embossed flower and the circle piece are scraps!!

Directions:
  • Make card from Ivory Cardstock.
  • Die-cut square pieces of Patterned paper (from scraps), ink all edges and adhere to a White piece of CS. Add stitches to every square.
  • Die-cut a flower and ink all edges.
  • Stamp sentiment on White Cardstock in Vintage Photo Distress Ink. Stencil it.
  • Die-cut border on Pink CS. Ink bottom edges,
  • Adhere to card. Add Ribbon and Pink button.
  • Add embossed flower and sentiment with foam tape.
Card Recipe:
  • Cardstock: White, Ivory (GKD), Tutu Pink (Bazzill)
  • Patterned Paper: Togetherness (Cosmo Cricket), Birthday (SEI)
  • Stamps: Block Greetings (Gina K. Designs)
  • Ink: Vintage Photo Distress, Tea Dye Distress (Ranger)
  • Embellishments: White Ribbon, Pink Button (GKD)
  • Accessories:  Border Die (Heartfelt Creations), Posy Flower Die (Heartfelt Creations), Circle Nestabilities (Spellbinders), Textile Folder (Provo Craft), Sponges, Foam tape, Medium Glue dots, Sewing machine.
I hope you can join us and play this challenge.

Now, your next stop on the hop is Stephanie.

Have fun hopping!!

Thursday, February 3

I love you

Hello my friends! I made a Pink Valentine card last night, my husband told me it is pretty, LOL, that means that card is not for me, right?  and not, this is not the card for him.
My inspiration for this card comes from Tuesday Trigger and other several blog challenges.


Directions:
  • Make card base from White Cardstock. (5.5" x 4.25")
  • Cut a piece of Pink Cardstock (5.25" x 4"), cut a piece of Patterned Paper (4 7/8" x 3.75"), ink all edges and mat together. Cut out stripes of Melon Cardstock (1.5"x 4 7/8" and 2" x 3.25"). Adhere to patterned paper and add straight stitches.
  • Stamp image onto White Cardstock in Memento Tuxedo Black. Color it with Copic Markers. Die-cut it with Rectangle Nestabilities, emboss and stencil.
  • Stamp sentiment in Espresso Ink.
  • Add image with foam tape.
  • Stick ribbon around, make a bow and add it.
  • Add Paper roses.
  • Cover colored hands with Crystal Lacquer and set to dry.

Card Recipe:
I am submitting this card to:
  1. Card Patterns : Sketch.
  2. City Crafters: All you need is LOVE.
  3. Speedy the Cat: Valentines
  4. Tuesday Throwdown: Stitching.
  5. Flourishes "Timeless Tuesday": Valentine
Hope you like it!
Have a great and blessed day.

Wednesday, February 2

Celebrate

Hello my friends! Wow, it has been almost a week since my last post, I am so sorry. I had all the intentions to create, but I have been attacked by horrible sinus headaches. I have my moments I just want to sleep and rest, but it is very hard sometimes.
Anyway, I have a cute little project for you today. I made a baby carriage from an empty ribbon spool. As every Wednesday you can enjoy more great project at the Heartfelt Creations Blog.

Directions:
  • Start with an empty ribbon spool.
  • Die-cut a couple of White Circles to cover the spool.
  • Die-cut a couple of Circles in Pink Cardstock. Divide it in 4 and cut out 1/4 piece to create the stroller shape. Mat this piece with a slightly darker piece of Pink Cardstock, cut borders with scallop scissor.
  • Die-cut Posy flowers with Posy Patch Die, ink all edges and create flower using 2 and 3 in each flower.
  • Add flowers to stroller and to create wheels.
  • Add Dew drops in each wheel and Red Gala Glits to stroller flowers.
  • Stamp sentiment from Cardinal with Holly Berries Pre-cut set. (stamp only the "Celebrate" part. Cut sentiment as a banner and add to stroller. Add a couple of dew drops.

Recipe:
  • Cardstock: White, Bubblegum Pink (GKD), TuTu Pink, Pinkini (Bazzill)
  • Stamps: Sentiment from "Cardinal with Holly Berries Pre-cut set.
  • Ink: Vintage Photo Distress (Ranger), Worn Lipstick (Ranger)
  • Embellishments: Poinsettia Dew Drops, Red Gala Glitz.
  • Accessories: Posy Patch Die (Heartfelt Creations), Large Circle Nestabilities (Spellbinders), Grand Calibur (Spellbinders), Jute tiwne, Scor-tape, Scallop scissors.
Hope you like it!
Have a great day.