Pages

Monday, February 26

My Sweet Petunia and Heffy Doodle Blog Hop


Hello friends! Welcome to another fantastic collaborating blog hop between Heffy Doodle and My Sweet Petunia.
We will choose two lucky commenters from the hop to win one of two prizes: a $50 shopping spree at My Sweet Petunia and a £25 shopping spree at Heffydoodle

Let me show you the projects I created with this super cute set "Happy Snappy Crocs" stamp set and coordinated dies.
Seriously, this set has super cute crocodile images, I am in love! Plus the cheesy smile, hehehe, feels like me, I have a very silly sense of humor and cheesy smile.


I started stamping several images using Memento Tuxedo Black and my Original MISTI. Then colored them with Spectrum Noir Markers.
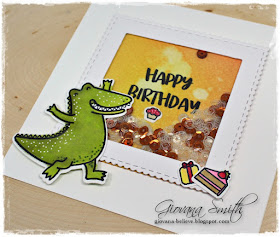
Happy Birthday Card
This card is just so much fun, the super cute croc is just adorable!! See the cute hands up (lol, hands, right?!) For this card I created a background using watercolor paper and Color Burst powders, stamped the sentiment using my MISTI and Jet Black Ink and adhered the little cupcake under the sentiment, then die-cut the piece with square dies. Also, die-cut a frame using scallop square and square dies. After that I created the shaker part adding clear and gold sequins. After that I adhered the shaker part on a 6" x 6" square card base and added the croc and the gift and cake to the frame.


Cheesy Smile card
I really love how this card turned out. A super cute croc-in-love, floating on clouds!!
For this card I again created a background using Color Burst on a piece of watercolor paper. Then die-cut the piece using scallop rectangle dies, also die-cut the inner part of the piece using cloud dies. Stamped the sentiment using the MISTI and Jet Black ink. Adhered a piece of foam behind the piece and added it to card base. Adhered more foam behind the clouds to create more dimension. After that, I added the croc on top of the cloud and few pieces of foam adhesive behind it,a dded the heart and blue rhinestones.


Hope you like my cards. Now, this is the hop list, remember to leave a comment to all the blogs so you can be entered to win one of the giveaway prizes!!
You have until Sunday March 4th, at 11:59 PM Central time  to leave a comment. Winners will be announced on Tuesday March 6th, on the Heffy Doodle and My Sweet Petunia blogs.

Now, this is the hop list:
Have fun hopping!


Wednesday, February 21

Joy


Hello friends!! Hope you all are having a great day! Today, I want to share with you a super cute and elegant card.
For this project I used the rose from the new set "Faith, Hope, Love". I stamped it the image several times on a piece of White cardstock in Memento Tuxedo Black, then colored the roses with Spectrum Noir markers, even the background, I also added clear shimmer to the roses, but it was very hard to photograph. Stamped the sentiment on a piece of Vellum in Brown ink and adhered it to image.
After that, I die-cut the image and created a die-cut frame as well from watercolor paper, added it on top of the image with foam tape.
Finally, I added the image to a white card base, added a bow and pearls.


Hope you like it. 
Thanks so much for stopping by.


Monday, February 19

He has Risen

Hello friends!Sharing today a set of Easter cards! Now that Valentine's is over, you can start all out Easter/Spring projects!!
I love tulips, they are so pretty and elegant looking, after so many years I planted a big row of tulips on my yard and once they bloomed I was a happy camper.

Anyway, let me show the cards I made, they are so easy to mass produce in case you send out Easter cards.
These are the Tutti Designs I used:

TUTTI-255 Easter TulipsTUTTI-413 Dotted Nesting OvalsTUTTI-419 Scalloped Stitched Nesting Circles

I started with a sheet of watercolor paper and added Color Burst Powders, set aside the paper to let it dry, then die-cut the piece using the Dotted nesting Ovals and Scalloped Stitched Nesting Circles Dies. I also die-cut the pieces in vellum paper.

 Die-cut the Easter Tulips in white, pink and a leftover watercolor painted piece.
 After that, I just adhered the pieces together, stamped the He has Risen sentiment on the piece of vellum. Finally I added pearls and the cards were done!


Here are the cards all together.

Entering this set to Simon Says Wednesday Challenge: Add a Die.

Hope you like my projects!
Have a fantastic day!

For your convenience, here are all the Tutti Designs quick links you will need:


Happy Crafting!


Thursday, February 15

Impression Obsession Challenge: Birthday Wishes


Hello friends!! It is time for another fun Impression Obsession Challenge!! This time is "Birthday Wishes" theme.

To enter the challenge go to the  Impression Obsession blog (all the details are there!). A random challenge card will be selected to showcase on the IO blog AND you can to enter to win a $25 gift certificate to IO just by playing! (IO stamps need to be used)

For this challenge I have created super clean and simple cards, actually I made 5! but the other 3 have different sentiments, I will share them later this week.
Anyways, for these cards I used "L20423 Watercolor Rose" and "DIE234-M Greeting Top Edgers"
I really love this stamp, you just need ink and your image will be amazing!! 


Hop List:

Today's hop list:
Hope you like them.
Have an amazing day!

Monday, February 5

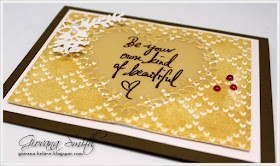
Be your own kind of beautiful

Hello friends! Happy Monday to you all! I have a super cute gold card for you today! Valentine's is just around the corner and this is a wonderful idea to share with others.

Here, few details:
  • Die-cut the middle are using a heart shape Or any shape you like.
  • Die-cut the background panel with stitched dies and added to card with foam tape. 
This is how your card will look like at the end. I added few red pearls and a die-cut flower/leaves.


You can get this stamps at the Technique Junkies store, you can use my TJ10Giovana code and get a 10% off!!
Hope you like it.
Have a fantastic day.

Thursday, February 1

Technique Junkies February Release Blog Hop

No automatic alt text available.
Hello friends!!! Welcome to another super Technique Junkies Release! This month we have 14 new sets and the Design Team is going to show a variety of products using all of them!! 
If you have arrived here from the Technique Junkies Blog, you are in the right place, if not, please start from HERE to start at the beginning of the hop

I have projects using 3 different sets for you today.
So let's get started.

Soul of a Gypsy:  This card is super simple. I stamped the saying on a piece of watercolor paper in Stazon Midnight  Blue Ink, then I colored the background using Spectrum Noir Sparkle markers. I created different backgrounds in different colors. I die-cut the saying and a white and another piece of watercolor background with stitched dies. Adhered the big background direct to the card front base and the other 2 layers with foam tape to create dimension. I filled the heart with Ruby Liquid Pearls.


+++++++++++++++

Rose Love: This card uses the  "Faith, Love, Hope" set (of 7). This set has beautiful images and sentiments that you can use them together or not. In this card I used only the Rose and Love sentiment. I stamped the roses on opposite corners in Stazon Ganache Ink on watercolor paper, then colored them with Spectrum Noir Sparkle Markers, then added a light blue shadow for the background. The panel was die-cut with Stitched Dies. Stamped the sentiment on a piece of vellum in Versamark Watermark ink and added gold embossing powder and heat set. Create a card base piece from Pink Cardstock, stamped the roses in Versamark Watermark ink and set aside to dry. Adhered panel to card with foam adhesive. Add pearls. As a final touch I covered the roses with Crystal Lacquer. Set aside to dry.


++++++++++++++

Something Different For this card I stamped the image in Stazon Ganache Ink on a piece of watercolor paper. I, again, used Spectrum Noir Sparkle Markers to color the image. Then die-cut a couple of scallop square pieces that were adhered direct on the front of card and a border from pink cardstock was added behind the image, then added foam adhesive and adhered to card base. Added few pearls to embellish the panel.

+++++++++++

Next stop is Ceal's blog!! She has amazing projects for you!

Now, all of the February 2018 New Release stamps are 15% off through January 8th! We can all use a little bargain, right? No codes needed, just put them in your shopping cart and the discount will be applied at checkout.

Hope you like my projects!
Have an amazing day!


Impression Obsession Challenge: Friendship Flowers

Hello friends! Welcome to another fun Impression Obsession Challenge, this time it is "Friendship Flowers"!! 
To enter the challenge go to the  Impression Obsession blog (all the details are there!). A random challenge card will be selected to showcase on the IO blog AND you can to enter to win a $25 gift certificate to IO just by playing!

So, I want to share with you how I made this card, super simple, but with fun details.

 For this project I used  "Spring Floral Heart" and "Sweet Happines"

First, I stamped the image using my Mini MISTI on a piece of watercolor paper in Jet Black Ink, then colored the image with Chameleon Color Tones PencilsI didn't use a solution to blend the colors, just the pencils and they blend beautifully.

After the image was colored, I cut it out. I wanted a bit of shimmer, but wasn't sure if a marker will change the color of the image, so I covered the image with Versamark Watermark ink and added Clear embossing powder. The image was beautifully coated, shiny and didn't change the colors. 

I cut a piece of White Cardstock 4" x 5.25" and scored the whole piece every 1/4". The background is very cool, I hope you can see it here.
Then, stamped the sentiment on a piece f Vellum in Versamark Watermark and added White Embossing Powder, adhered it on top of image and added rhinestones.
All panels were added to card base using foam adhesive.


Hope you like it!
Have a fantastic day!