Pages

Friday, October 30

Skipping Stones Challenge

Hello friends! The month is almost over! My goodness, times is sure flying and we are getting close to Thanksgiving and Christmas!

We have a new challenge over at the Skipping Stones Designs Blog, this time we have a sketch + inspiration picture, you can choose one or both! I decided to mix both into my project, the inspiration picture has a lot of elements you can pick to create a card, I got inspired by the damask, white/black. teal colors and the little bits of gold.


This is the card I created, here are the details:
  • Make a card base from White cardstock. A2 size.
  • Cut a panel from Black cardstock 3.5" x 4.75"
  • Cut a panel slightly smaller than black in teal color. Stamp damasks from Damask Darling in Gold delicata ink and set aside to dry.
  • Stamp sentiment on teal cardstock from Merry & Bright set in StazOn Jet Black ink. Trim piece and add a piece of white cardstock behind.
  • Add stamped panel to card base, a stripe of gold cardstock and the sentiment with foam adhesive.
  • Die-cut a white snowflake and adhere it card with foam adhesive. Add a rhinestone to center of snowflake.


Don't forget to add your creations HERE, you have until Friday, November 6th at 5:00 pm EST to enter the challenge.

Entering this project to:

Hope you like it.
Have a fantastic day!

Tuesday, October 27

Let it snow

Hello friends!! Happy Tuesday to you all! I have a Christmas card for you today, I made a stepper card.
I haven't made one in a while (I think) and I love the way this card turned out, at first it was just too plain so I decided to use my Spectrum Aqua markers to give it more life ;)

Here are some of the details:


Entering this project to:


Hope you like it!
Have a fantastic day!!

Monday, October 26

Ken Oliver and Maya Road Winner!!

Hello!! Happy Monday to you all! Thanks so much to everyone who participated in the Ken Oliver and Maya Road Collaboration Hop!!

And we have a winner! I used random.org and it selected...


Velvet, please email me your information at giovanachavez AT msn DOT com so your prize can be sent as soon as possible!

Thanks again!!

Thursday, October 22

Maya Road and Ken Oliver Blog Hop!!


Hello friends!! Today I am super excited to be joining the Maya Road and Ken Oliver Crafts Designer Challenge Blog Swap!!
For all the details, please check Ken's Blog

I got fun goodies from Maya Road and Ken Oliver Crafts and I just couldn't make 1 projects, so I made 2 and then I thought I will make one more, LOL. I made a canvas too, but that one will take more time to finish ;)

So let's get started with my projects:


Merry Christmas card

  • Start with a card base from White Cardstock. A2 size, then cut a panel from Kraft cardstock 3.75" x 5".
  • Cut a panel from Watercolor paper 4.5" x 4.75". Here is the fun part, I drew the poinsettia!! I think it turned out really pretty {wink, wink}. Color the flower with Alizarin Crimson, Pthalo Green and Lemon Yellow Color Burst. Be sure you have a mat for easy cleaning, I used the The Best Ever Craft Mat.
  • After the flower is flower is dried, create the washed background with Lemon Yellow and Ultramarine Blue Color Burst.
  • Apply as much needed Stick It behind a piece of Gold cardstock. Die-cut the "Merry Christmas" x3, peel the Stick It and mount them together.
  • Mount Kraft and watercolor piece and add stitches. 
  • Add die-cut to panel, add sequin and rhinestones.
=========================


Just for YOU friend
  • Start with a card base from Red Cardstock.
  • Cut a piece of watercolor paper, create washed background using Lemon Yellow and Alizarin Crimson Color Burst.
  • Cut a piece of yellow lace, long enough to add it behind a wooden token, to create a "flower look"
  • Adhere a piece Stick it on a piece of Coastal Pearl Shimmering cardstock, big enough to die-cut "friend" x3, then peel the pieces and mount them together.
  • Add a stripe of Kraft cardstock to left side and add stitches.
  • Finally, add die-cut and wooden token to panel.
===========================


Hello

  • Start with a card base from White Cardstock. A2 size.
  • Cut a panel from Watercolor Paper 3.5" x 4.75", create a washed watercolor background with Alizarin Crimson Color Burst. Set aside to dry, then add a Kraft panel behind and add stitches.
  • Die-cut stitched tag and mini label from Gold Cardstock. Add mini label behind of Corrugated Kraft tag and stitched tag on top of kraft tag. 
  • Adhere a piece Stick it on a piece of Coastal Pearl Shimmering cardstock, big enough to die-cut "hello" x3, then peel the pieces and mount them together.
  • Add silver thread to tag and add the "hello" die-cut.
  • Take a butterfly wooden token, ink all edges and adhere it to tag.
  • Add tag to card base.
**Products in red are from Maya Road**

Don't forget to visit Ken and Maya Road's blogs!!

Giveaway!!

Yes, I have a giveaway for you!! What about some Stick it (This adhesive is fantastic!! ) and a Tool it All (9 tools in 1, I have 1 and it is amazing) and fun goodies from Maya Road? Just leave a comment here on this post and I will draw a winner. You have until October 25th at midnight (ET)  and I will announced the winner on the 26th!!


Hope you like my projects!
Have a fantastic day!

Wednesday, October 21

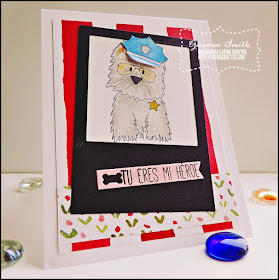
You are my hero

Hello friends!! It's midweek and we are all thinking about the weekend. Today I want to share with you a card I made using brand new stamps sets from Latina Crafter, this cute puppy is part of the new "Flogger Collection" and he is "Flogger Policía" (Police Flogger), this set is super cute, it has all the elements to create fantastic cards.

The image was color with Spectrum Noir Pencils, the paper are from Stampin' Up and the die are from Top Dog Dies.

I love how simple and adorable this card turned out.


Submitting this project to:
Hope you like it.
Have a great day!

PS: Come back tomorrow, I have a fantastic post and a giveaway too!!

Tuesday, October 20

Just for You

Hello friends! How are you doing today? I hope you are having a great day. I am starting my day feeling a bit better, I've been (am) dealing with sinus pressure/headaches for almost 2 weeks, tried almost everything (except going to the doctor), maybe calling the doctor is the next step.

Anyway, I want to share with you today a card I made using "Dies only", no stamping needed. Easy and fast to make, here are the details:


Submitting this project to:


Hope you like it.
Have a fantastic day!!

Thursday, October 15

Winner, winner

Hello friends! I apologize for not announcing the winner of the stamp set earlier this week, I had few crazy days, but things are better now and also remember to pick a winner, so the winner is...

Sharon, please email me your info at giovanachavez AT msn DOT com

Sharon Sharon W

Sharon SharonW said...
stumbled upon your blog from Heartfelt Creations. And boy am I glad I did! Your work is just so gorgeous! and this new 'Believe' stamp is perfect! I love vintage feel, the music and santas. Just beautiful! and thank you for the opportunity to win one! Yeah!

Tuesday, October 13

Miss you

Today I am blogging on the Skipping Stones Blog, hope you can hop over there and leave me a comment if you have a minute.


Have a great day!

Monday, October 12

Love you


Hello friends!! Happy Monday to you. Last Saturday I had a great time crafting, some cards were just for fun, like this one! I used one of the new sets I got from last month release by Concord & 9th, this one is called Love you, Mean it. If you haven't checked out their stamps, the are FAB!!
I decided to create a super clean and simple card, if you know me, I don't create many CAS cards because I like layers and ribbon and pearls and... you get the idea, LOL, but I really wanted to make a OLC, sadly my finger got some ink at the bottom of the card and I had to die-cut the piece, BUT it is still a super CAS card, and honestly I love it!!

I used the sketch from CAS(E) this Sketch


So, here are the details:

  • Make a card base from White cardstock. A2 size.
  • Stamp hearts in Memento Love Letter Ink, sentiment in StazOn Jet Black ink and little dots in Delicata Golden Glitz ink. Die-cut and emboss piece with rectangle dies.
  • I decided to stamp the heart border in Claret Ink.
  • Add die-cut piece to card base.
  • Cover hearts with Clear wink of Stella. 


Hope you like it.
Have a fabulous day!

Saturday, October 10

Skipping Stones Designs Technique/Tip Blog Hop


Hello friends!! Welcome to another Skipping Stones Designs Technique/Tip Blog hop!!  Today, I have a super easy one with step by step pictures. I call it "No Dies, No Problem". If you have been crafting for a while, you know you have to have all the beautiful dies around, I remember when I started, only 2 companies have dies, WOW!! and it took me a while to buy dies, so today my card doesn't have any dies!! and you can do it too!!

Let's get started:
  • I created a card base using watercolor paper, yes the whole card is from watercolor paper. Stamped the image and sentiment in StazOn Jet Black Ink using Victorian Summer Set. Colored the images with Spectrum Aqua Scarlet and Moss.

  •  Hard to see on the picture, but I trace a rectangle with my wet brush, this way the color will not go into the dry area. You will see in the next picture.

  • I used Spectrum Aqua Aquamarine color to create the rectangle background. As you can see a little red spot is showing up in the aqua area, I used a little red rhinestone to cover it up ;)

And ta-da!!! Here is my card!! Super simple, very easy and elegant at the same time.

Now, I will invite to visit the DT blogs and enjoy their technique and tips!! This is the line up:

Giovana --You are here

Also, don't forget to leave a comment when you hop along, one lucky commenter will be randomly chosen and win a stamp set!! You have until Wednesday October 14 at 5:00PM EST to leave a comment.

Hope you like my tip!
Have a fantastic day!

Friday, October 9

Simply thanks!!


Hello friends! How are you doing today? How is the weather where you are at?  Here it has been really nice during the day and quite chili during the night, and I like it!
Today, I want to share with you a very simple card with few details for you!

  • Create a card base from Gold Cardstock. A2 size.
  • Cut a piece of White cardstock 3.75" x 5", stamp flowers and leaves, here I used Distress Inks.
  • Stamp sentiment in 2 ink colors, creating a shadow effect. Here I used StazOn St. Valentine and Claret, then stamp gracias in Claret ink and cut the little piece.
  • Add silver thread behind the "gracias" word, then add rhinestones and sequins.
  • Finally, score each side at 1/8"
  • Mat the white panel with a bigger piece of red cardstock and add panel to card base. 


For this card I used the sets:  "Sólo porque" and "Sencillamente". 


Submitting this card to:


Hope you like it!
Have a fantastic day!!

Thursday, October 8

Christmas Boxes!!

Hello friends!! How are you doing today? It's almost Friday ;) I want to show you some of the Christmas projects I created for HSN show, yesterday it was a 24 hour craft day!! I had a post already scheduled, but it disappeared! Sometimes blogger is a real pain in the neck.

Anyways, Sara Davies introduced a new "Holiday Cardstock", it s a very beautiful, super smooth and very elegant 12" x 18" paper!! perfect for big and small projects!!

 Here is shot of the projects from yesterday's show:

And here are some of the pictures I took before sending the projects to Florida!!


And the great news!! This paper is not sold out YET!! So, get your packs now before they are gone!!

And don't forget about the giveaway HERE!! I will pick a winner tomorrow!

Have a fantastic day!!
Giovana

Tuesday, October 6

Christmas JOY + a Giveaway!!!

Hello friends!! Happy Tuesday to you all! Sharing with you another project I created for tomorrow's Crafter's Companion on HSN show!!
Love this card very much and I think I will reproduce it to send to friends and family, a couple of products I used for this project are going to be sold tomorrow, so please don't miss the show, great bundles and prices.

Don't miss the show, it's going to be fantastic!! Sara Davies is going to have more time and you are going to enjoy new products! YAY!!

Here is the schedule in case you need to set up your DVD player.

And to celebrate I am going to giveaway the stamp set I used for this project! (A brand new one!!) This set is called "Believe" and the only thing you need to do is leave a comment here, you have until Friday and I will announce the winner on Saturday.


Hope you like it.
Have a fantastic day!!

Monday, October 5

CRAFTER'S COMPANION SNEAK PEEK FOR HSN WEEK!

Hello friends!I can finally start sharing some of the projects I've created for the upcoming HSN show!! Crafter's Companion founder, Sara Davies, will be sharing some fantastic products on HSN this Wednesday, October 7th as part of their 24-hour Craft Day. Sara will be live on-air featuring an exclusive purple glitter edition of our Ultimate Crafter’s Companion papercrafting system, two new project DVDs, plus our Spectrum Noir alcohol marker coloring system and blendable pencils. And you will see the first issue of our Crafter’s Companion Inspiration magazine, which is exclusive to HSN. Designs from our Die’sire Create a Card and Edge’ables collections are also featuring in the shows along with exclusive 12”x18” printed cardstock.


Want some inspiration before the shows? Here is one of the projects I made for the Die'sire Create a Card Christmas Eve card.


Before I go, I would like to invite to visit the Crafter's Companion Blog and share with us what shows/products can't wait to see!

Submitting this project to:

Have a fantastic day!!

Saturday, October 3

Fall Coffee Blog Hop Winners!!

Hello friends! Sorry I am a bit late posting the winners, I had a fun day at the fair and then I took a must deserved nap {wink, wink}

Here are the winners!!


Celeste and Sandi, please send me your info at giovanachavez @ msn . com so I can send your prize as soon as possible!

Thanks so much to all of you who entered the giveaway! I will have another one next week!!

Have a wonderful weekend!


Friday, October 2

I miss you!

Hello friends! We are starting a new month, October is here, the leaves are changing colors and we can enjoy everything pumpkin! I love October weather, perfect for me (I don't like extreme temperatures, with that being said Summer and Winter are not my favorite)

Anyway, new month means new challenge over at Latina Crafter Blog, the twist for this month is "Buttons", so you can use the sketch, the twist or combine both.


And this is my creation, I flipped the sketch to the side to use this cute owl image. The sets I used are "Te extraño" and "Eres mi razón"
The image was colored with Spectrum Noir markers, the paper is from Stampin' Up. I added stitches, rhinestones and a button with twine.


You can join us and submit your creations HERE

Have a fantastic day!