Pages

Friday, July 31

Nordic Christmas "Joy"


Hello friends!! How are you today?! Are you glad is Friday? I am!! because Saturday and Sunday are coming, I have plans to do yard/garden work very early in the morning, also I can rest and sleep at any time, LOL although my daughter wants to do school shopping, I am not sure about that yet, the temperatures are going to be high, 106 degrees is not fun! Also, I can craft and catch up with DT projects.

Anyway, I have a sneak peek for you today. The new Nordic Christmas for Crafter's Companion is coming to town next week and the images are adorable!! Also, a CD will be available with super fun papers and more!

Here are the details of this project:

  • Make a card base from Ultra White Premium Cardstock.
  • Print snow blue patterned paper and adhere it to a piece of red cardstock, adhere it to card base.
  • Die-cut Scenic Pines from White cardstock, stencil the pine trees with Peeled Paint Distress Ink and adhere it to card, cover the lower part with Star Dust Stickles, set aside to dry.
  • Stamp image and color it with Spectrum Noir Markers:
    • Santa's Sleigh: CR9, TN5, TN7, TN8, GB11
    • Reindeer: TN2, TN4, TN5, TN7, GB11, LG2, DG2
    • Santa's outfit: DR1, IG6
    • Sac: GB11
  • Fussy cut image and add it to card base with foam adhesive.
  • Stamp sentiment, die-cut and emboss it with circle dies, add it to a scallop circle piece from red cardstock.


Submitting this project to:

Hope you like it!
Have a great day!!

Thursday, July 30

Christmas in July!!

Hello friends!! Today I want to bring you a little bit of winter in this very hot season!! I honestly don't like extreme weather, but I will prefer some cold than the extreme hot temperatures we are having now. Anyways, I think we can start celebrating Christmas in July! So, I have a monochromatic gold card for you, here are the steps:

Step 1: Gather all your materials needed, in this case I used Stardream Metallic Fine Gold and Savoy Bright White Card stockWhite Organza Ribbon, Golden Glitz Delicata ink and stamps.


Step 2: Cut a piece of Savoy Bright White cardstock, 4.25" square and stamps snowflakes in Golden Glitz Delicata ink. Mount piece on a 4.5" square piece of same color card stock.

Step 3: Die-cut snowflakes from Stardream Metallic Fine Gold Card stock.

Step 4: Die-cut a couple of same snowflakes from Bright White Card stock and adhere them behind gold one.

Step 5: Tie White organza ribbon on stamped panel, then adhere it to a 5" square Stardream Metallic Fine Gold card base.

Step 6: Add snowflakes with foam adhesive, stamp sentiment and add it to card with foam adhesive as well.

Stamps and dies are from Sweet 'n Sassy Stamps, sadly, they are retired.

Submitting this project to:

Hope you like it and give it a try!
Have a fantastic day!


Products used for this project:

Wednesday, July 29

Morgan Fitzsimons Flight of Fantasy CD-ROM Release!

Hello friends! Happy Wednesday to you all. I have a new card for you today. This tie using an image from the new Morgan Fitzimons Flight of Fantasy CD-ROM, this CD is full of images, patterned papers, sentiments and more! You are going to enjoy creating whimsical projects or just having fun coloring!

For this card I printed the patterned paper from the CD then added a panel from Pink Pearl Shimmering Cardtock and added stitches. the image was colored with Spectrum Noir Markers:

  • Skin: FS1, FS2, FS3, FS4, FS9 , EB1
  • Dress: PP1, PP2, PP3, PP4, CR5, TN3, CR1
  • Gloves: CR2, TN1
  • Wings: LG1, LG2, LG3, DG1, DG2, CG4
  • Hair: TN1, TN2, TN3, TN4, TN8
  • Headflower and feathers: GB6, IB1, IB2, IB3, BT2
  • Pillow: TN2, TN3, TN4, TN5, TN7
The image was die-cut with Circle dies, finally added lace and rhinestones.


Submitting this project to:
Hope you like it!
Have a fantastic day!!


Products used for this project:

Monday, July 27

Faith

Hello friends! Happy Monday, today is the last Monday of the month!! Today I have a card showcasing one of the new Sheena Victorian Floral stamps "Lily". The collection includes coordinated dies, this card is very simple since I really wanted to show how pretty the flower is.

Here are the details:
  • Start with a scored white card base. 6" x 6".
  • Cut a panel from Yellow Pearl Shimmering cardstock 5.5" x 5.5". Die-cut a circle window in the center of panel, then dry emboss piece with Petite Dot Embossalicious embossing folder.
  •  Die-cut a circle window on a Rose Pearl Shimmering cardstock to add behind the yellow panel, add foam adhesive and add panel to card base.
  • Stamp, color and die-cut flower. 
    • Spectrum Noir Markers Used:
    • Flower: FS1, FS3, FS4, FS6, CR1, CR2.
    • Leaves: CG1, CG2, CG3.
  • Add flower to card.
  • Stamp sentiment on a white cardstock in black ink, die-cut it with Just the Tickets die.
  • Add black dots and create a double bow with Ultimate Tool.


Entering this card to:
Hope you like it.
Have a fantastic day.

Products used for this project:


Saturday, July 25

Mr & Mrs

Hello friends! Happy Saturday! Hope you are having a relaxing day, that is the plan I have for today. I want to craft and create, I will not worry about meals or laundry, LOL. At least that's my plan, I have to run few errand before, but we'll see if I can work on the things I have planned.

Anyway, I have a super glittery and shiny card for you. The picture doesn't make justice on how glittery the paper is. I created this card for CutCardStock, the charcoal is paper, so I added cardstock to the sides after die-cutting the top.


This is the inside look! 

I also stamped a silver seal to decorate the envelope.

Super easy and fun card!! Also, you have the chance to win some envelopes and seals! Just leave your comment HERE, you have until midnight July 26th!

Submitting this card to:


Hope you like it!!
Have a great day!

Wednesday, July 22

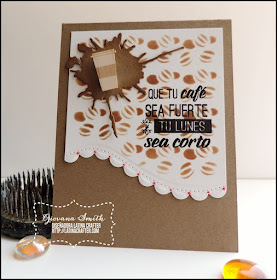
May your coffee be strong

Hello friends! Happy Wednesday, today I have a couple of cards that I planned to post on Monday, but let's say I have had a couple of so so days and couldn't write the post, so today we will pretend is Monday {wink, wink}

For these 2 cards I used the coffee stamps from Latina Crafter, both say the same in English and Spanish. The cards are super simple, here are the details:

  • Make card base from Kraft cardstock.
  • Cut a piece of white cardstock and die-cut the bottom edge with detail dies. Then use the coffee beans stencil and Vintage Photo distress ink and sponge the panel without touching the die-cut part.
  • Stamp sentiment in Black StazOn ink.
  • Die-cut the splash shape, ink all edges with Vintage Photo Distress ink and adhere it to card with dimensionals.
  • Add a coffee cup wood veneers on top of splash.


Hope you like them!
Have a fantastic day!!