Pages

Tuesday, March 31

Heartfelt Creations Alumni March Blog Hop

Hello friends! I am glad to participate again on the Heartfelt Creations Alumni Blog Hop! Today I have a simple yet elegant Easter card.

Here are the details:

  • Make card base from Ivory Cardstock A2 size.
  • Cut a panel from Ivory Cardstock, 4" x 5.25", dry emboss and ink all edges. Adhere it card base.
  • Die-cut and emboss the  , ink all edges and adhere it to card panel.
  • Stamp Malabar Clematis on a piece of heavy vellum cardstock in Versamark Ink, then add gold embossing powder and heat set. Then, die-cut image with coordinated die.
  • Stamp sentiment on a piece of Ivory Cardstock, cut pieces out and glue them to card panel.
  • Add rhinestones.


Now, here is your chance to enjoy amazing creations from the Alumni team, here is the list of participants:
Don't forget to leave a comment for your chance to win a $25 Gift Certificate to Heartfelt Creations!
You have until Friday April 3rd midnight (ET) to enter. The winner will be announced on April 4th.

Have fun hopping!
Have a beautiful day!

Products used for this project:


Monday, March 30

Happy Easter

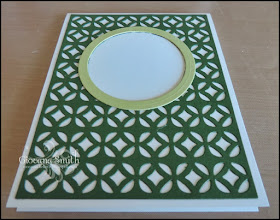
Hello friends!! Today, I have a super cute and simple Easter card, with step-by-step picture directions. For this project I used CutCardStock Curious Metallic Botanic, Cryogen White, Lime and Super Gold. The colors are so vibrant and the touch of shimmer is great!


Let's get started!
  • Die-cut a background piece using a piece of Curious Metallic Botanic Cardstock.
  • Then, create a circle window on your background piece. Die-cut a circle border from Curious Lime Metallic Cardstock and circle dies.
  • Die-cut leaves from Curious Metallic Super Gold and Cryogen White cardstock.
  • Adhere background piece to a A2 card base from Curious Metallic Cryogen White Cardstock, then adhere the circle window .
  • Stamp sentiment in Brown Ink and add leave piece, decorate as desired. I added ribbon, twin and paper flower and some clear rhinestones around the circle and on the background panel.
  • And here is the final product!!

Submitting this project to:

Hope you like it and give it a try!
Have a fantastic day!


Products used for this project:

Friday, March 27

Lily (as seen on HSN)

Hello friends!! Happy Friday to you all! I am excited for the weekend, why? Because I will start cleaning up and gardening again! I already have chives and lettuce growing. Spring and Summer (after it cools down) are so much fun for me, I really love gardening and spending time harvesting, it's a lot of work, but I love to eat what I get from my hard work {wink, wink}

Anyway, back to my project. Last Tuesday, Sara Davies, owner of Crafter's Companion, was on HSN and my projects made it to the show!

Can you see my card here? It's just above the Pinterest word :)
Let me show you one of the projects I made, this one is super easy and elegant.

Here are the details:
  • Make card base from Ultra Smooth Premium White cardstock. A2 size.
  • Cut a panel from Pink Pearl Shimmering Cardstock. 3.75" x 5", score top and bottom using Angel Wings Embossing Board and The Ultimate Tool.
  • Stamp image on a piece of White cardstock in Black ink. Color image with with Spectrum Noir Blendable Pencils: 002, 003, 13, 16, 43, 44, 58, 78, 82. Cut out image.
  • Create a frame using Scallop Square and Square Dies and Rose Pearl Shimmering cardstock. Add a piece of White Pearl Shimmering cardstock behind the frame. Add it to pink panel with foam adhesive.
  • Add Lily image to frame.
  • Add bow and sequins.


Submitting this project to:

Hope you like it.
Have a fantastic day!

Products used for this project:


Wednesday, March 25

We look so good together.

Hello friends! Happy Wednesday to you all! Today I want to share with you a card I made with one of the new sets from Latina Crafters, this set is called "Flogger enamorado" (Flogger in love) and have adorable images!!

Here are the details:

  • Make card base from White cardstock. A2 size.
  • Cut a panel from White cardstock, 3.25" x 4", stamp image and color. Here I used Spectrum Aqua Markers.
  • Die-cut grass from Patterned Paper and adhere it to panel.
  • Die-cut bubble speech, stamp sentiment and adhere it to card panel.
  • Cut a panel from Peach cardstock, mat white panel to it, tie twine around.
  • Add panel to card base.
  • Add hearts too.


Hope you like it!
Have a fantastic day!!

Products used for this project:

Monday, March 23

Thinking of you

Hello friends! How is your day today? Hopefully is amazing. Today I want to share with you a super cute and easy card. Well, this card has a little story, the Crafter's Companion DT has a group where we share our projects before anybody else, so I saw DT member Chrissie's card and I was in love, I asked if I could CASE her card and she said "of course". I loved being inspired by my fellow DT members, cool, huh?

Anyway, this card was super easy and fast to make, I think I will create a set with different sentiments.

Here are the details:
  • Make card base from Kraft cardstock. A2 size.
  • Cut a panel from Patterned Paper, 3.75" x 5" (Smith Craft Collection)
  • Cut a panel from Ivory Cardstock, 3.25" x 4.5", stamp sentiment, then stitch panel together.
  • Die-cut and emboss rose and leaves in watercolor paper, then keeping the die in place, color them with Spectrum Aqua Markers: Peach, Rose Pink and Moss.
  • Glue leaves and rose to panel. Tie on ribbon.
  • Add stitched panels to card base. Add rhinestones.


Submitting this card to:


Hope you like it!
Have a great day.

Products used for this project: